- How To Configure Video Custom Player From Gutenberg?
- How To Configure Video Custom Player From Elementor?
- Final Outcome
- Get Live Experience Of Personalized Video Custom Player
When you embed video content into your WordPress site from various sources, they come with the default video player controls of the original video. With EmbedPress, you can personalize and configure video custom player controls. This video custom player controls feature will be available for YouTube, Vimeo, and self-hosted videos.
Note: Some of the features included with the video custom players are exclusive to the premium version of EmbedPress. To access those exclusive features, you will have to install and activate EmbedPress PRO.
How To Configure Video Custom Player From Gutenberg? #
Follow the step-by-step instructions to configure the video custom player controls of your embedded video content using Gutenberg editor.
Step 1: Add EmbedPress Block In Gutenberg #
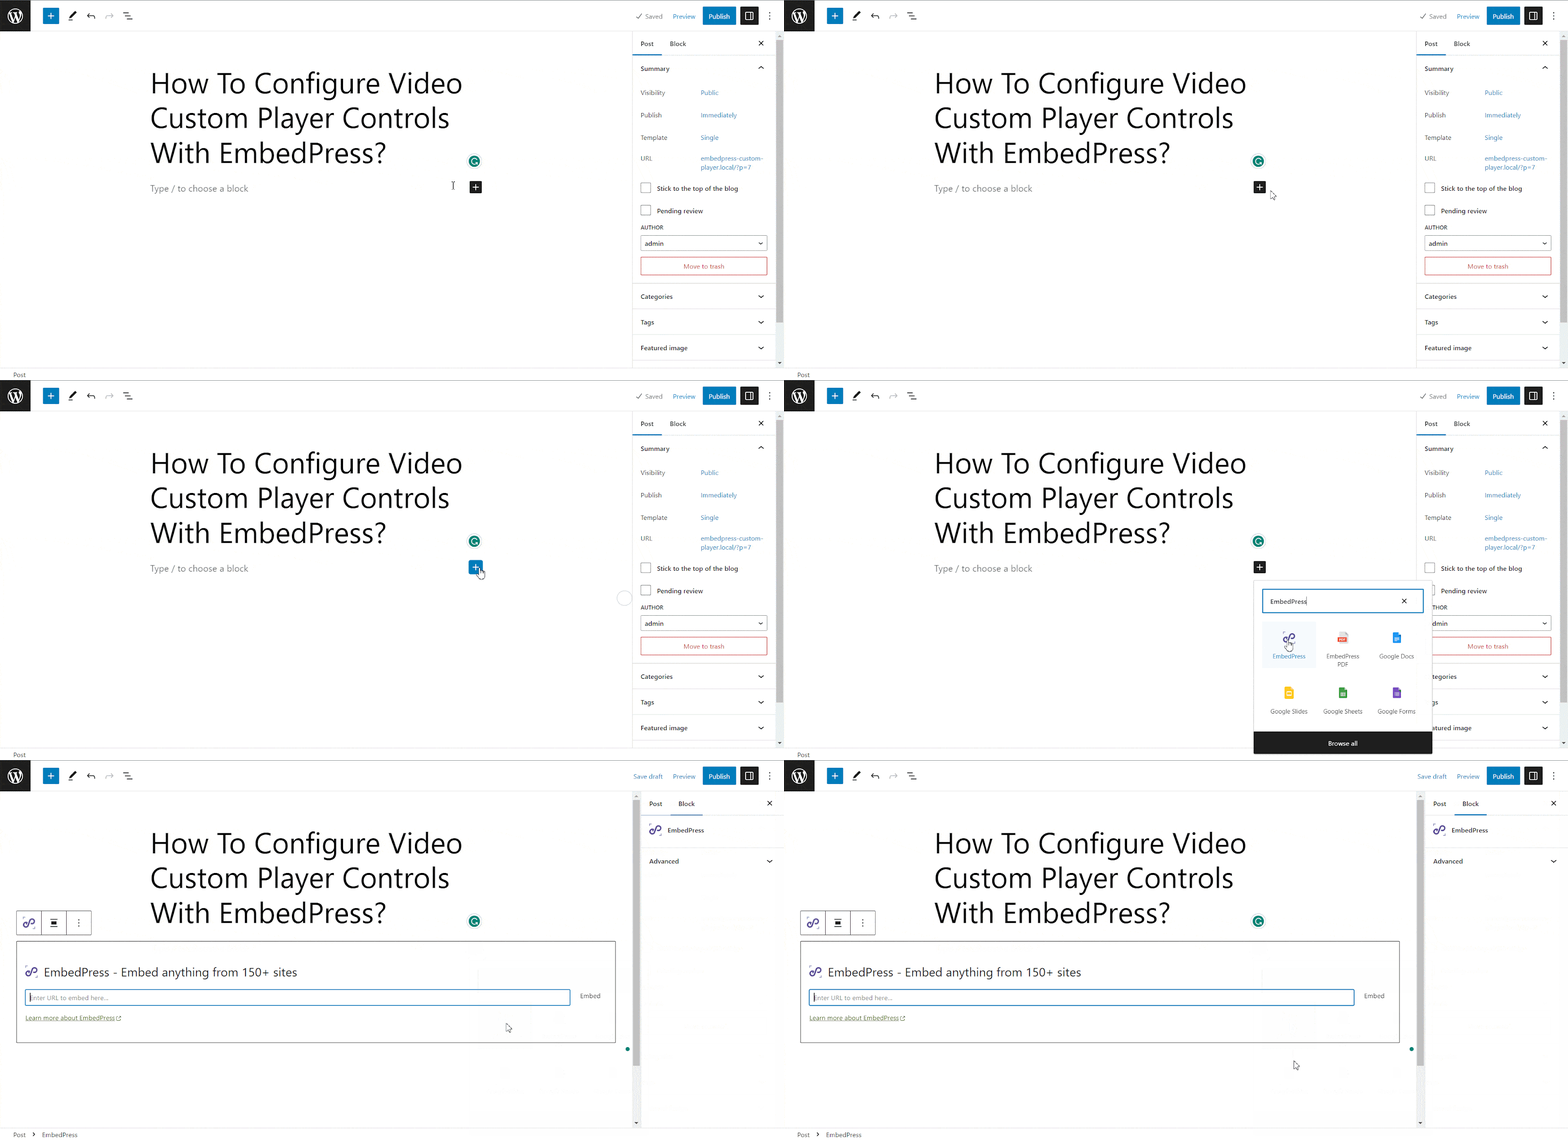
First, click on the ‘+’ icon on your post content area in the Gutenberg editor and search for the ‘EmbedPress’ block. Click on the block and it will be directly added to the page.
Step 2: Embed Videos Using EmbedPress Block #
Find the desired video content and copy its URL and paste it into the EmbedPress block. This applies only to Youtube, Vimeo, and self-hosted videos.
YouTube Or Vimeo Videos #
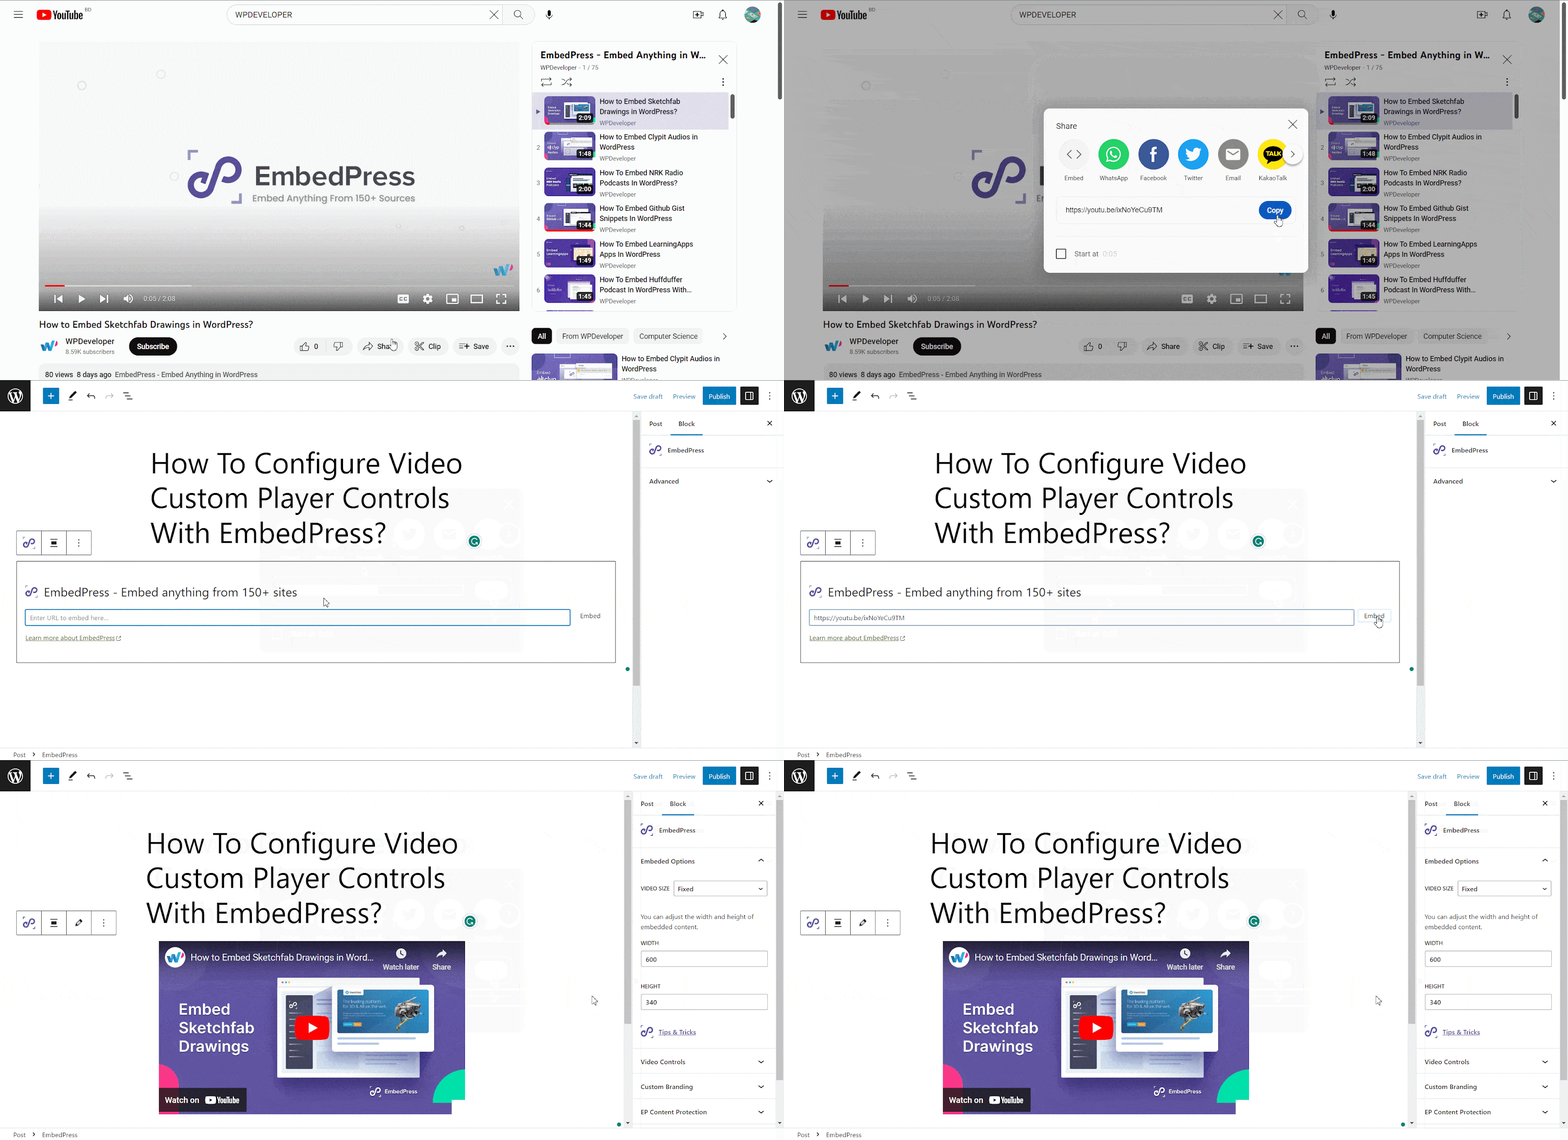
For the tutorial purpose, here we are embedding a YouTube video. Now paste the YouTube video URL on the input field and click on the ‘Embed’ button and the video will be embedded on your website.
Self-hosted Videos #
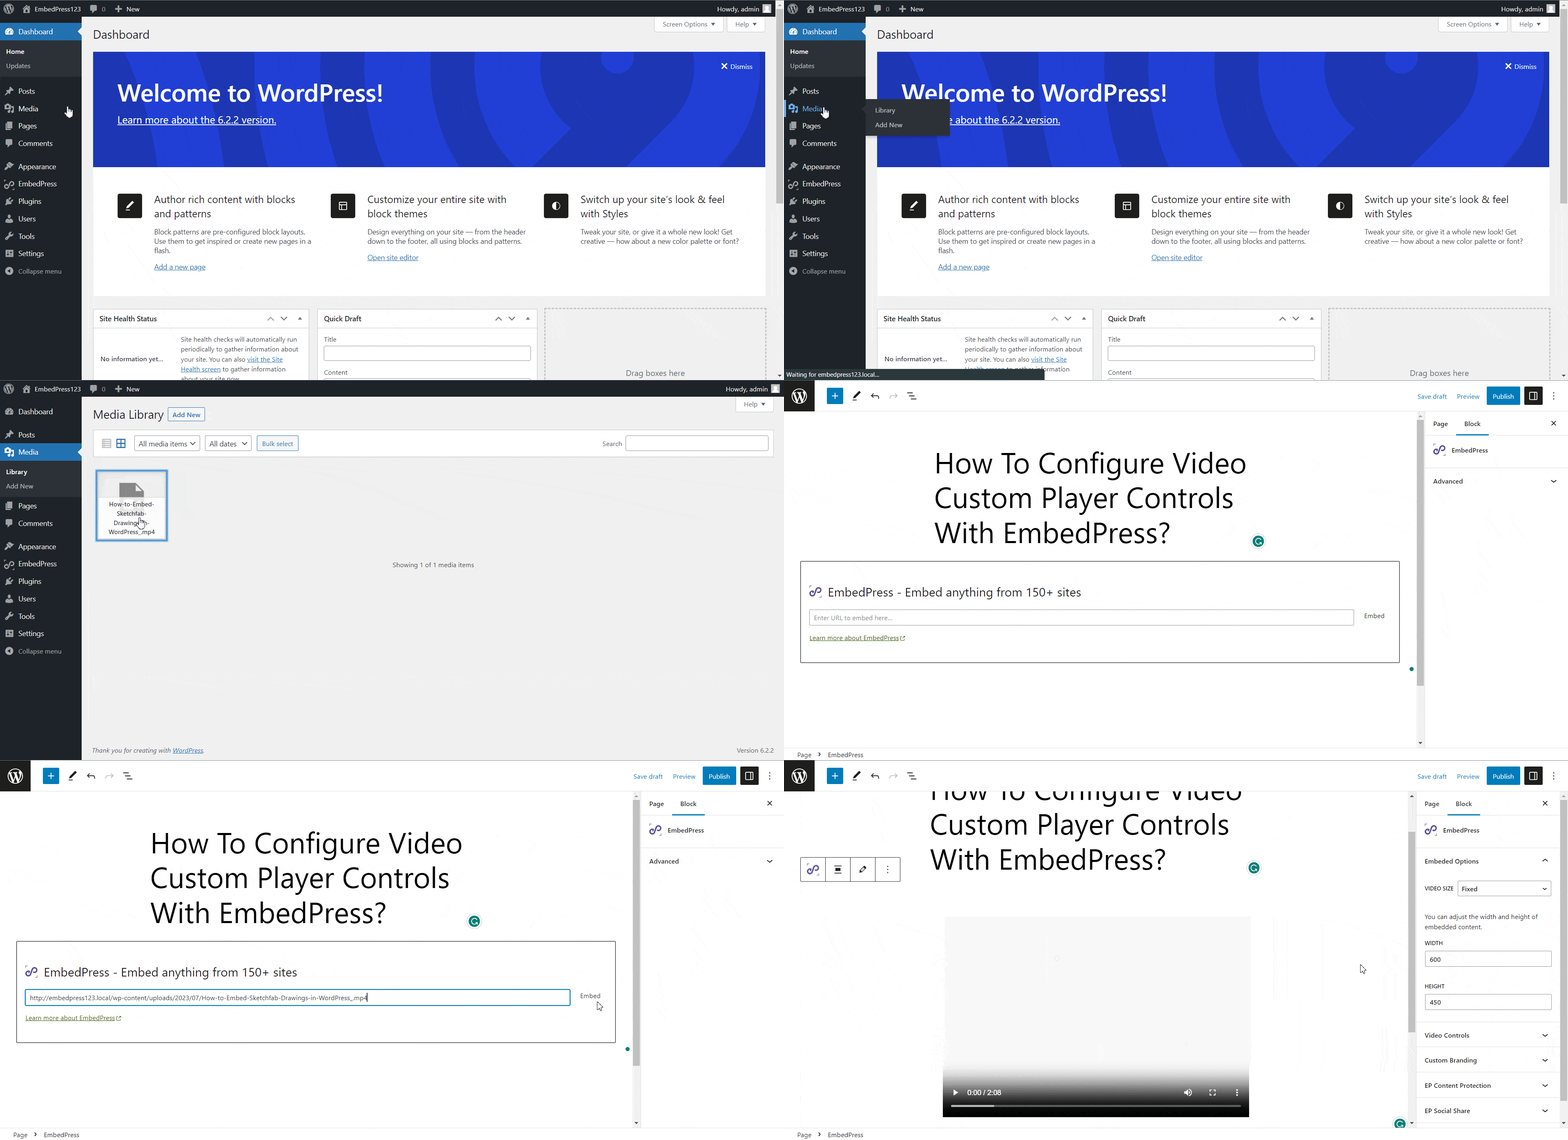
Instead of using YouTube or Vimeo videos, you can also use a video custom player on a self-hosted video. If you intend to use a self-hosted video, navigate to ‘Media’ from your WordPress dashboard and upload your video. Now copy the URL of your desired seld-hosted video and then paste the link to the EmbedPress Block.
Step 3: Configure Video Custom Player For The Embedded Video #
Video custom player is a dynamic feature. Only when you will embed an audio or video file, it will appear on the right-side settings panel. You can customize the embedded content seamlessly from there.
Key Highlights Of Video Custom Player Controls #
With this EmbedPress video custom player, you will get the following controls:
Presets (Pro) #
Set Start Time #
Set End Time #
Player Color Change (Pro) #
Auto Play #
Fullscreen Button #
Restart #
Rewind #
Fast Forward #
Tooltip (Pro) #
Auto Hide Controls (Pro) #
Source Link (Pro) #
Sticky Video (Pro) #
Related Videos (Pro) #
Upload Thumbnail (Pro) #
Under the ‘Video Controls’ tab, toggle on the ‘Enable Custom Player’ option to customize the embedded video appearance. You can choose the video control player’s layout from the three different presets.
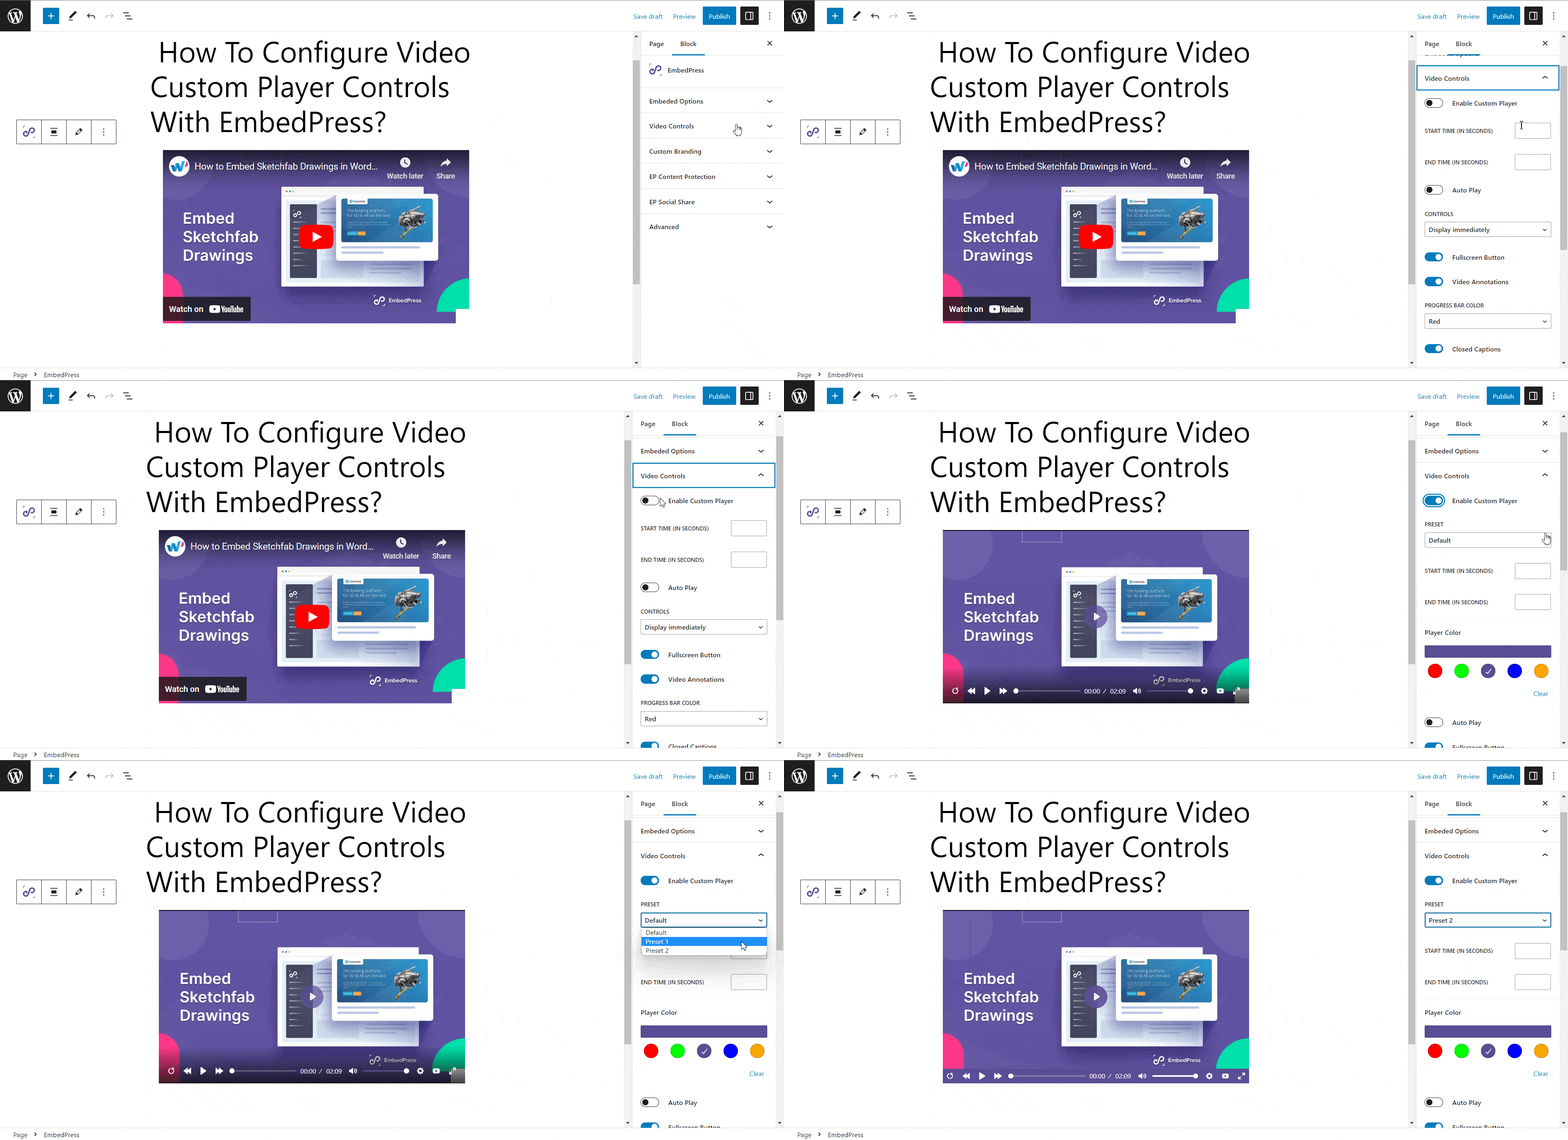
If you want to display a particular segment of the embedded video, you can easily achieve that by specifying the ‘START TIME’ and ‘END TIME’. The video custom player’s color can be changed from the ‘Player Color’ option. Additionally, you can choose to enable the ‘Auto Play’ option for automatic video playback.
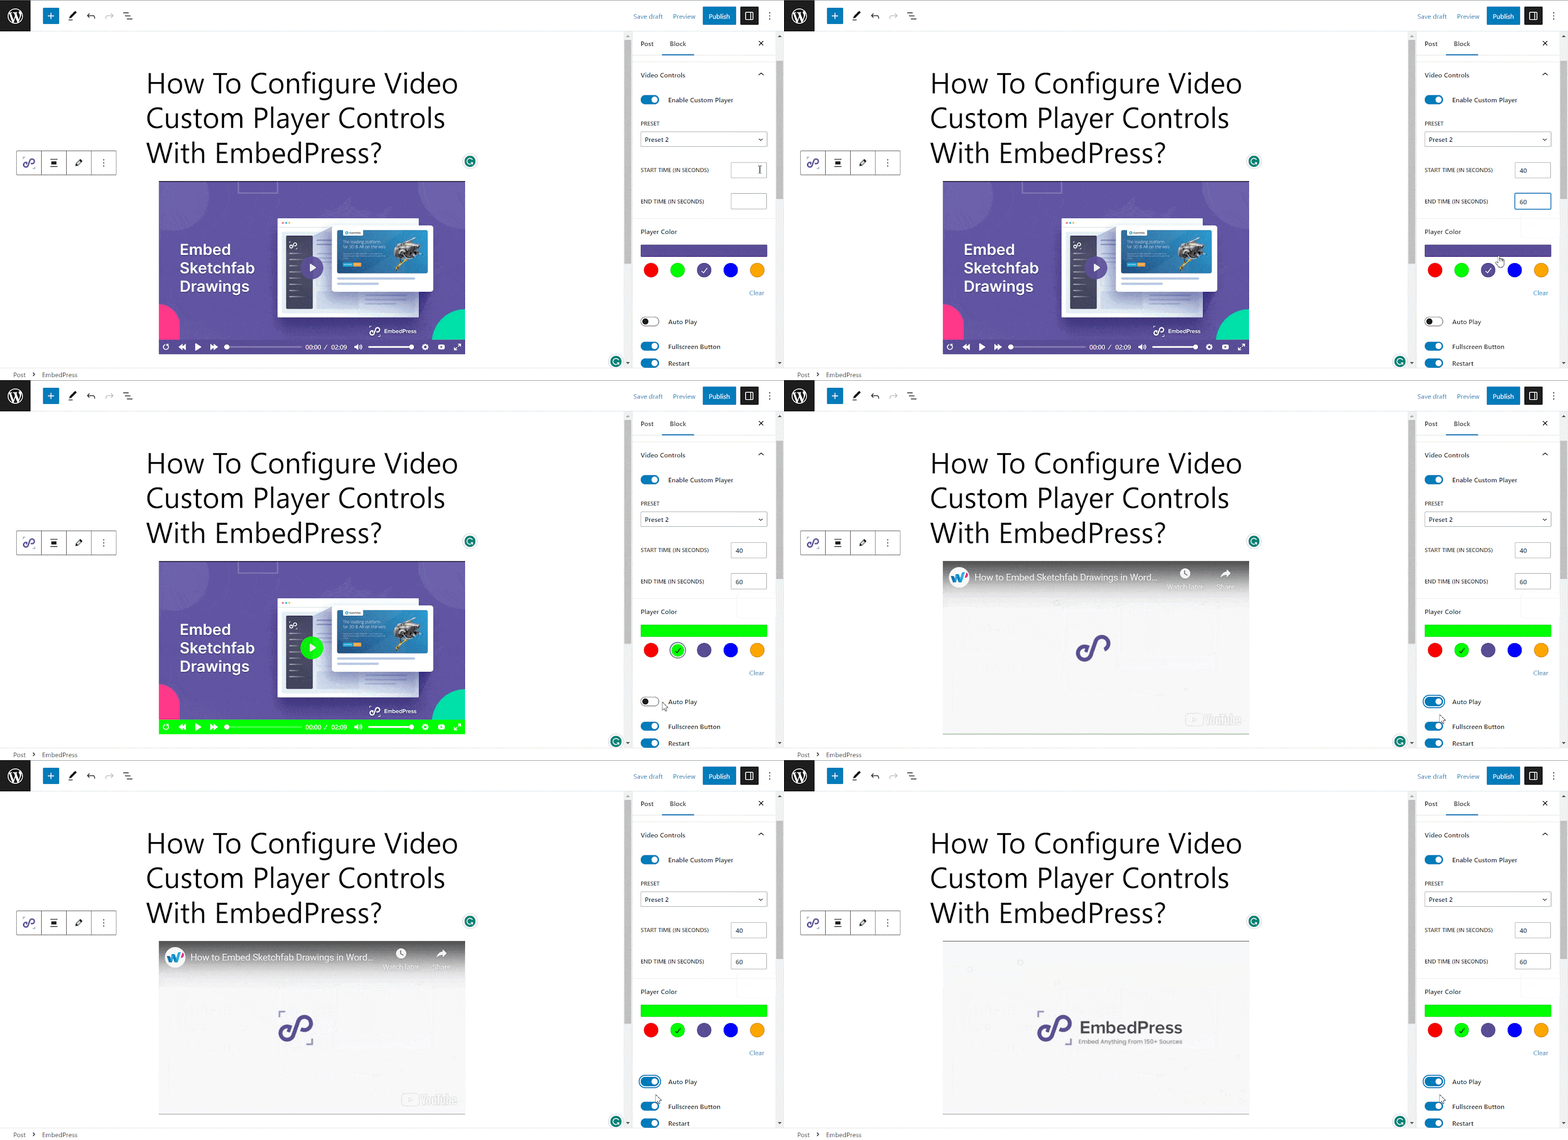
You can include buttons such as ‘Fullscreen Button’, ‘Restart’, ‘Rewind’, ‘Fast Forward’, and ‘Source Link’ with your embedded video control section. Simply toggle the corresponding options and the control buttons will be added within the control panel.
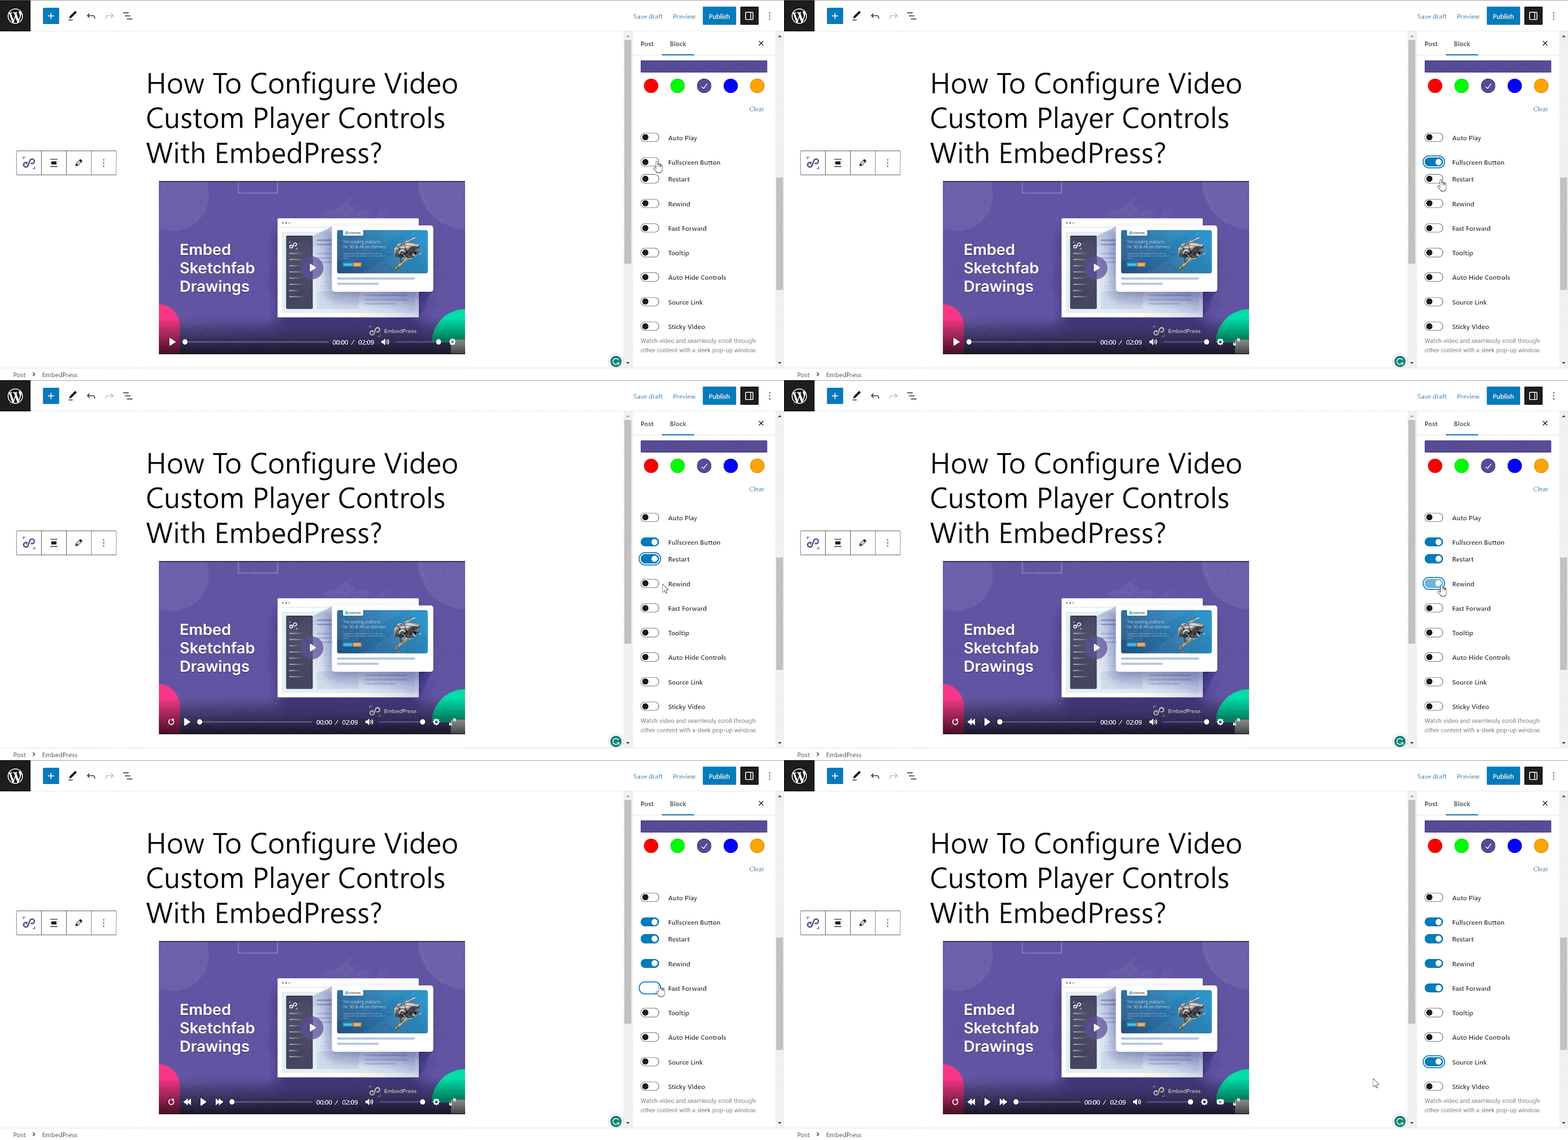
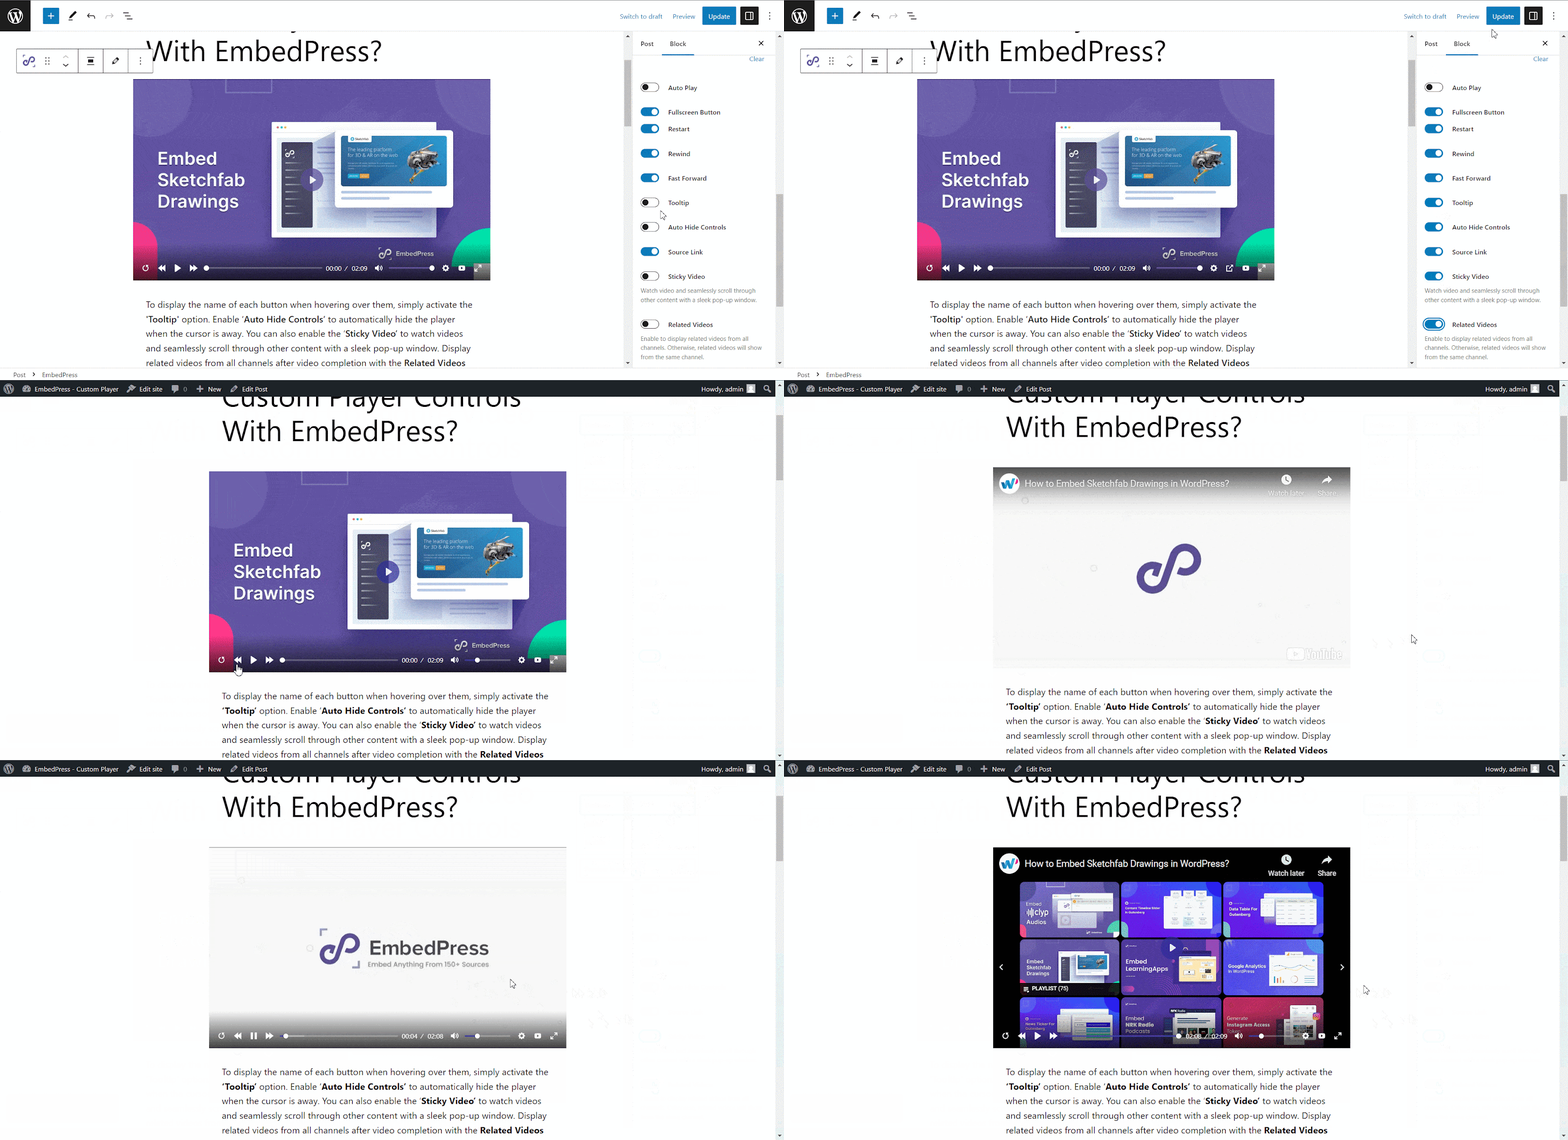
To display the name of each button when hovering over them, simply activate the ‘Tooltip’ option. Enable ‘Auto Hide Controls’ to automatically hide the player when the cursor is away. You can also enable the ‘Sticky Video’ to watch videos and seamlessly scroll through other content with a sleek pop-up window. Display related videos from all channels after video completion with the ‘Related Videos’ option.
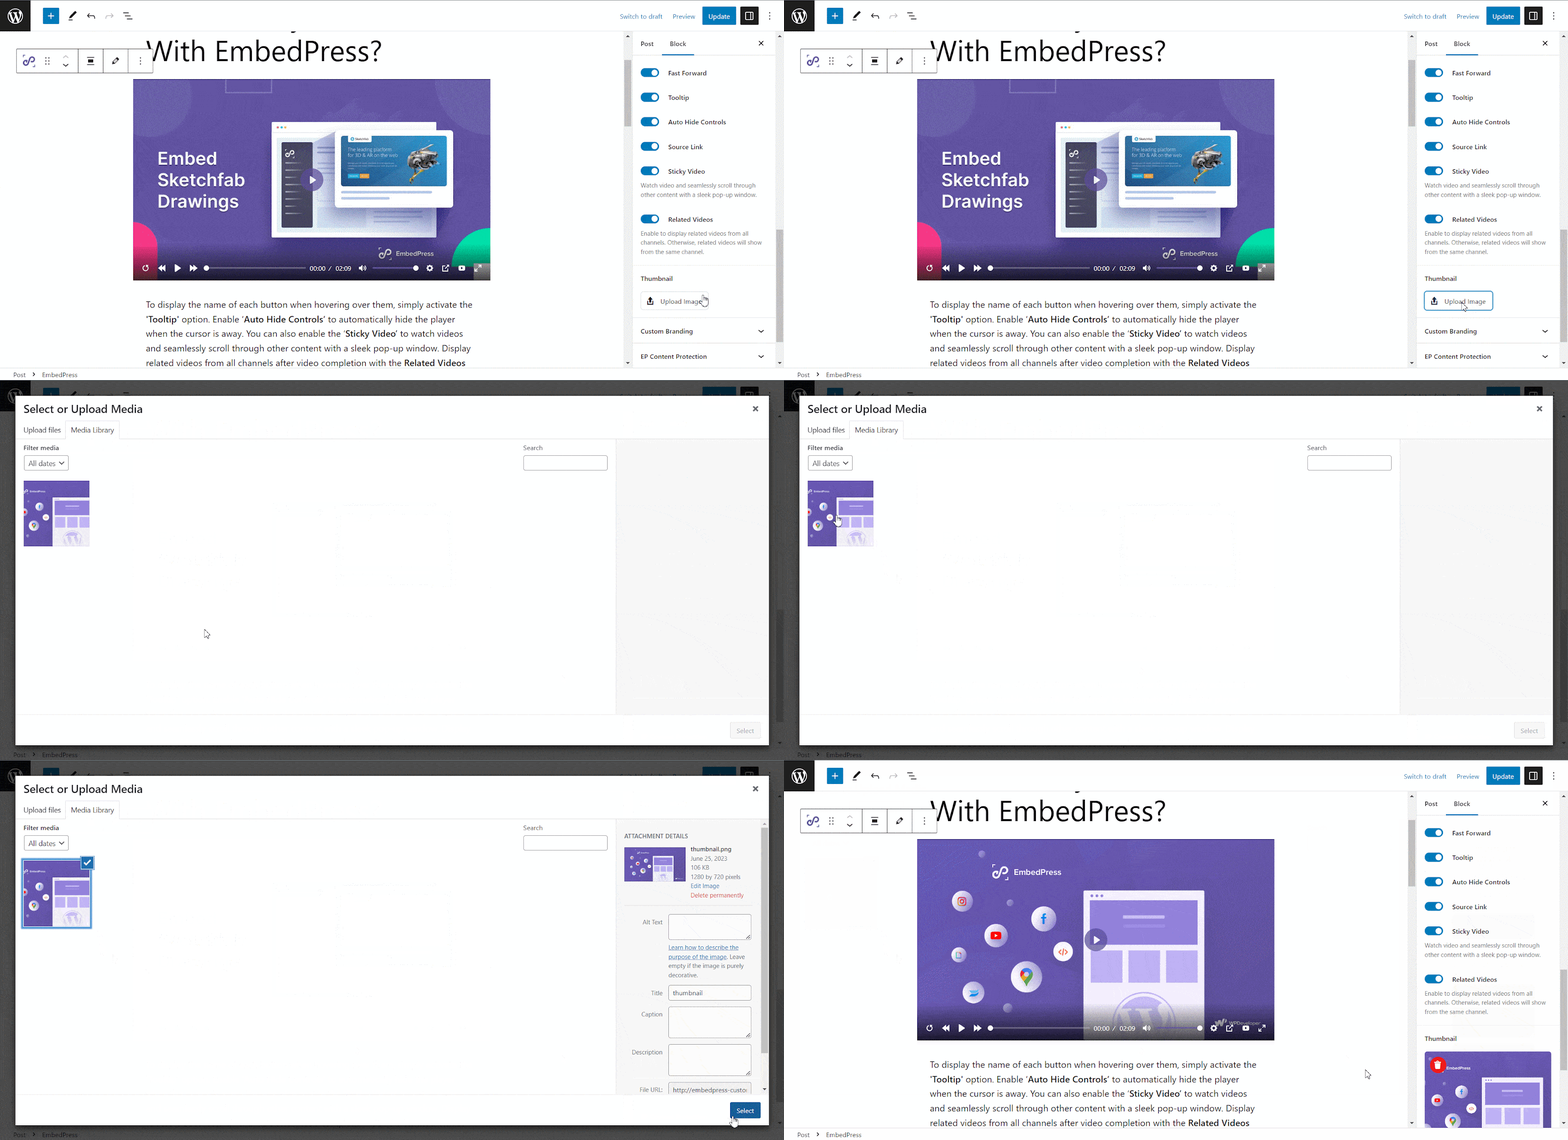
You can also update the thumbnail of your embedded video from the ‘Thumbnail’ option.
How To Configure Video Custom Player From Elementor? #
Follow the step-by-step instructions to configure the video custom player controller of your embedded video content using Elementor.
Step 1: Add The EmbedPress Element #
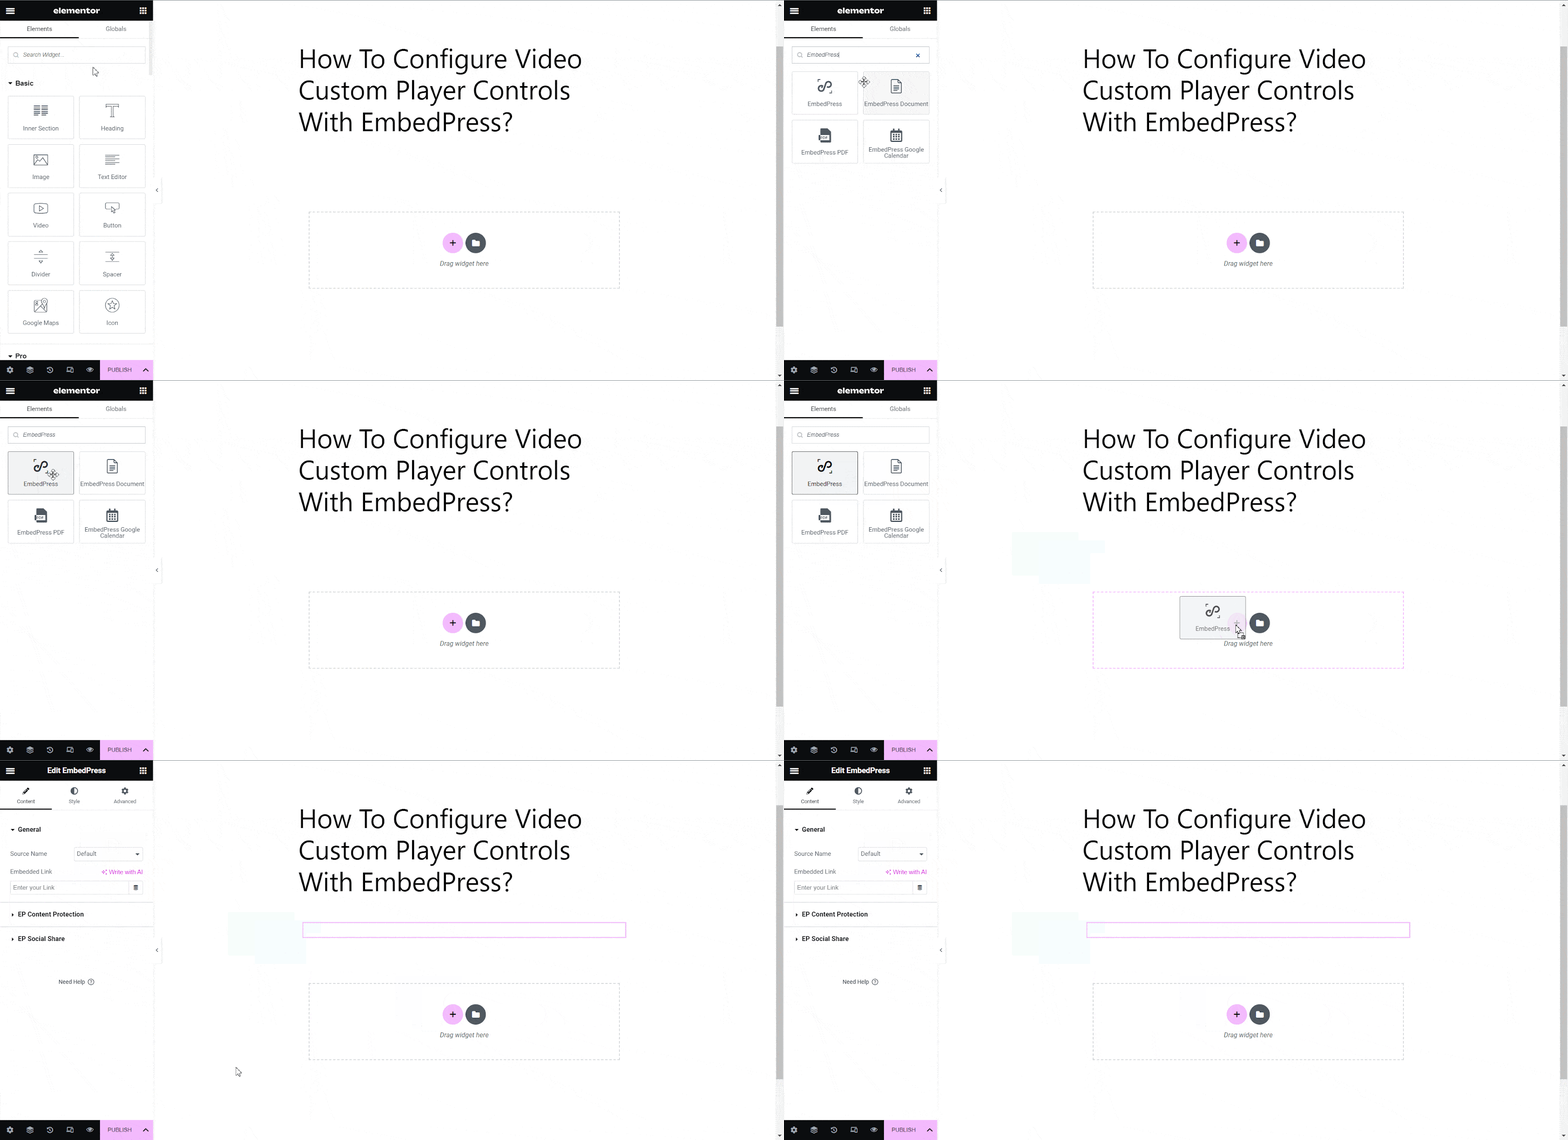
From the left side panel, search for the ‘EmbedPress’ widget. Drag and drop the widget to the place you want to embed your video or audio content.
Step 2: Paste The Video URL In ‘Content Settings’ #
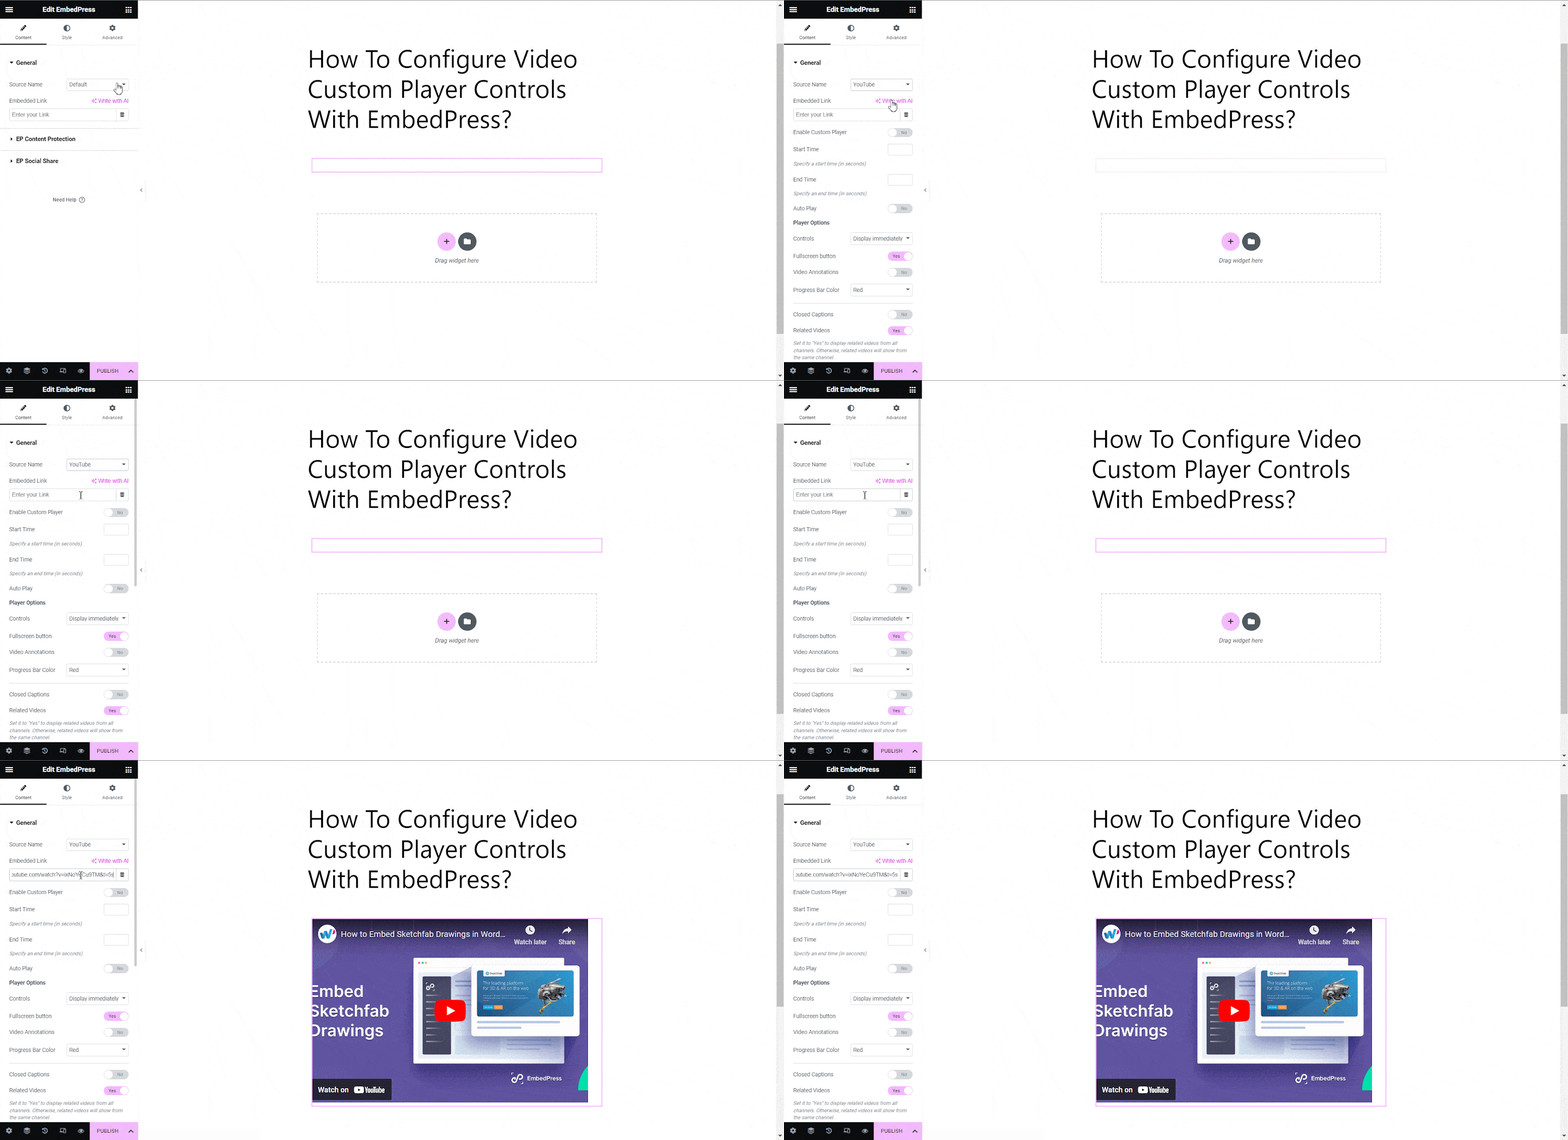
Select the widget, and now the control panel for the widget will appear on the left side. Select the source of the embedded content. And then paste the URL of the video.
YouTube Or Vimeo Videos #
For tutorial purposes, we are using a YouTube video. So, here the source is going to be ‘YouTube Video’. If you choose to embed a Vimeo video then the source would be ‘Vimeo’. Then paste the source video URL to the ‘Embedded Link’ input field under the ‘Content Settings’ tab.
Self-hosted Videos #
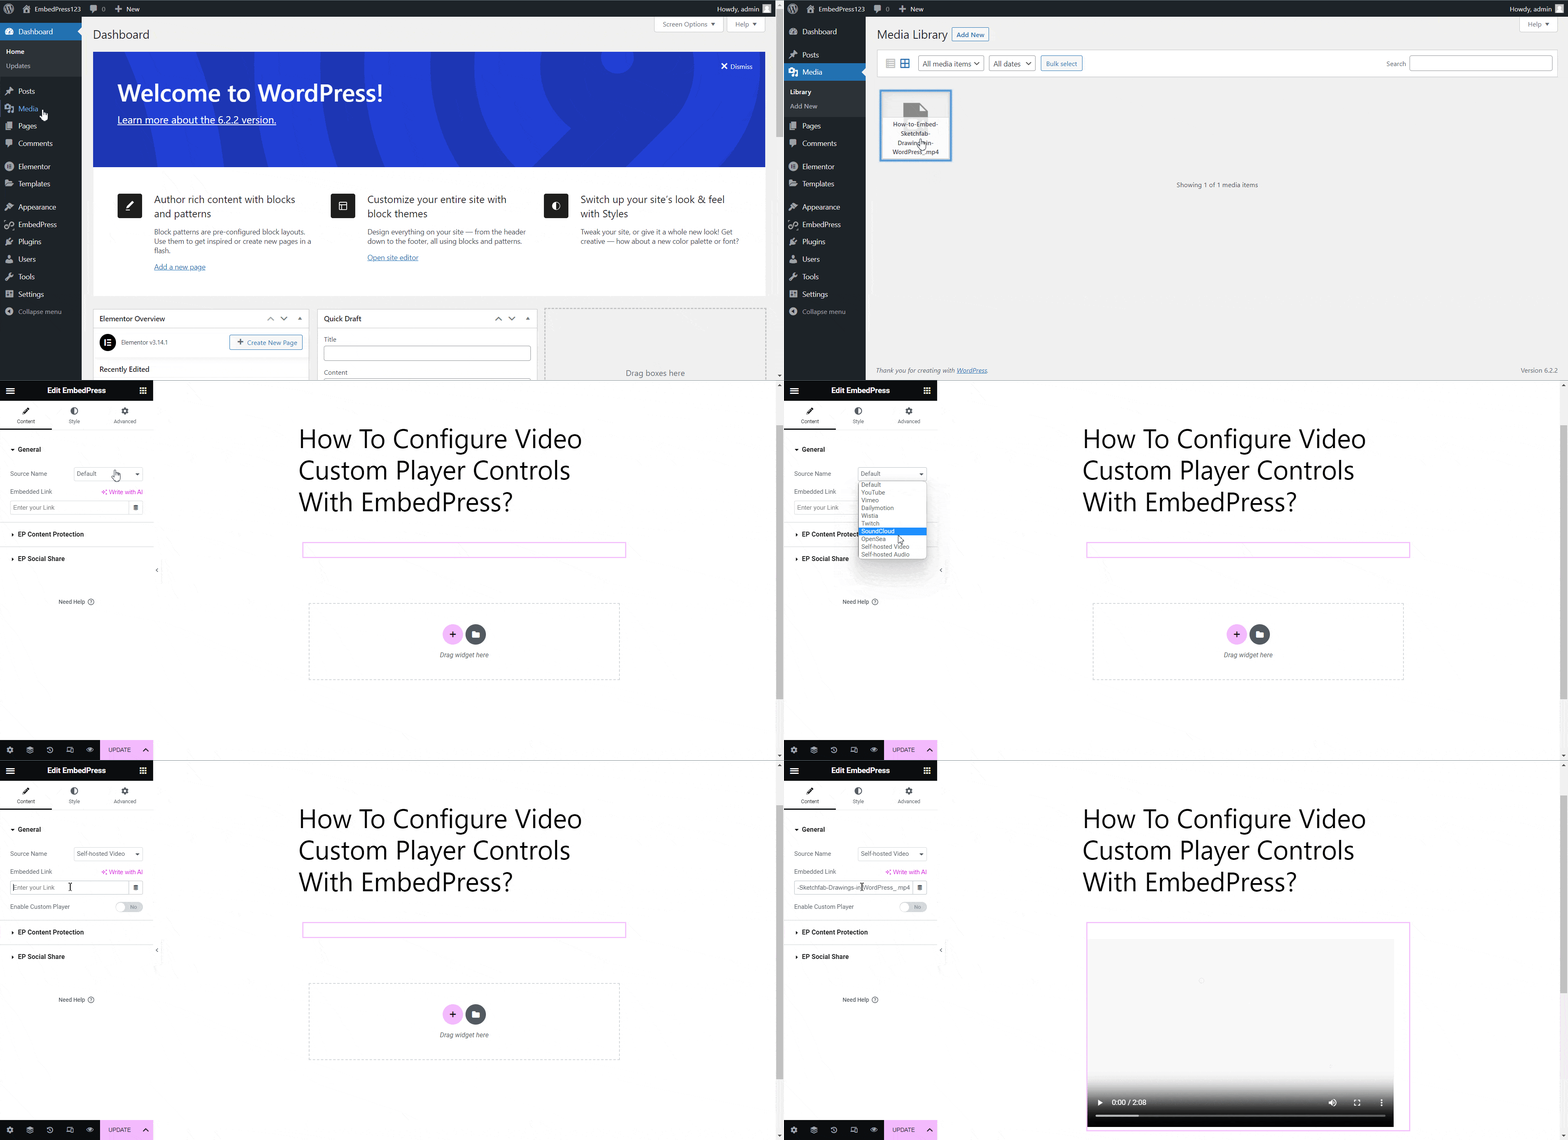
Instead of using YouTube or Vimeo videos, you can also use a video custom player on a self-hosted video. If you intend to use a self-hosted video, navigate to ‘Media’ from your WordPress dashboard and upload your video. Now copy the URL of your desired seld-hosted video. Then select the source in the EmbedPress widget as ‘Self-hosted Video’ and paste the copied link to the ‘Embedded Link’ input field under the ‘Content Settings’ tab.
Step 3: Configure Video Custom Player For The Embedded video #
Toggle on the ‘Enable Custom Player’ option. You can choose the video control player’s layout from the three different presets.
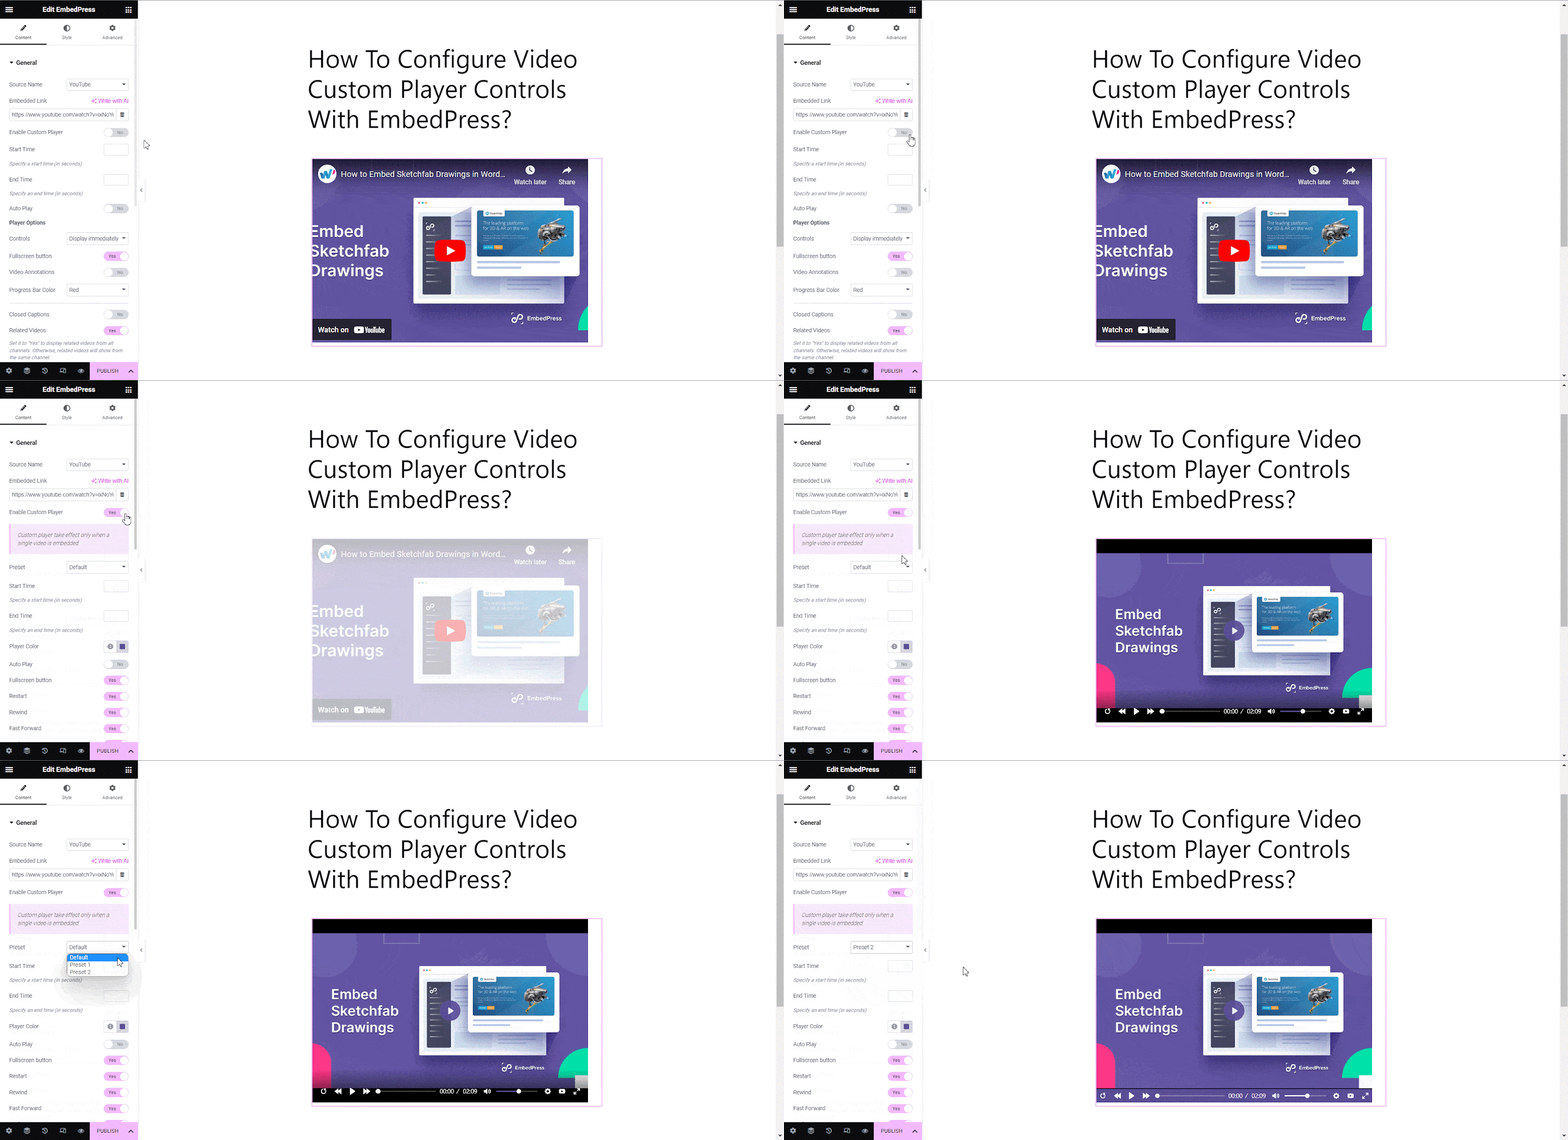
If you want to display a particular segment of the source video, you can easily achieve that by specifying the ‘START TIME’ and ‘END TIME’. The video custom player’s color can be changed from the ‘Player Color’ option. Additionally, you can choose to enable the ‘Auto Play’ option for automatic video playback.
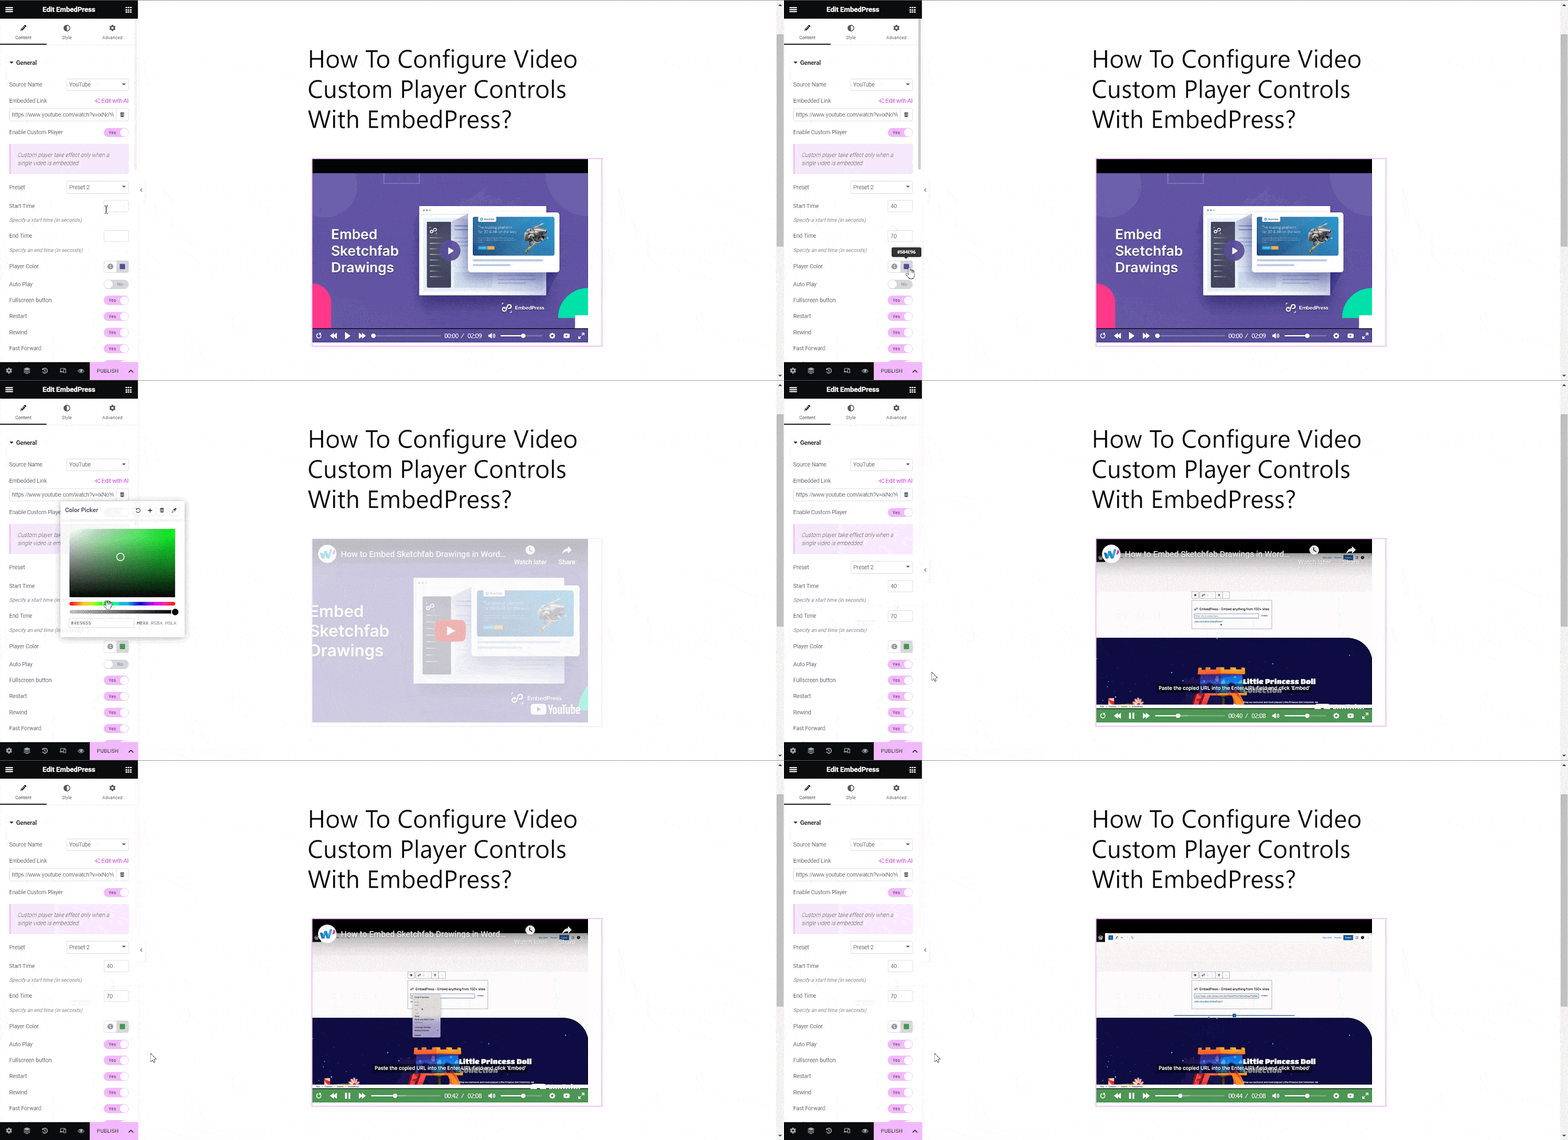
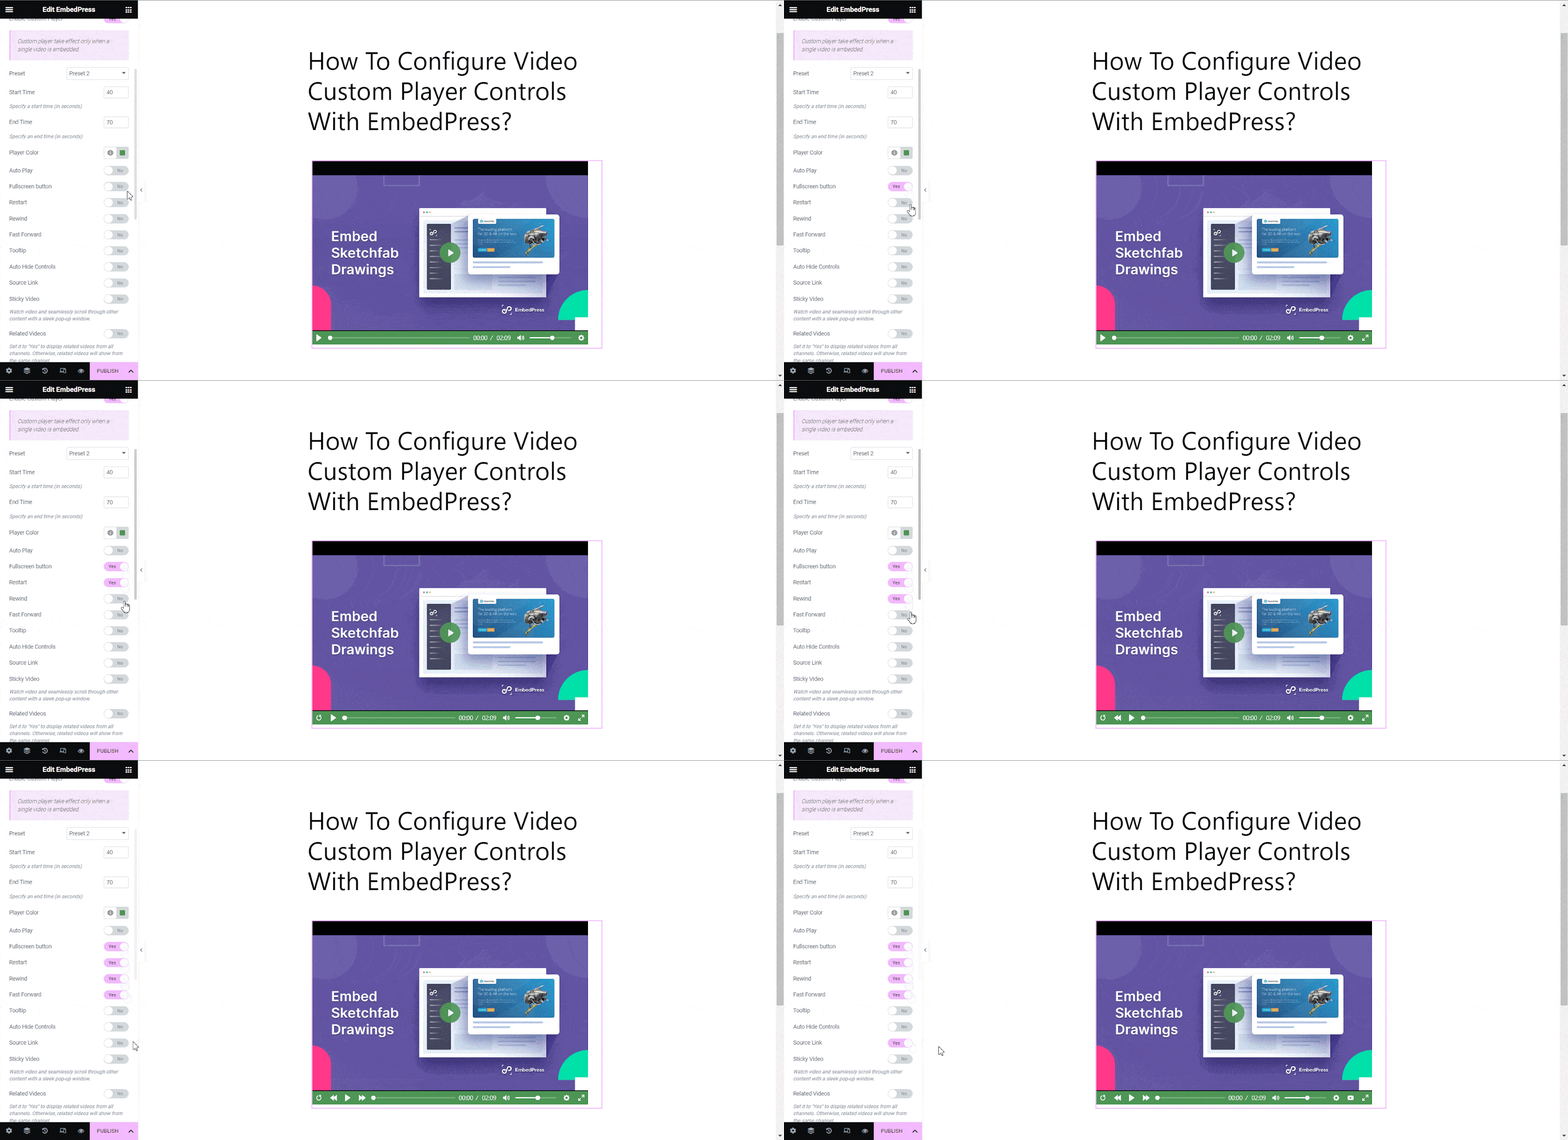
You can include buttons such as ‘Fullscreen Button’, ‘Restart’, ‘Rewind’, ‘Fast Forward’, and ‘Source Link’ with your embedded video control section. Simply toggle the corresponding options and the control buttons will be added within the control panel.
To display the name of each button when hovering over them, simply activate the ‘Tooltip’ option. Enable ‘Auto Hide Controls’ to automatically hide the player when the cursor is away.
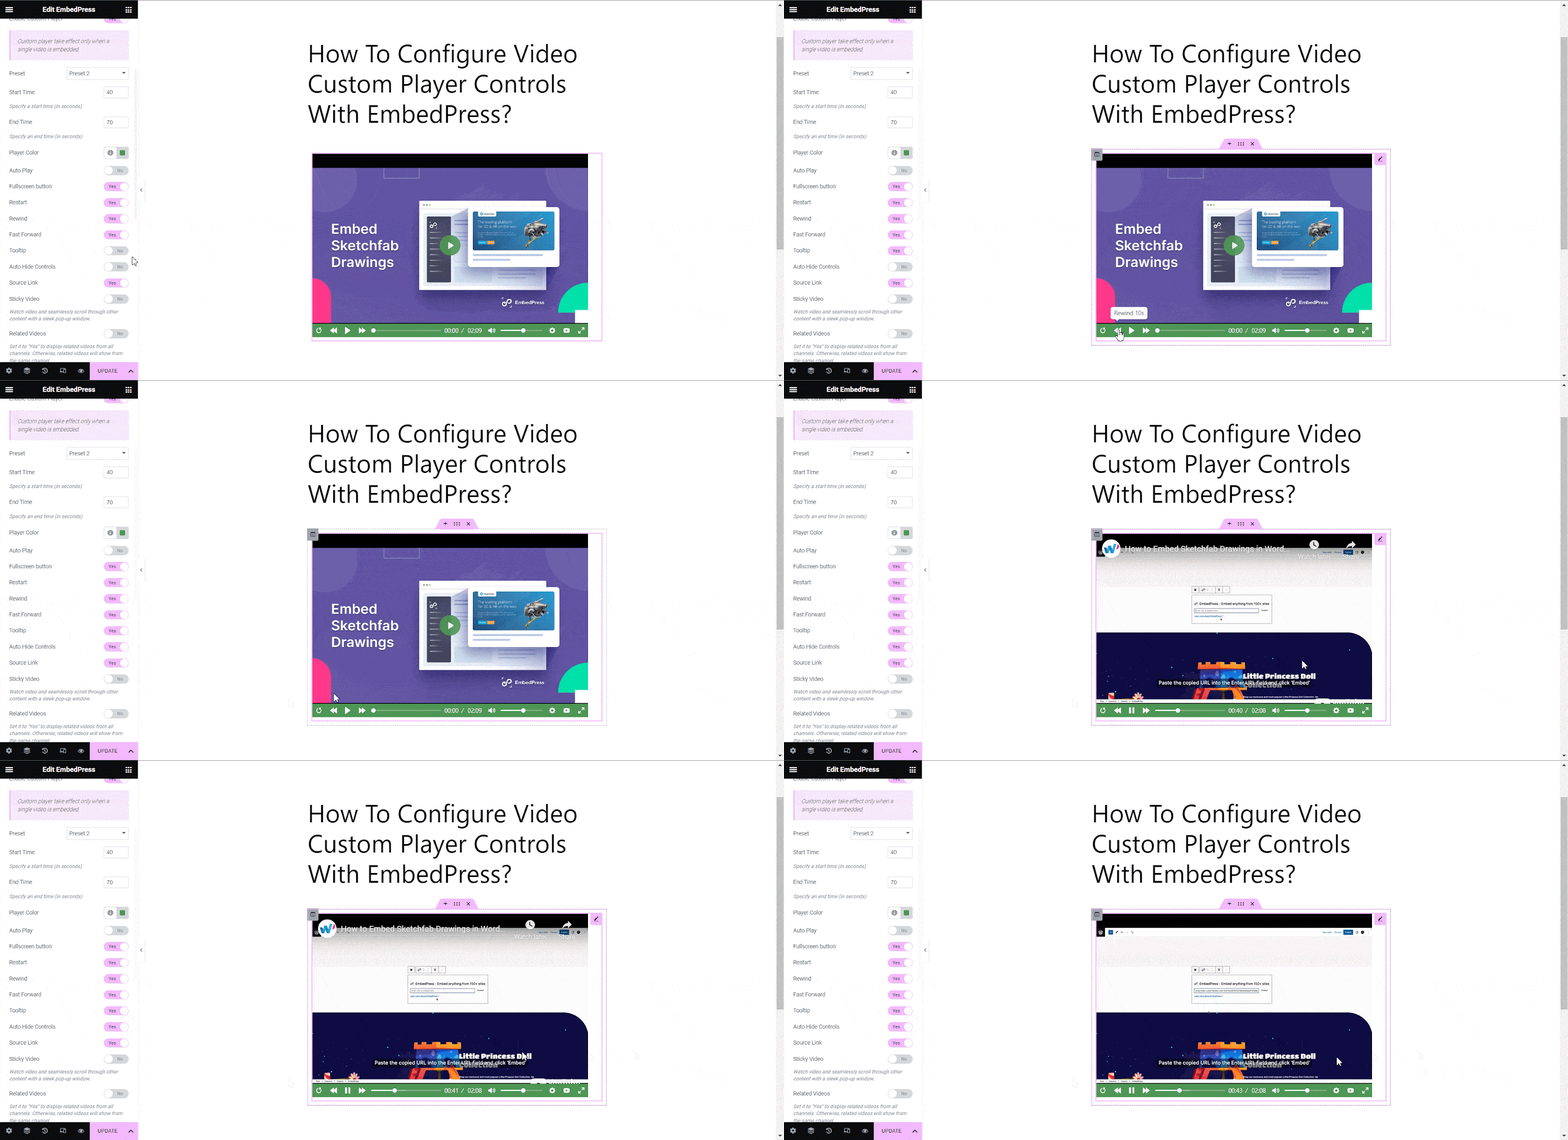
You can also enable the ‘Sticky Video’ to watch videos and seamlessly scroll through other content with a sleek pop-up window. Display related videos from all channels after video completion with the ‘Related Videos’ option.
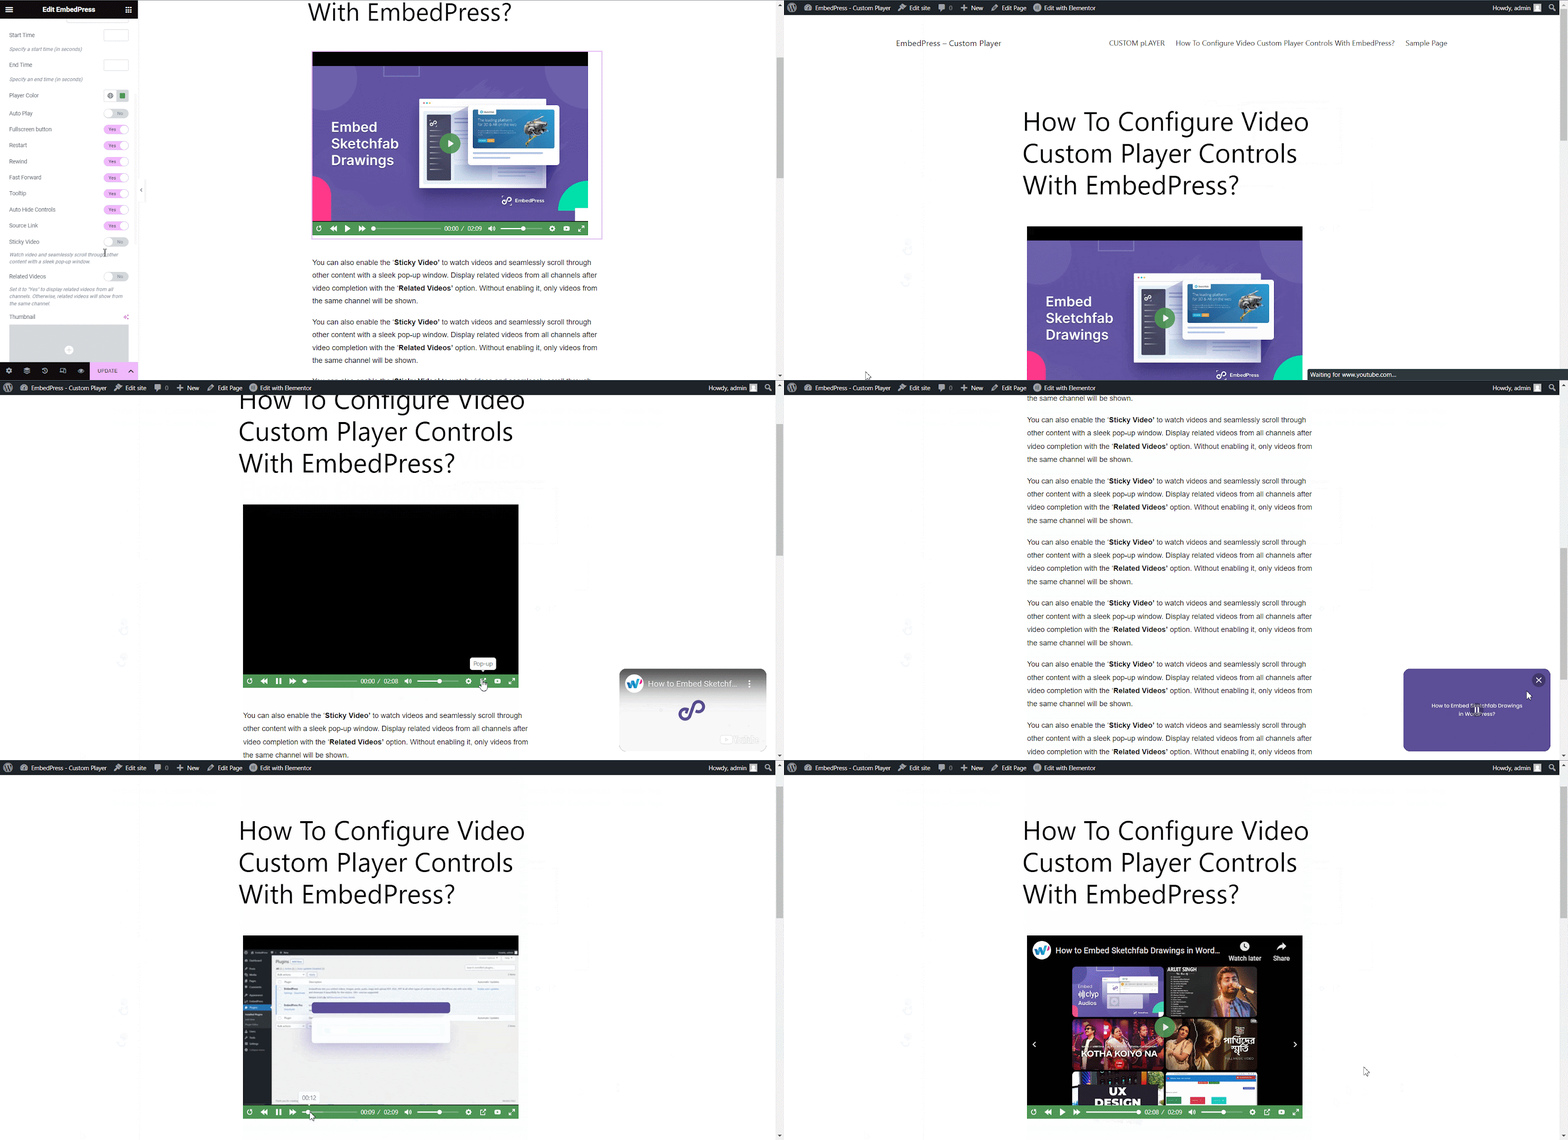
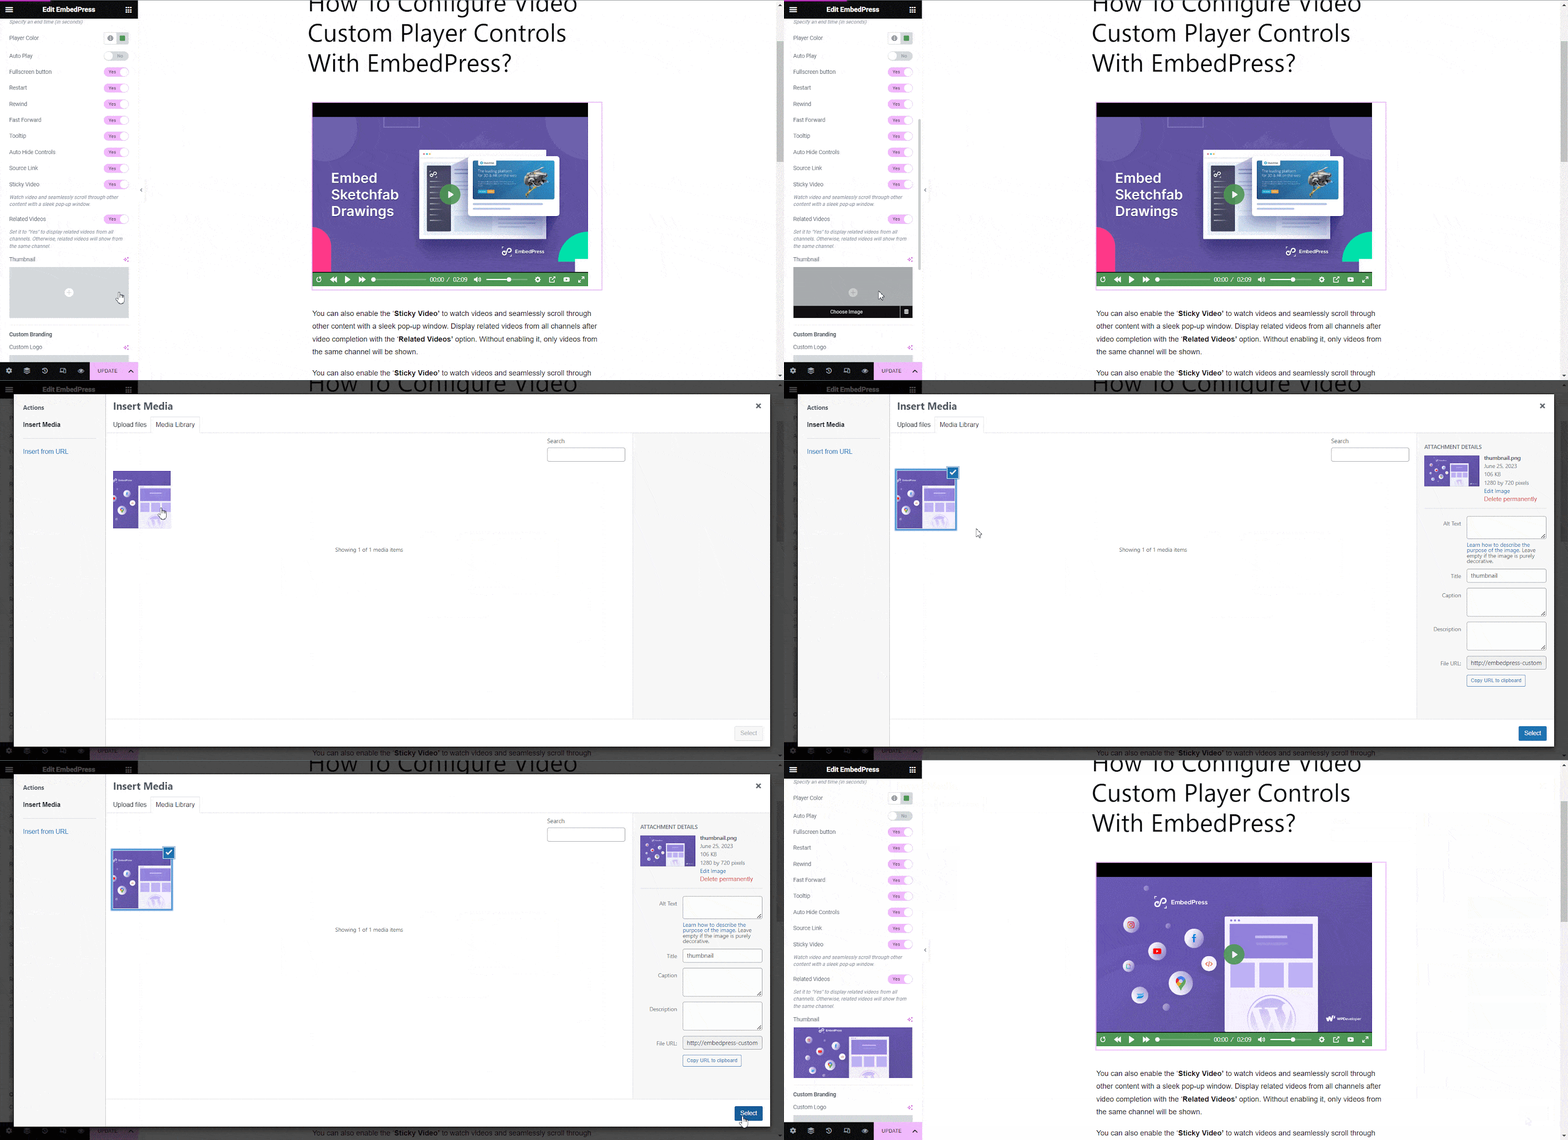
You can also update the thumbnail of your embedded video from the ‘Thumbnail’ option.
Final Outcome #
By following these simple steps, you can easily configure video custom player controller for your embedded videos. This is how your custom video control would look like:

This is how easily you can customize embedded videos with EmbedPress custom player.
Get Live Experience Of Personalized Video Custom Player #
If you are facing problems and require further assistance, feel free to contact our support or join our Facebook Community to get in touch with WordPress experts and content creators like yourself.


