When embedding content on a website, content protection measures must sometimes be implemented to prevent unauthorized use or distribution. EmbedPress allows you to protect embedded content views with a few clicks, preventing unwanted use of your content.
With EP Content Protection, you can lock embedded content on websites using the ‘User Role’ and ‘Password Protection’ so that the content can be accessible by certain people. This step-by-step guideline lets you learn how to embed anything in a website and control visibility with EP Content Protection in Elementor, Gutenberg or other editors.
Note: You must install and activate EmbedPress PRO on your site, as EP Content Protection is a premium feature of EmbedPress.
How To Add EmbedPress Content Protection Feature From Gutenberg Editor? #
You can easily implement the EP Content Protection on any embedded source of your website content. Follow the steps below to configure the EP Content Protection feature with embedded content.
Step 1: Embed Content Using EmbedPress Block #
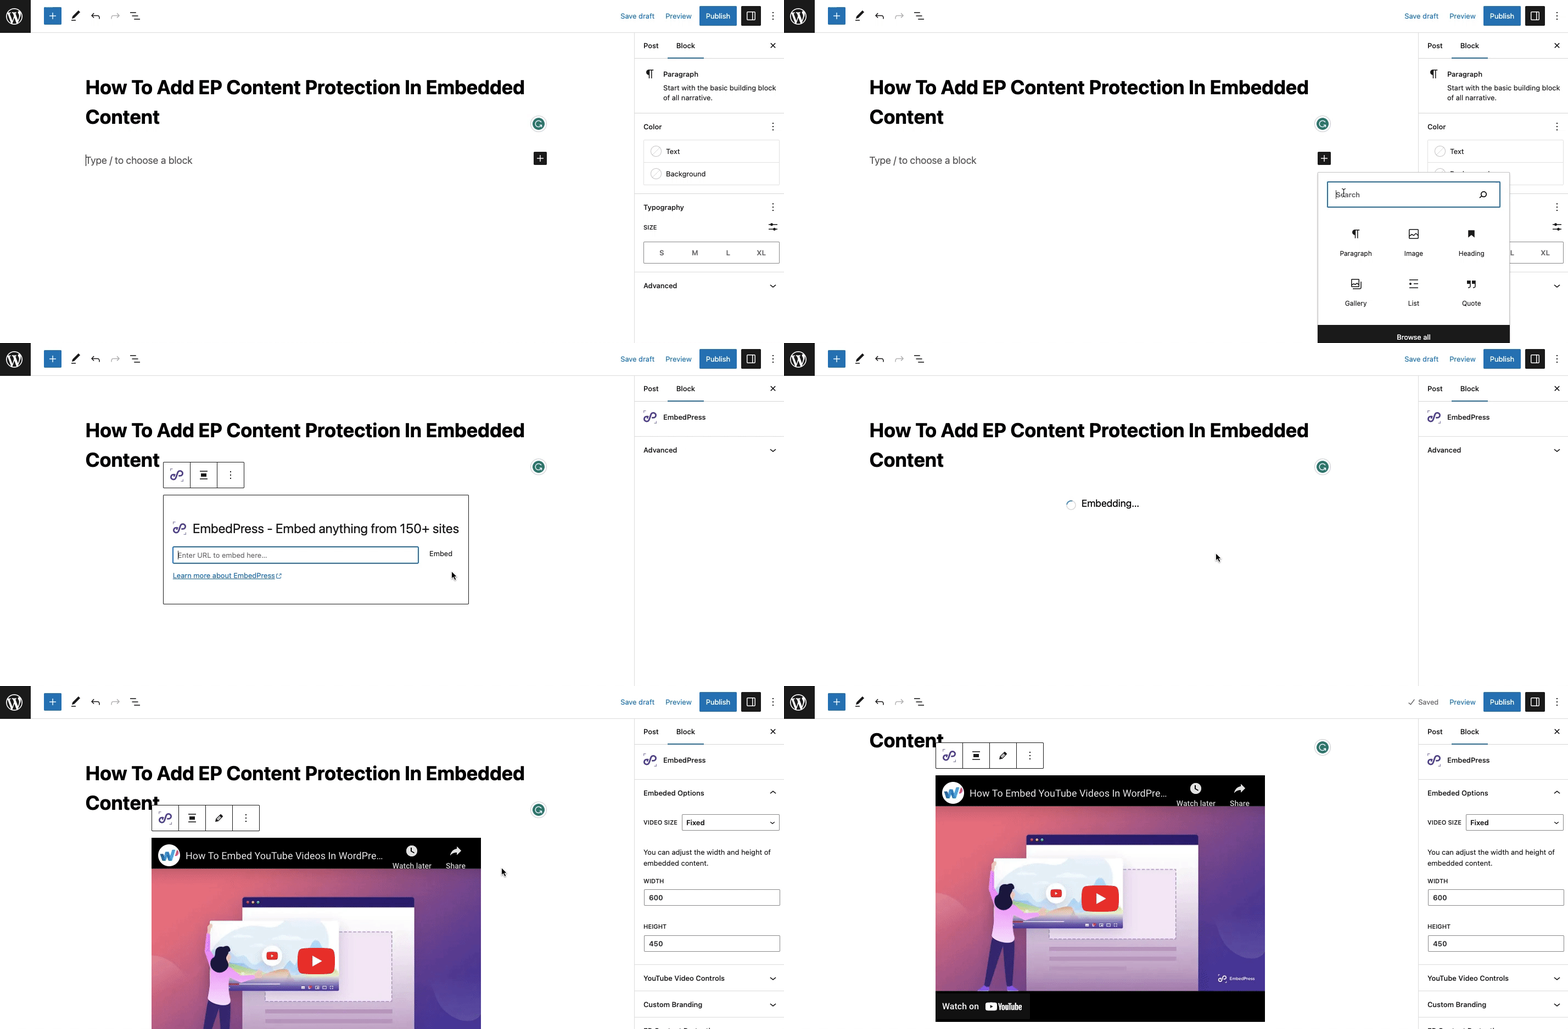
For the tutorial purpose here we will embed a YouTube video and show how to use the EP Content Protection feature. First, open a page or post and click on the ‘+’ icon on your post content area in the Gutenberg editor. Then, select ‘EmbedPress’ and paste the content URL on the input field and hit on the ‘Embed’ button and the URL content will be embedded on your website.
Step 2: Configure EP Content Protection Feature #
Now, navigate to the right-side settings panel and go to the ‘EP Content Protection’ option located within the ‘Block’ tab. Once there, toggle on the ‘Enable Content Protection’ option to activate the feature.
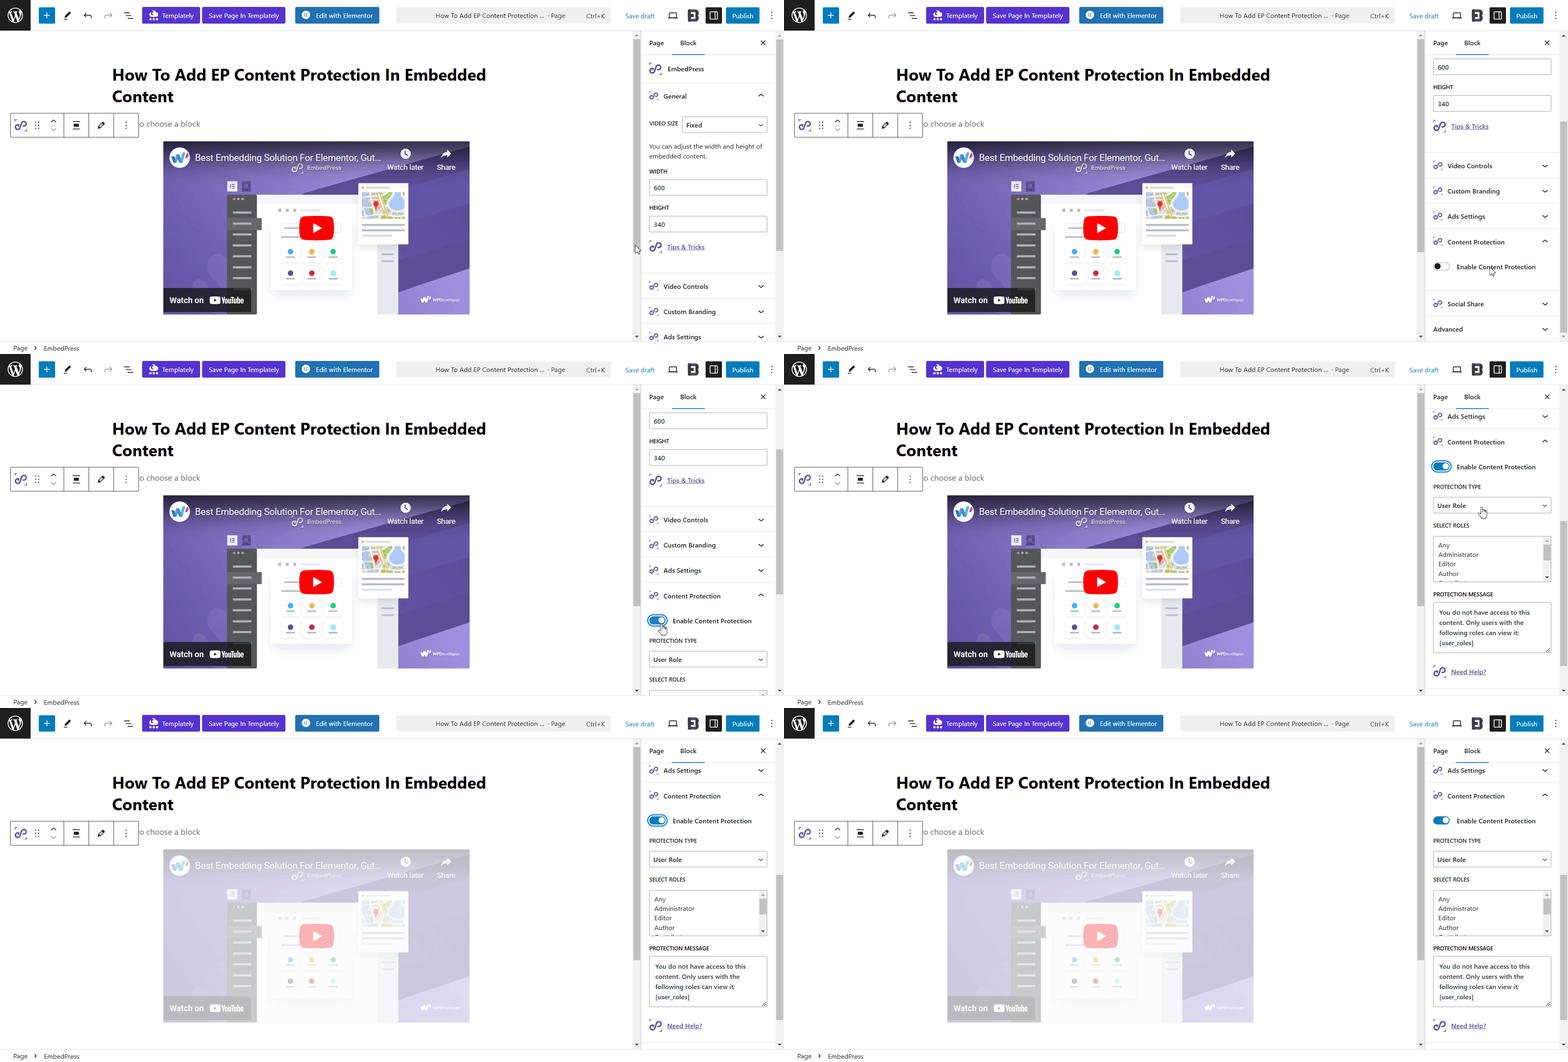
Afterwards, you will get two options: ‘User Role’ & ‘Password Protection’ for protecting any content of your website that will be accessible and available exclusively for certain authorized people.
1. Protect Content By Using User Role #
Under the ‘Protection Type’, choose ‘User Role’ from the drop-down menu to protect the content according to the user role and grant permission to certain individuals.

Next, go to the ‘Select Roles’ option, choose from different user roles such as ’Administrator’, ’Editor’, ’Author’, ’Contributor’, ’Subscriber’, ’Customer’, ‘Shop manager’ and give permission based on the specific role.
Note: To select, multiple roles just choose the roles that you want to permit while clicking on Shift or CLT button.
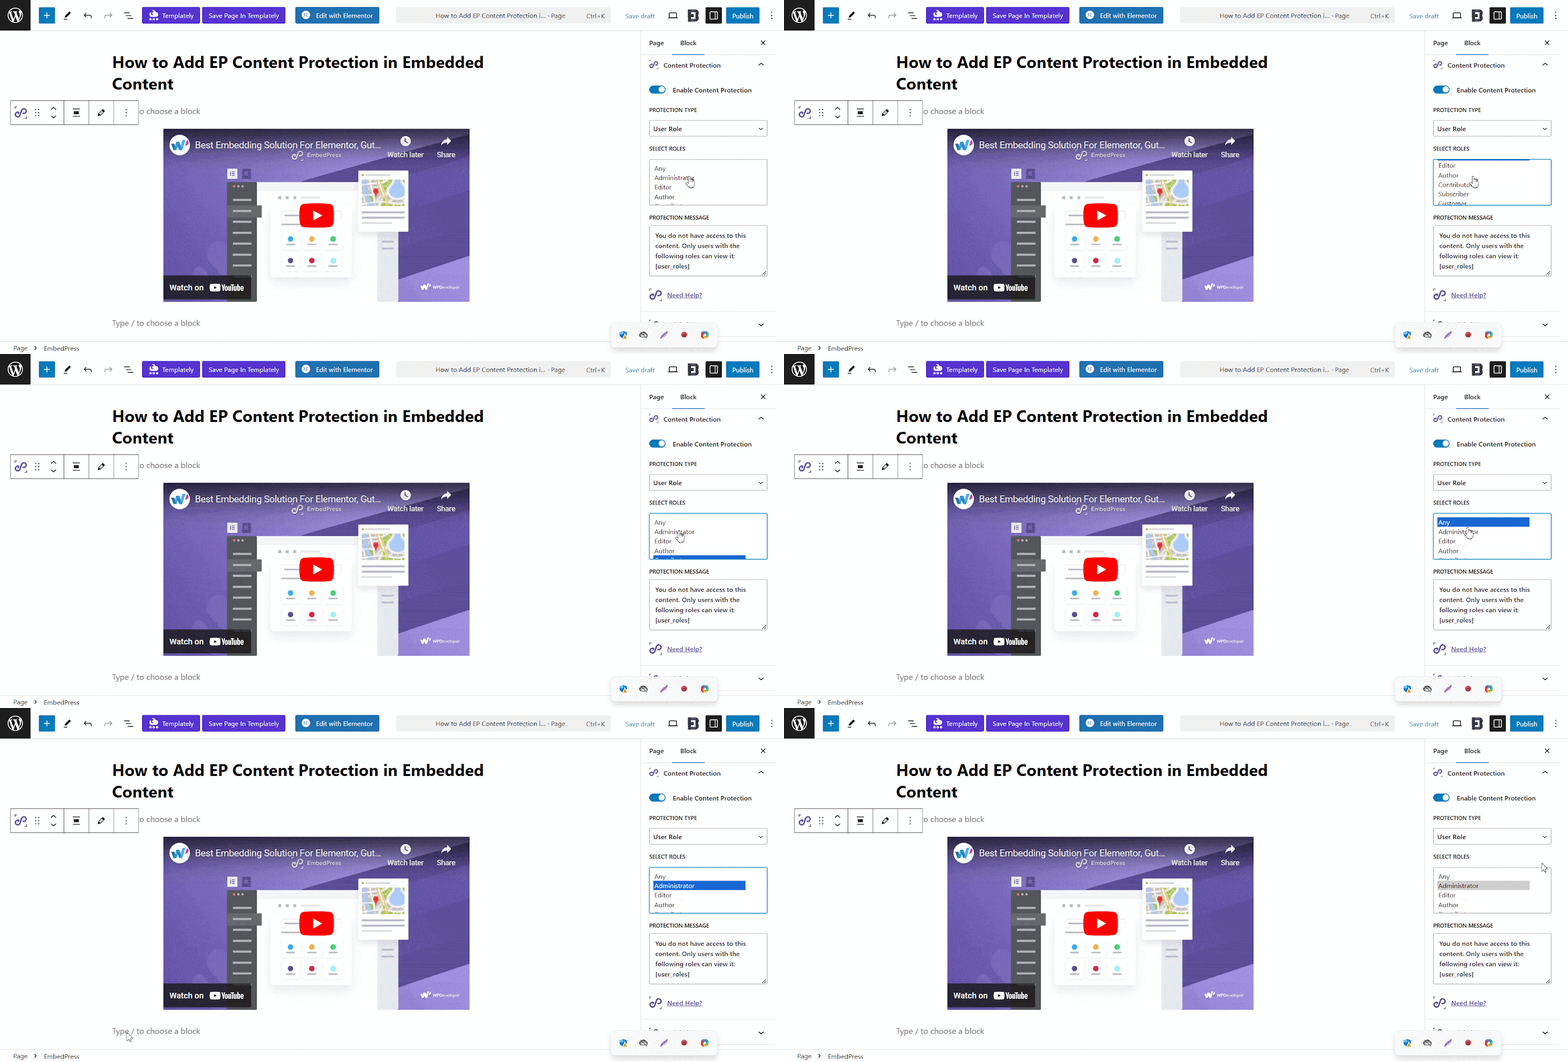
Now, you can even go to the ‘Protection Message’ section. Here, you can showcase a custom ‘Message’ to the viewer of the site and personalize or adjust the content according to your preferences and specific requirements.

2. Protect Content By Using Password Protection #
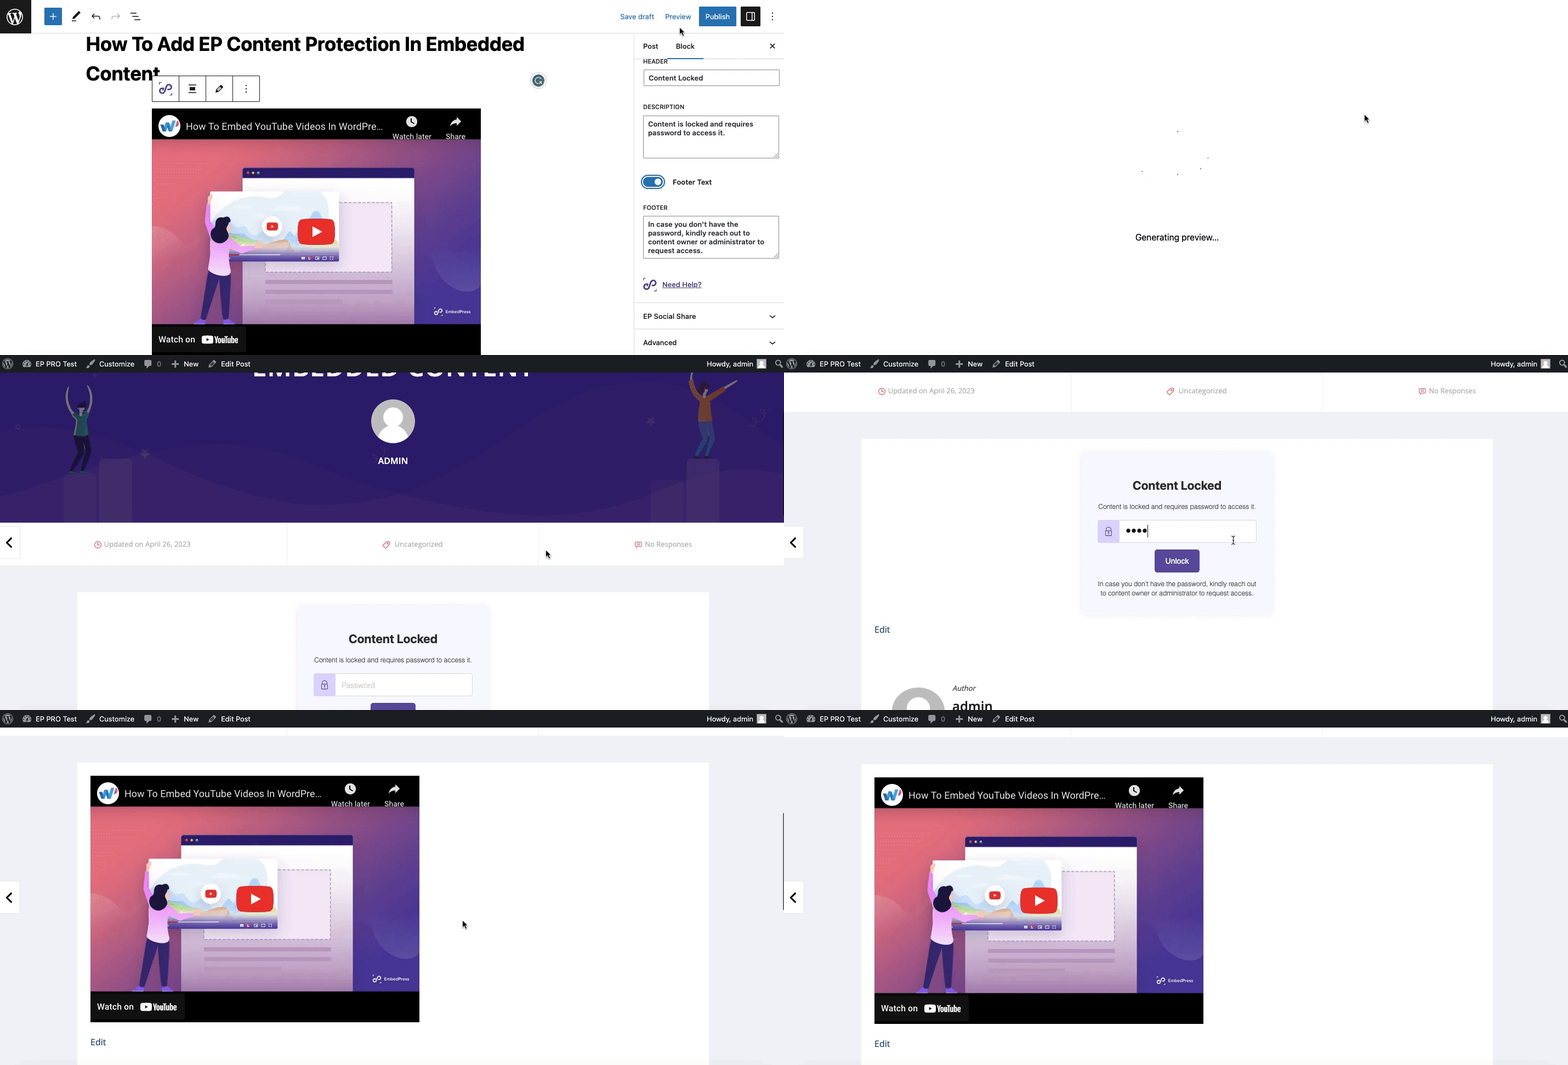
To protect content using a password, choose the ‘Password Protection’ option from the drop down menu under the ‘Protection Type’ to protect the content using a password so that certain people can access this content.

Now, set a ‘Password’, and ‘Error Message’ for the embedded content as you want. Also set the ‘Placeholder’, ‘Button Text’, ‘Unlocking Text’, ‘Header’ and ‘Description’. You can enable and set a ‘Footer Text’ as well.
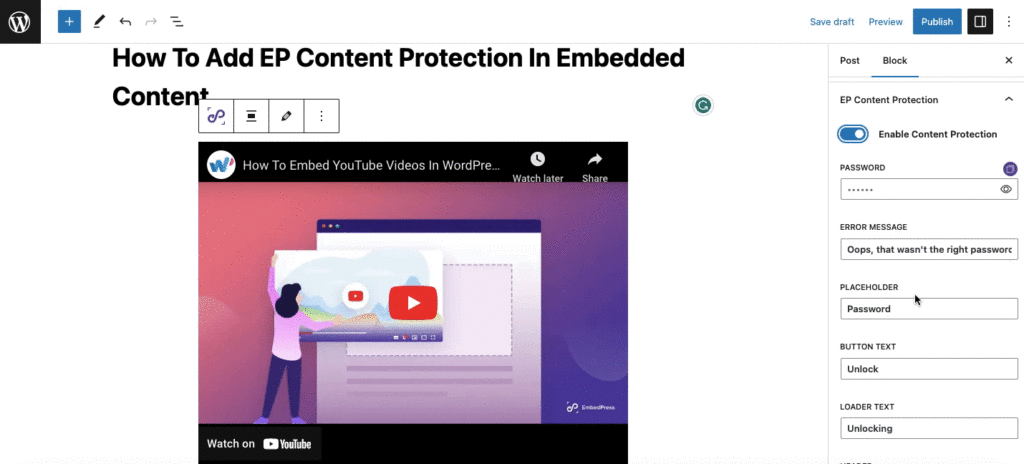
Now, publish the page to make it live for your visitors. All of this content except the password will be shown when the user sees the embedded locked content.
How To Add EmbedPress EP Content Protection Feature From Elementor? #
You can use the EP Content Protection feature while using EmbedPress PRO on the Elementor. You must install and activate EmbedPress PRO on your site. Now, go to the page or post where you want to embed. It will take you to the Elementor editing panel.
Step 1: Embed Content Using EmbedPress Widget #
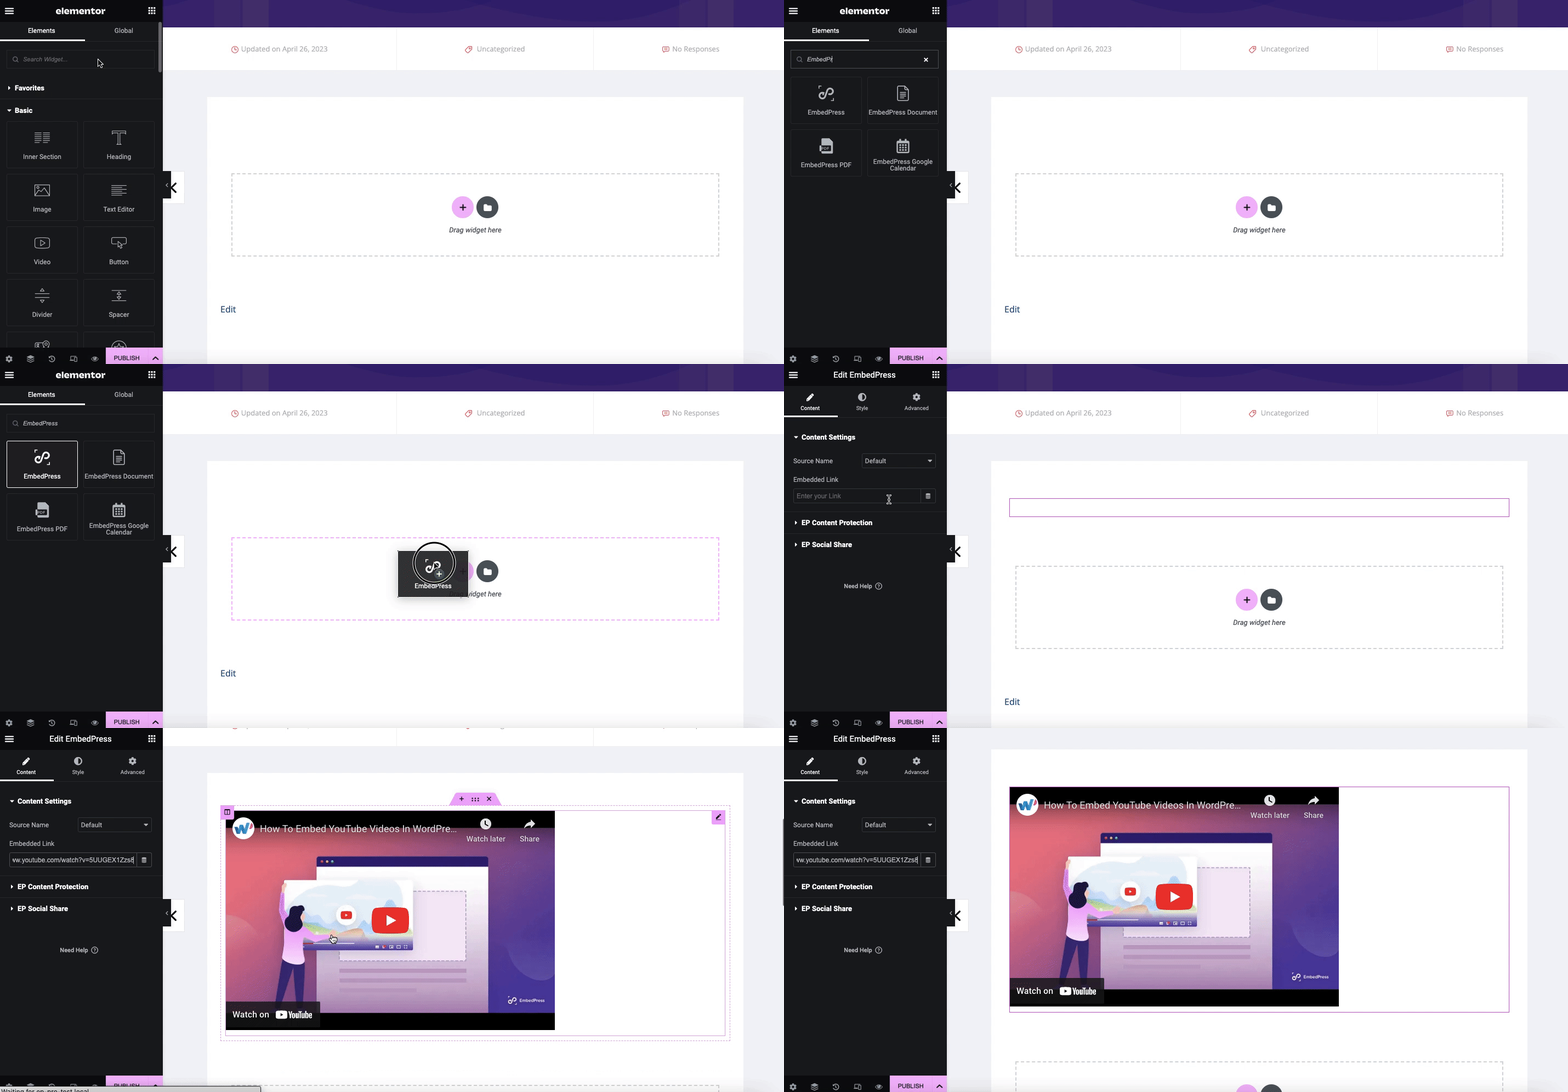
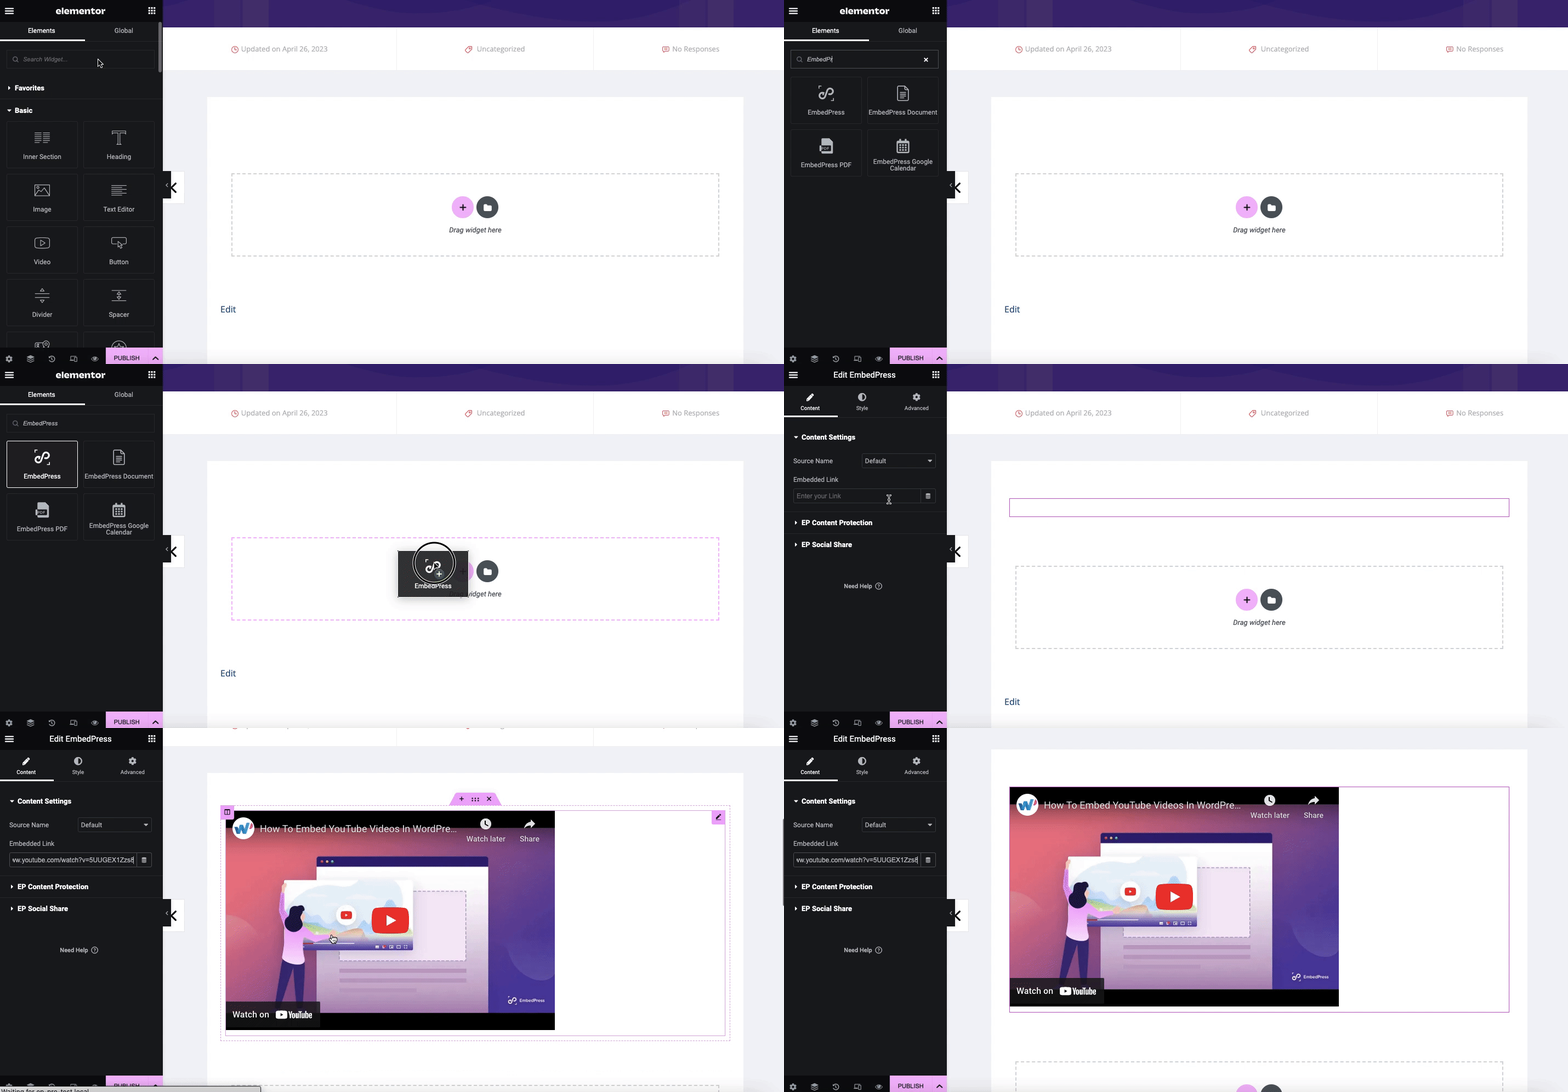
Search for the EmbedPress element on the widget panel and then drag & drop the ‘EmbedPress’ onto the editor interface. Afterward, paste the YouTube video link onto the ‘Content Setting’ input field. Your embedded link will automatically be embedded into your website.
Step 2: Configure EP Content Protection Feature #
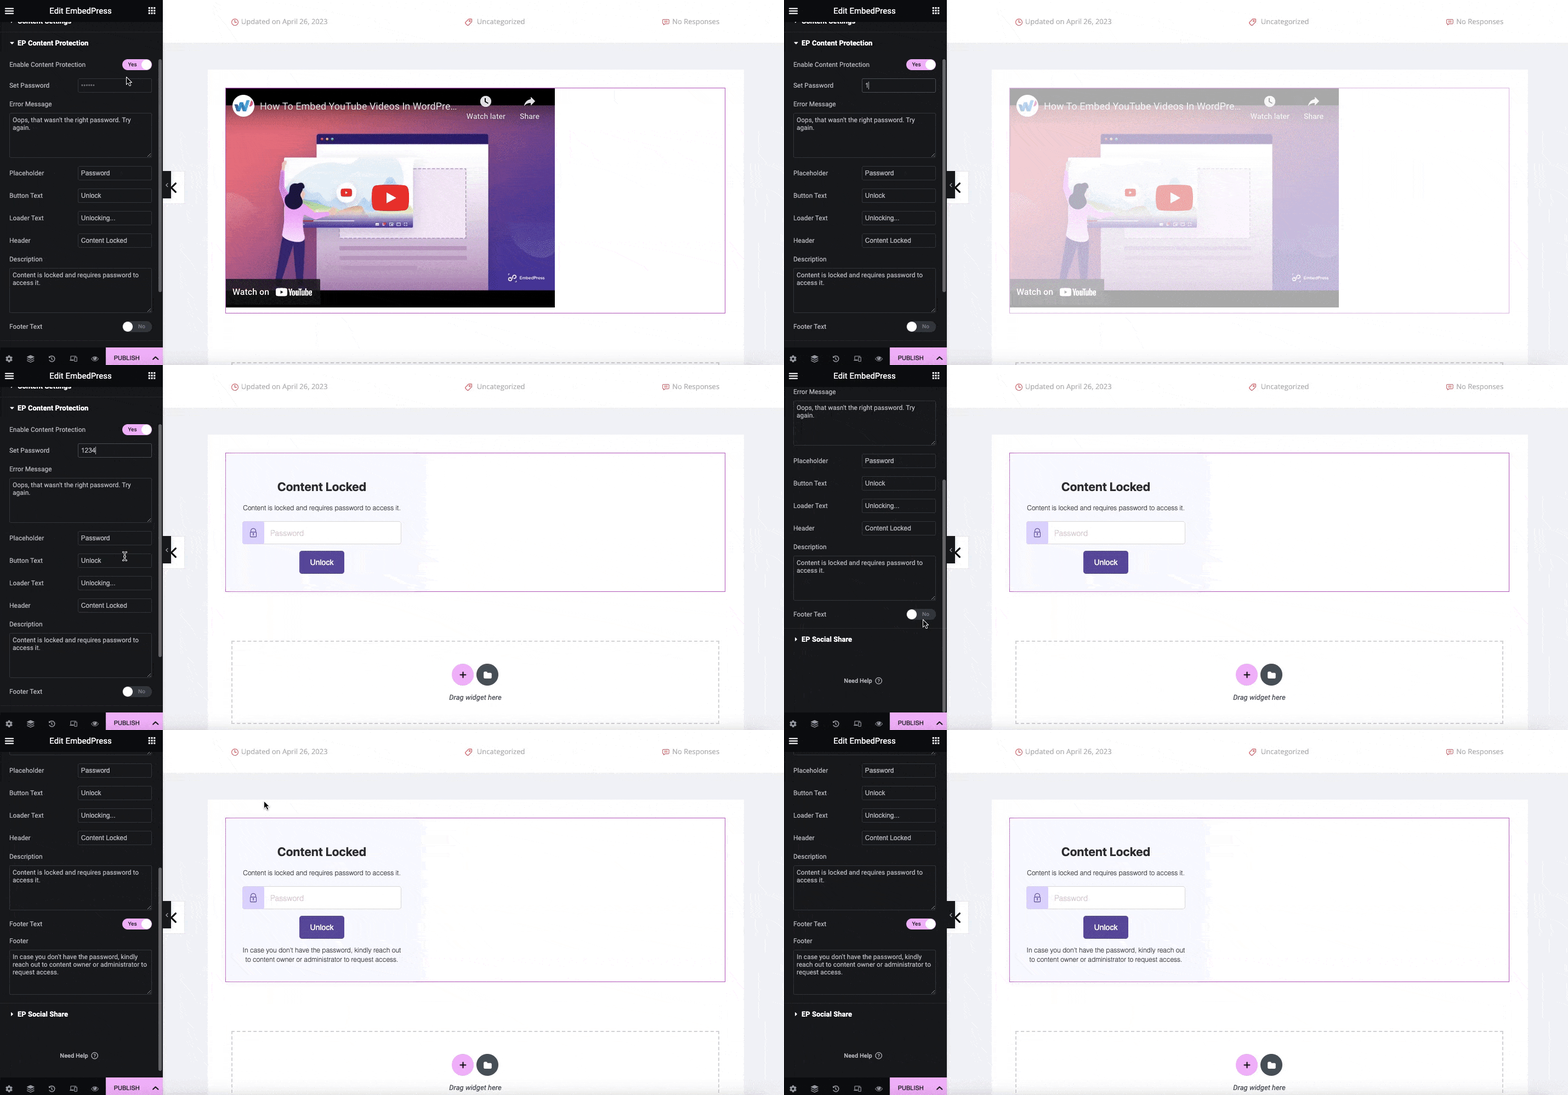
Now navigate to the side panel and go to the ‘EP Content Protection’ option. Toggle on the ‘Enable Content Protection’ button as shown below.
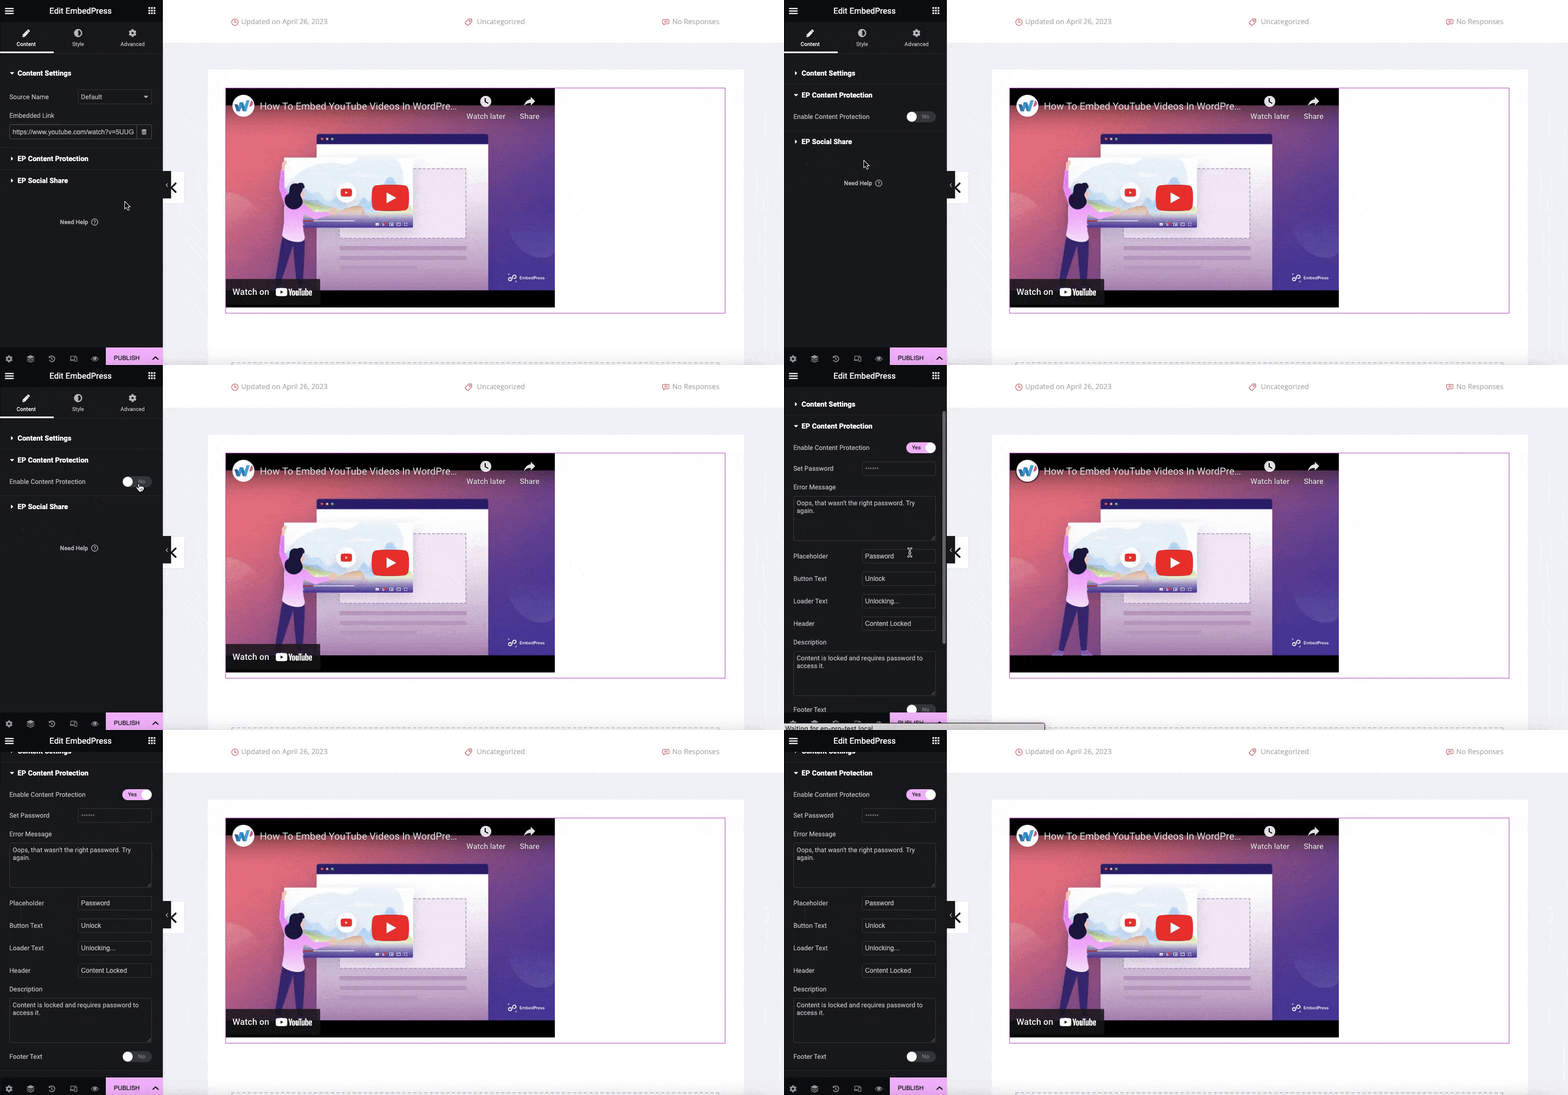
Afterwards, you will get two options ‘User Role’ & ‘Password Protection’ for protecting any content that you want to make available for certain people only.
1. Protect Embedded Content By Adding User Roles #
From here, choose ‘User Role’ from the drop-down menu under the ‘Protection Type’ to protect the content according to the user role and give permission to certain people.
Next, go to the ‘Select Roles’ option, choose from different user roles such as ’Administrator’, ’Editor’, ’Author’, ’Contributor’, ’Subscriber’, ’Customer’, ‘Shop manager’ and give permission based on the specific role.

Now, you can even navigate to the ‘Protection Message’ section. Here, you can showcase a personalized ‘Message’ to the viewer of the site, allowing you to customize and adjust the content according to your preferences and specific requirements.

2. Protect Content By Using A Password #
To protect content using a password, choose the ‘Password Protection’ option from the drop-down menu under the ‘Protection Type’ to protect the content using a password.

Now, set a ‘Password’, and ‘Error Message’ for the embedded content as you want. Also set the ‘Placeholder’, ‘Button Text’, ‘Loader Text’, ‘Header’ and ‘Description’. You can enable and set a ‘Footer Text’ as well.
Now, publish the page to make it live for your visitors. All of this content except the password will be shown when the user sees the embedded locked content.
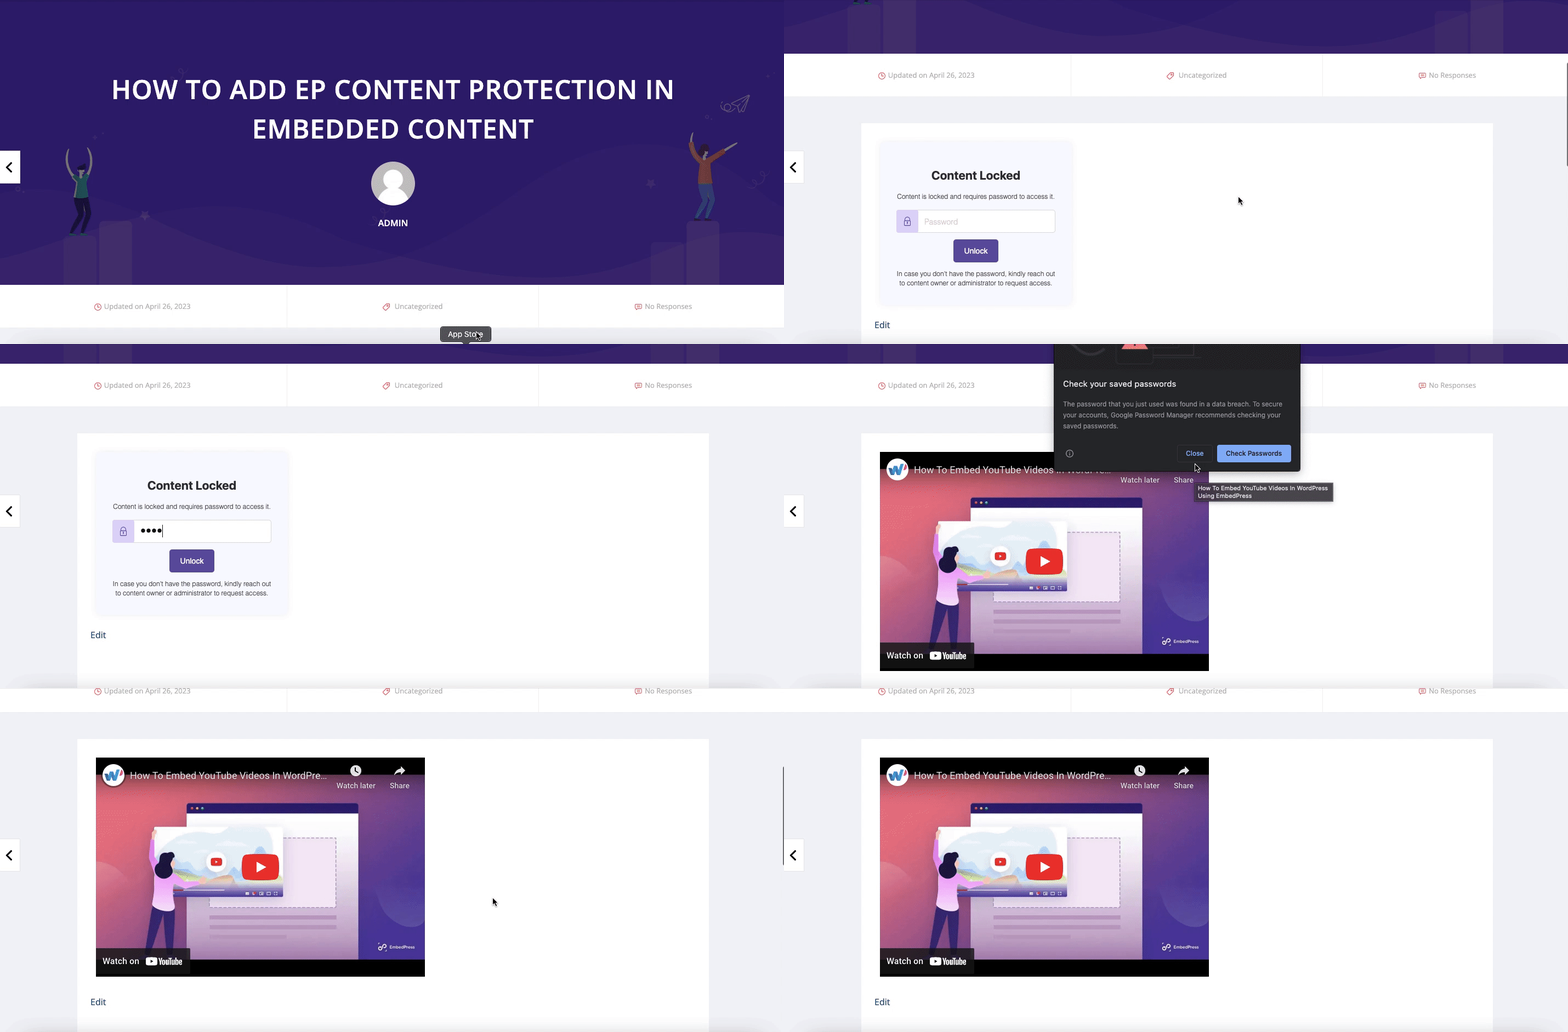
Once you publish the embedded content on your website, your visitors will find the content lock, and they need to unlock it with your password, or it will be visible to specific role users.
How To Add EmbedPress EP Content Protection Feature Using Classic Editor? #
You can use the EP Content Protection feature while using EmbedPress PRO using the Shortcode from Classic editor as well. You must install and activate EmbedPress PRO on your site. Follow the easy steps below:
Step 1: Protect Content With User Role #
First, go to the page, where you want to place the shortcode, t then paste the below shortcode into the page and customize as you prefer.
[embedpress width='600' height='400' protection_content='true' protection_type='user-role' user_roles='editor, author' protection_message='this my content message for']https://www.youtube.com/watch?v=fvYKLkEnJbI&sttick=0[/embedpress][/embed]Here You can insert the user roles such as ‘Any’, ’Administrator’, ’Editor’, ’Author’, ’Contributor’, ’Subscriber’, ’Customer’, ‘Shop manager’ and give permission based on the specific role. Also, you can customize the message.

Step 4: Protect Content Using Password Protection #
Now, if you want to protect content using the password in Classic Editor, then paste the below shortcode into the page and customize it as you prefer.
[embedpress width='600' height='400' protection_content='true' protection_type='password' protection_password='34']https://www.youtube.com/watch?v=fvYKLkEnJbI&sttick=0]Here You can insert the user roles such as ’Administrator’, ’Editor’, ’Author’, ’Contributor’, ’Subscriber’, ’Customer’, ‘Shop manager’ and give permission based on the specific role. Also, you can customize the message.

This is how you can add EP Content Protection to embedded content using EmbedPress. If you are facing problems and require further assistance with EmbedPress, feel free to contact our support or join our Facebook Community to get in touch with WordPress experts and content creators like yourself.
Get A Live Experience Of Adding EP Content Protection #
Note: Use this password to unlock the content. [Password: 1234]


