Want to embed Google Calendars in your WordPress website and show all your schedules, meetings, or events in just a single click? EmbedPress comes bearing some great news just for you. With yet another update, this ultimate embedding solution for WordPress brings you one of its most awaited content sources – the Google Calendar! 🎉
In today’s fast-paced digital era, Google Calendar stands out as one of the most useful tools for managing everyday activities. With its outstanding features, ease of use, and seamless interaction with Google’s other services, this advanced calendar solution is the ideal tool for organizing your schedule, setting up remote meetings with synchronized video links, making reminders, and a lot more.
It even allows you to coordinate multiple calendars together to see when you are free for any meeting and send out invitations to clients and customers accordingly. And on top of all that Google Calendar helps you create recurring events, manage who attends, and add optional participants, among other things.
While embedding Google Calendar into your website is not a new idea, the process to do so was always a bit complex. But now, on popular demand by many of our dedicated, EmbedPress brings you outstanding means to effortlessly embed Google Calendar in just a few clicks.
How Can Embedding An Online Calendar Solution Help You?
For website and business owners, online calendar solutions like Google Calendar can be extremely advantageous for various reasons:
🗓️ Google Calendar embeds do not need to be updated manually as they get constantly and automatically synchronized across all devices as well as on your WordPress websites.
🗓️ While there are many third-party solutions or WordPress plugins to help you add scheduled events to your website, most are quite redundant and time-consuming. On the other hand, when you embed Google Calendars on your site, they get synced into your site instantly. You’ll be able to keep track of all of your scheduled activities by adding comments, reminders, and notes, which will help you work more efficiently.
🗓️ Additionally, utilizing Google Calendars to discuss deadlines or events with team members or clients on your website is considerably faster and more efficient because you can invite other users to share their calendars with you. This way, anyone with access to a certain calendar can see what’s on the schedule for the day and stay up to date at all times.
🗓️ It is exceptionally helpful if you want to start a website where you want to hold schedules for appointments with your website visitors and business customers. But embedding Google Calendar is not just confined to that. You can also share your special event calendar, such as your personal wedding schedules with your invitees, through your website.
Similarly, you will find many other uses of the Google Calendar on your WordPress website. However, now that you have a clearer understanding of why you should embed Google Calendar on your website, let’s move on to how EmbedPress helps you with the outstanding facilities to embed both your public and private calendars with ease.
Embed Google Calendars In A Few Clicks Using EmbedPress
EmbedPress is your one-stop solution to embedding any multimedia content onto your WordPress. With its unique mechanism, all you need is the URL of the content you want to embed to seamlessly insert high-performing, powerful media files from 100+ content sources to skyrocket the engagement rates on their websites.
From the beginning, EmbedPress has been completely compatible with several Google Drive contents, to enable students or business personalities to embed important documentation, presentation slides, or forms, and more with complete ease:
📃 Google Docs 🖼️ Google Slides
📊 Google Sheets 📜 Google Forms
🖌 Google Drawings 🌍 Google Maps
But the only facility that was missing from EmbedPress till now was Google Calendar. But we did not want to disappoint our users; instead, we want to provide you with every facility and embed source needed to take your storytelling to newer heights with ease.
And so, with the latest updates, we bring you the unmatched, advanced feature to embed Google Calendars in your website, with just a few clicks, using EmbedPress. And the best part? You do not even have to worry about whether your calendar is set to public or private on the Google platform.
Just like any other content source compatible with EmbedPress, you can embed fully synchronized versions of your calendars in Gutenberg or Elementor editor using just a single URL. All you need to do is follow the easy and simple steps given below. So, without further ado, let’s dive in and get started.
How To Retrieve The URL For A Public Google Calendar?
As mentioned right above, you will need the correct URLs to embed your calendars into your WordPress websites. So, let’s get started with how you can easily retrieve URLs for your public Google Calendar from your Google account.
Step 1: Collect Public Google Calendar URL
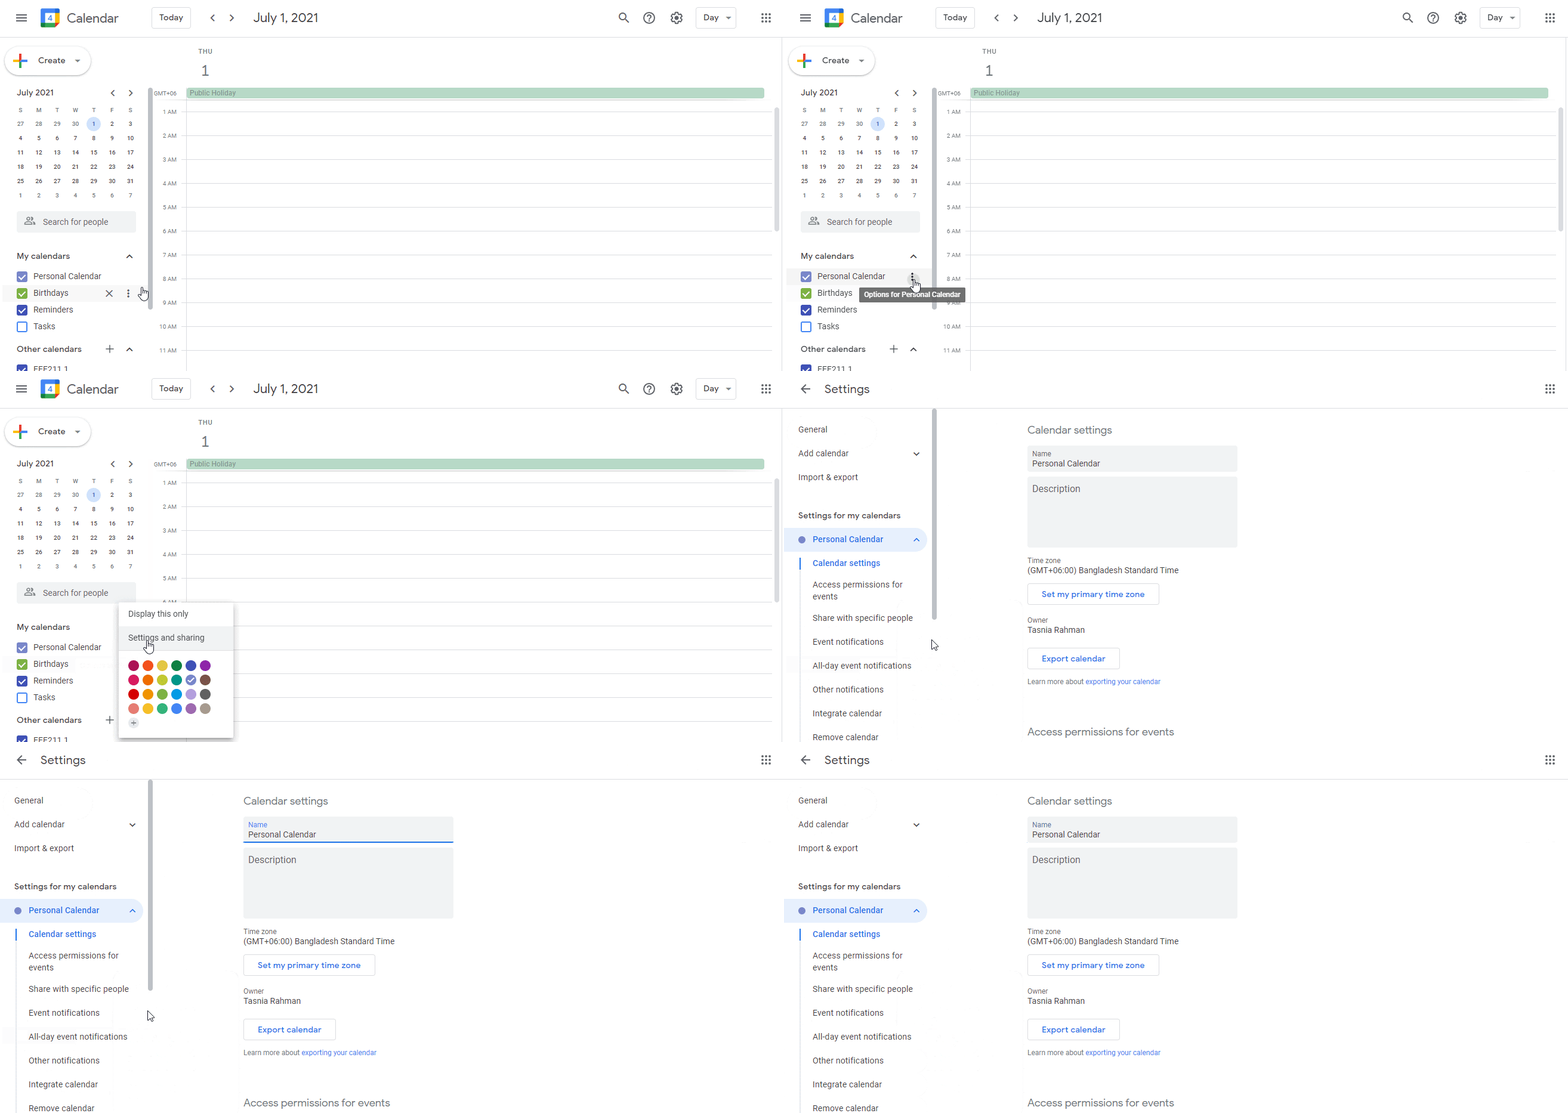
First, you need to navigate to your Google Calendar account. There, you will see all your public and private calendars listed on the left-hand side panel.
To retrieve the public Google Calendar URL, you need to click on the calendar you want to embed on your website and select ‘Settings and Sharing,’ as shown below.
Step 2: Copy The URL For Public Google Calendar
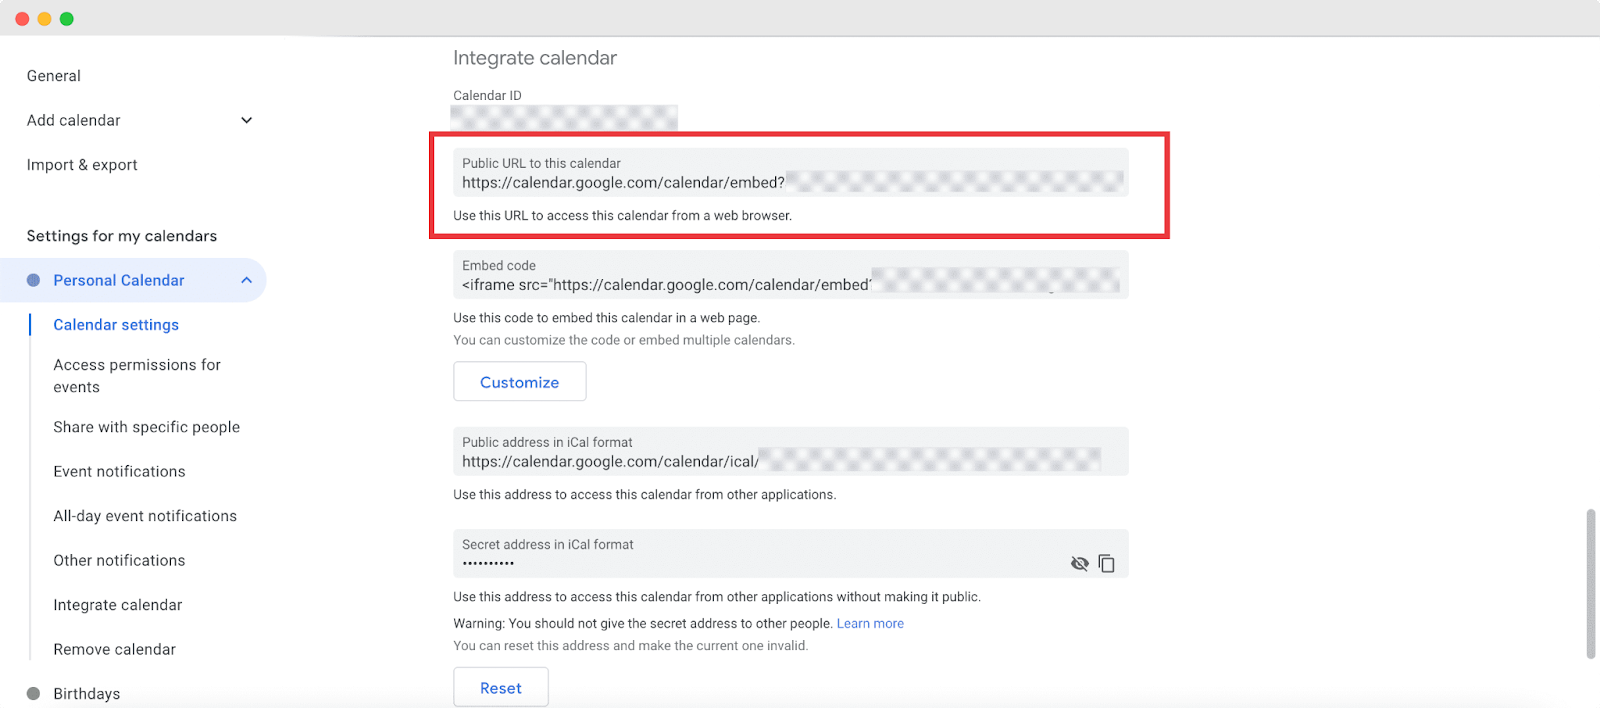
This will redirect you to a new web page where you will come across the option to ‘Integrate Calendar’. It will contain the public URL for the calendar you have selected. Simply copy this URL.
How To Retrieve APP API For A Private Google Calendar?
Retrieving your private Google Calendar data is a little different, but with EmbedPress PRO, you can even embed your private Google calendar easily within just a few steps too. Unlike how you have retrieved the URL for the public calendars, this time, you will need to retrieve Google Calendar App API.
Just follow the step-by-step instructions below to learn how you can easily retrieve the Google Calendar App API key:
Step 1: Create New Project In Google Cloud Platform
To start off, you have to go to the Google Developers Console to generate your Google Calendar API. Here, you have to create a project and give it a name by clicking on the ‘New Project’ from the Dashboard.
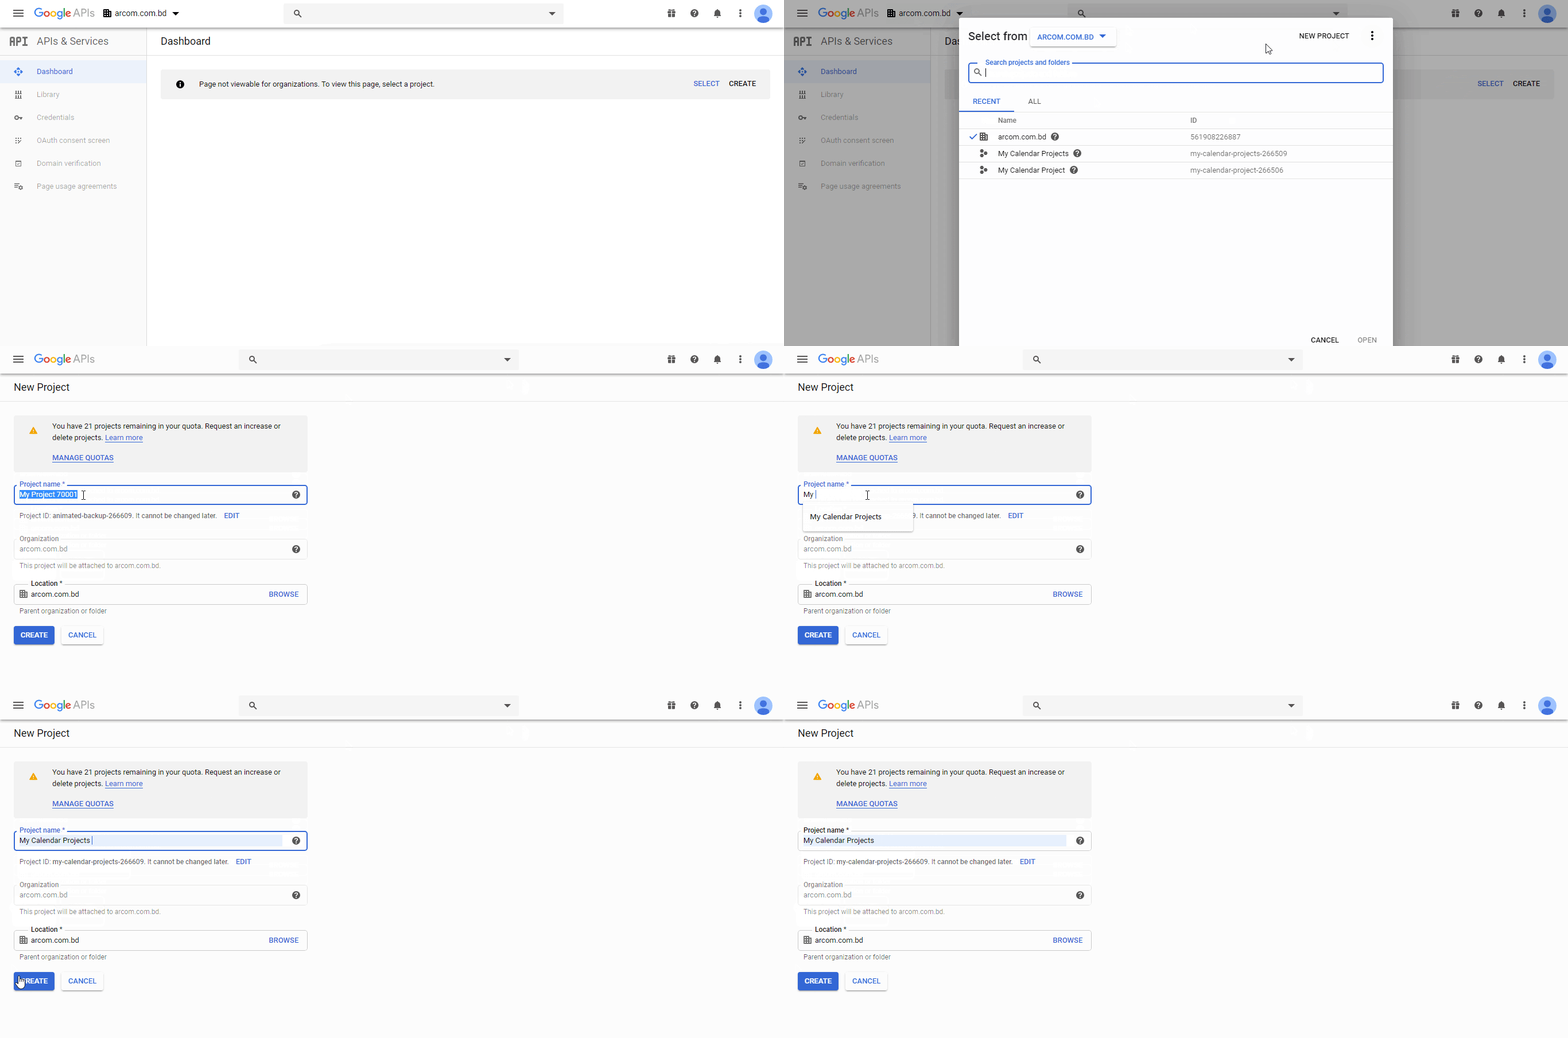
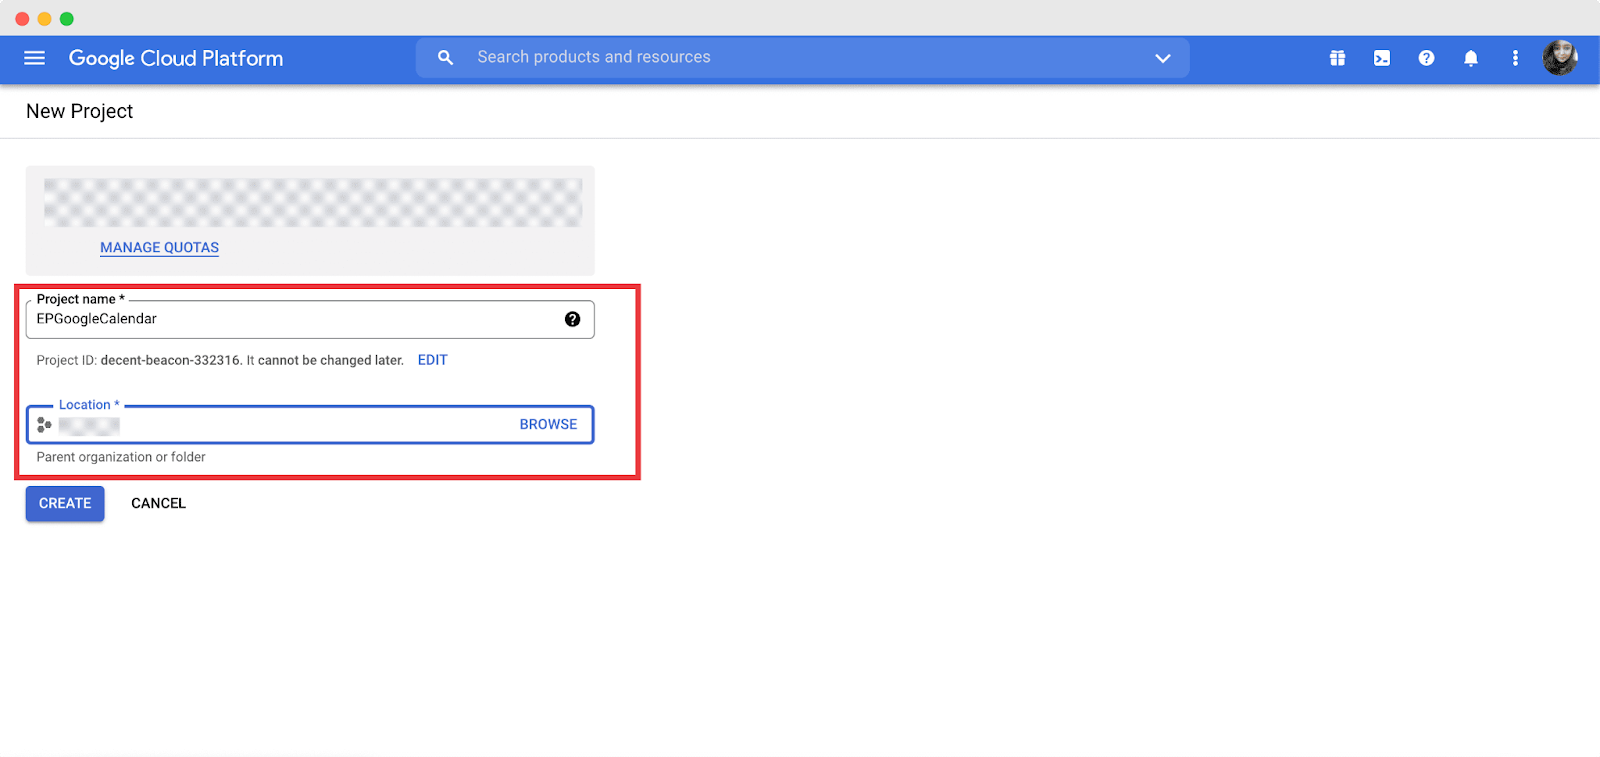
Then, in the next screen, you will need to provide a custom name and organization location for your project, as shown below. Finally, hit the ‘Create’ button.
Step 2: Configure Application Registration
Once the project is created, navigate to the OAuth consent screen → API and Services tab from the left-hand side panel of your Google Cloud Platform. Here, set the user type to ‘External’ and hit the ‘Create’ button.
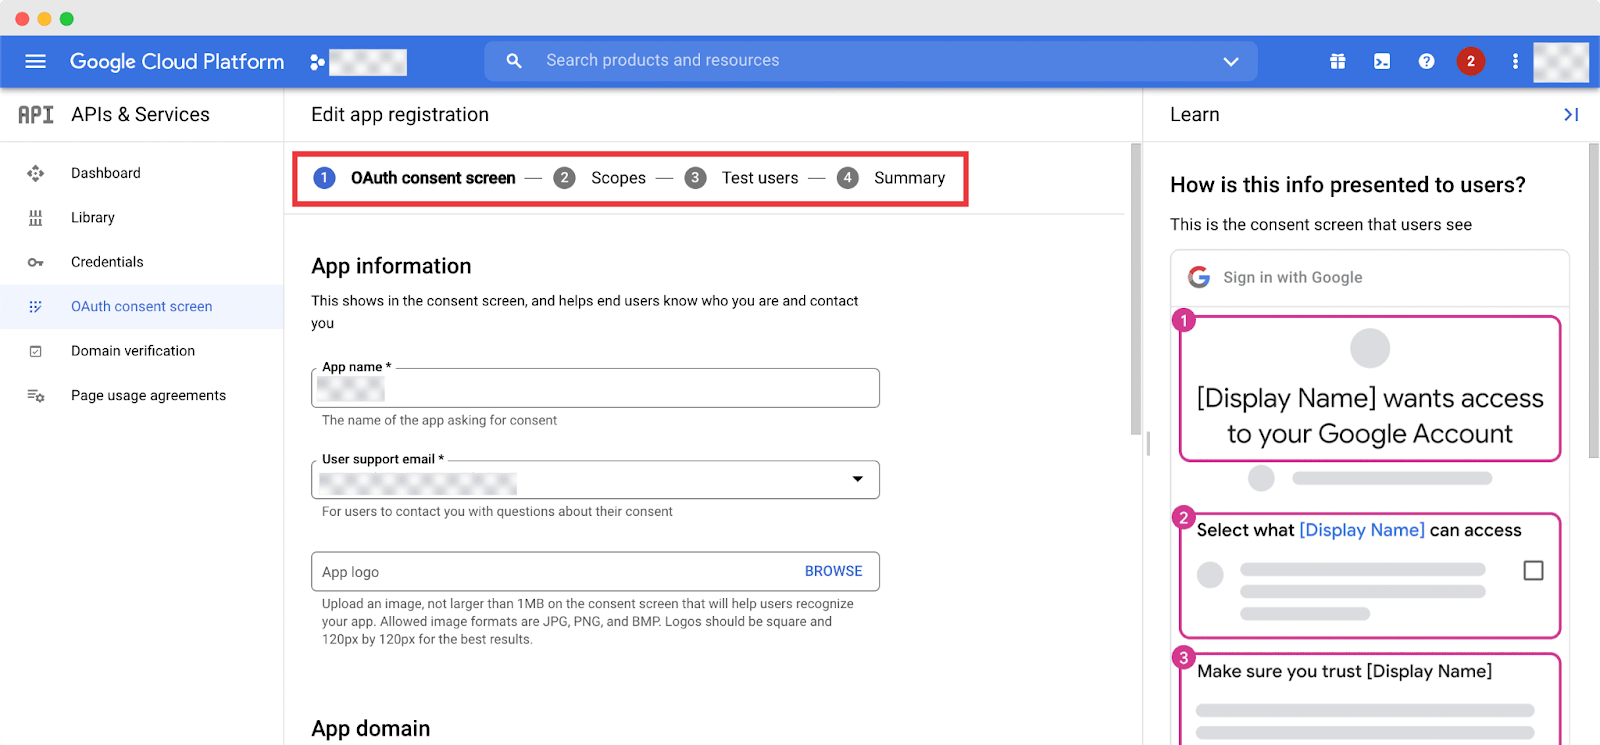
You will then be redirected to the Edit App Registration page where you need to fill out all the necessary fields with related information, in 4 simple steps.
Step 3: Publish The App To The Web
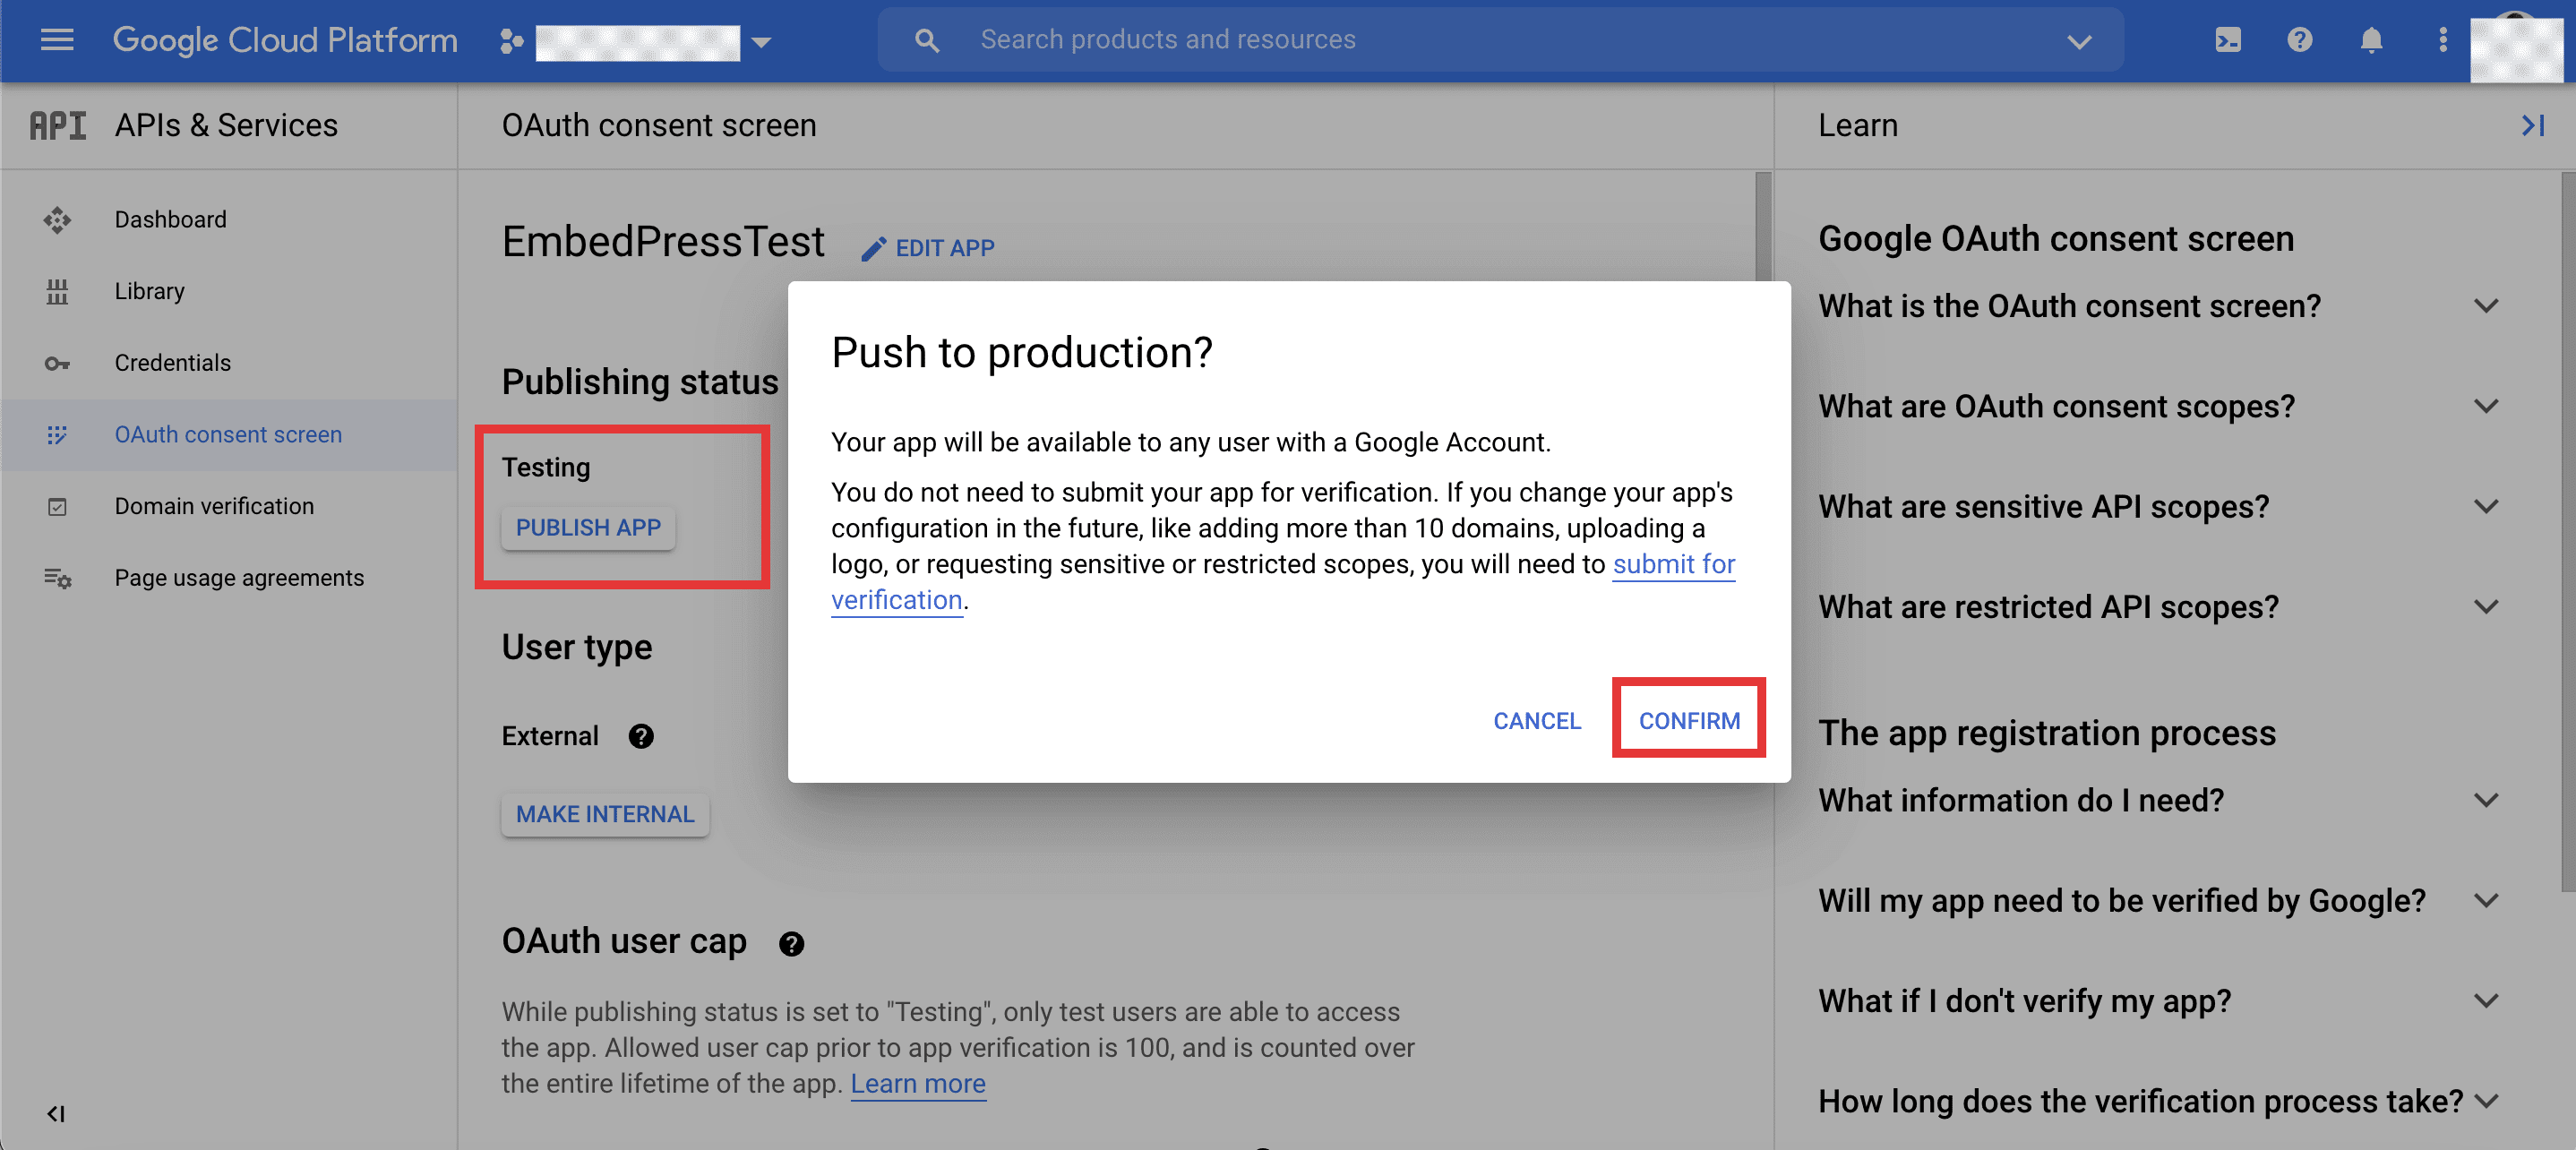
Once you have already provided all the needed information for your app, you will be redirected back to the ‘OAuth Consent Screen‘. Here, you will need to publish your created app by simply clicking on the ‘Publish App‘ button.
A popup screen appears, simply hit the ‘Confirm‘ button and you will be good to proceed to the next step.
Step 4: Enable The Google Calendar API
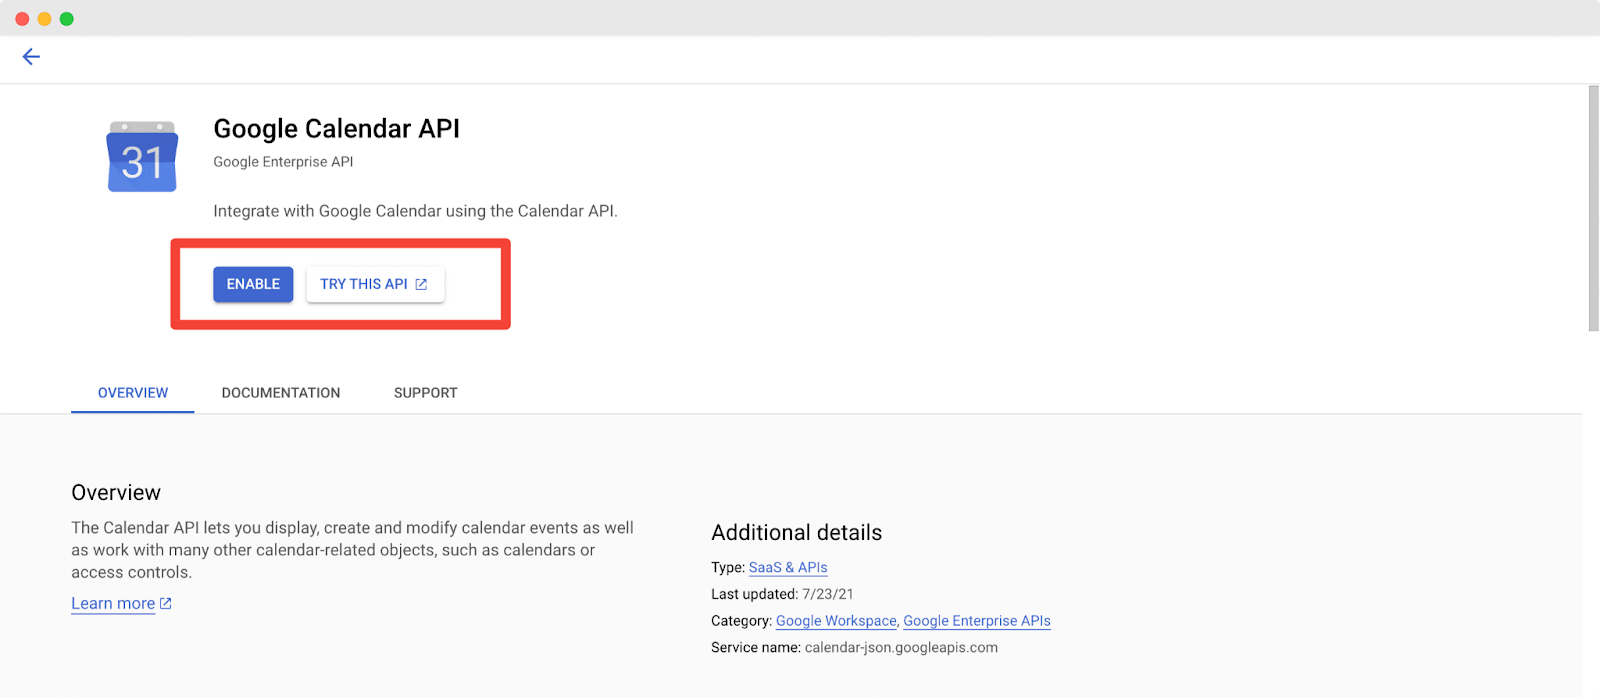
Now that your app has been published, it’s time to connect your Google Calendar’s API to the app through Google Cloud Console. Simply, navigate to the ‘Library’ tab from the left-hand side panel which will take you to the ‘API Library’. Here, search for ‘Google Calendar API’ and hit the ‘Enable’.
Step 4: Create OAuth ID & Set Authorized Redirect URL
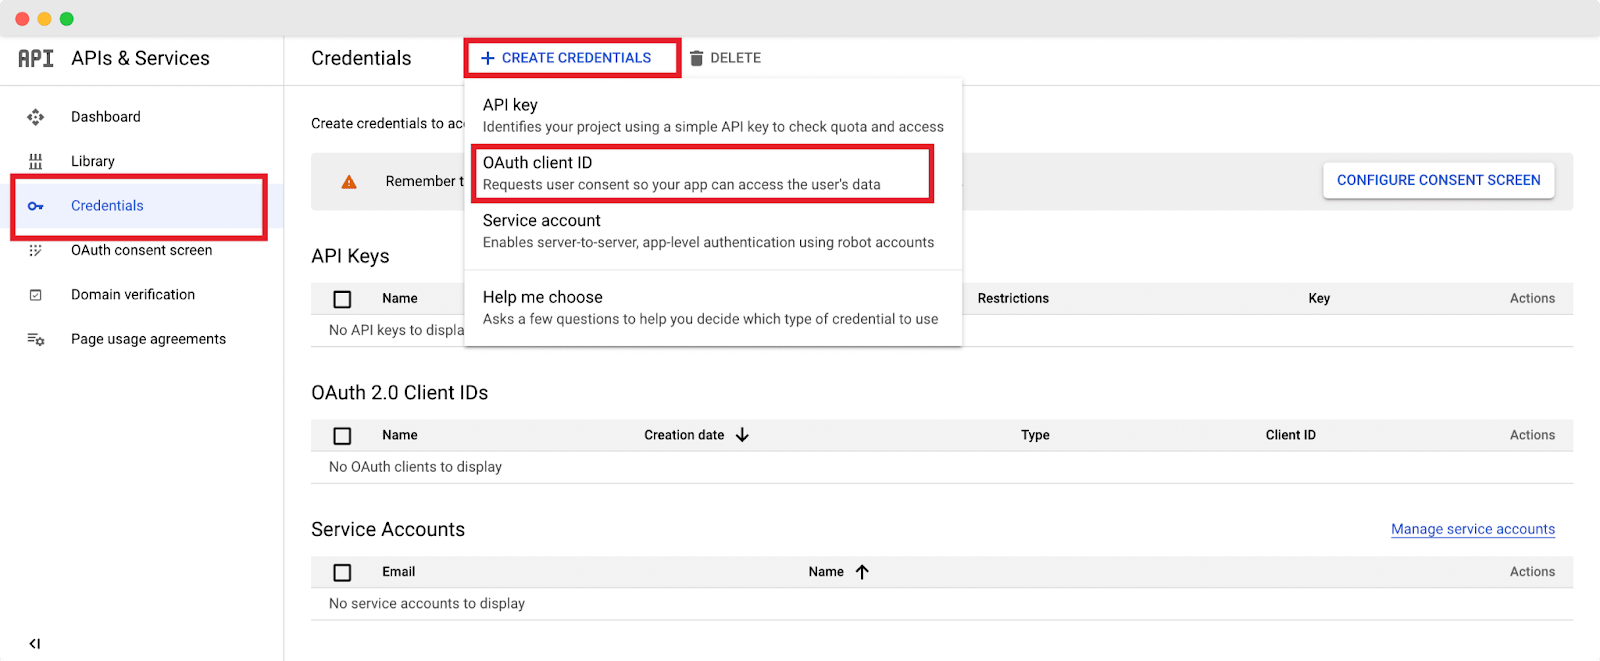
Then, navigate to the ‘Credentials’ tab → ‘Create Credentials’ → ‘Create OAuth ID’. Here, set the application type to ‘Web Application’.
Before you hit ‘Create’, you need to navigate to your EmbedPress plugin user interface from your WordPress website dashboard from a separate window or tab.
Click on the ‘Platforms’ tab and select the ‘Google Calendar’ option from the drop-down menu, as shown below. And copy the URL given to you under the Google Auth JSON section.
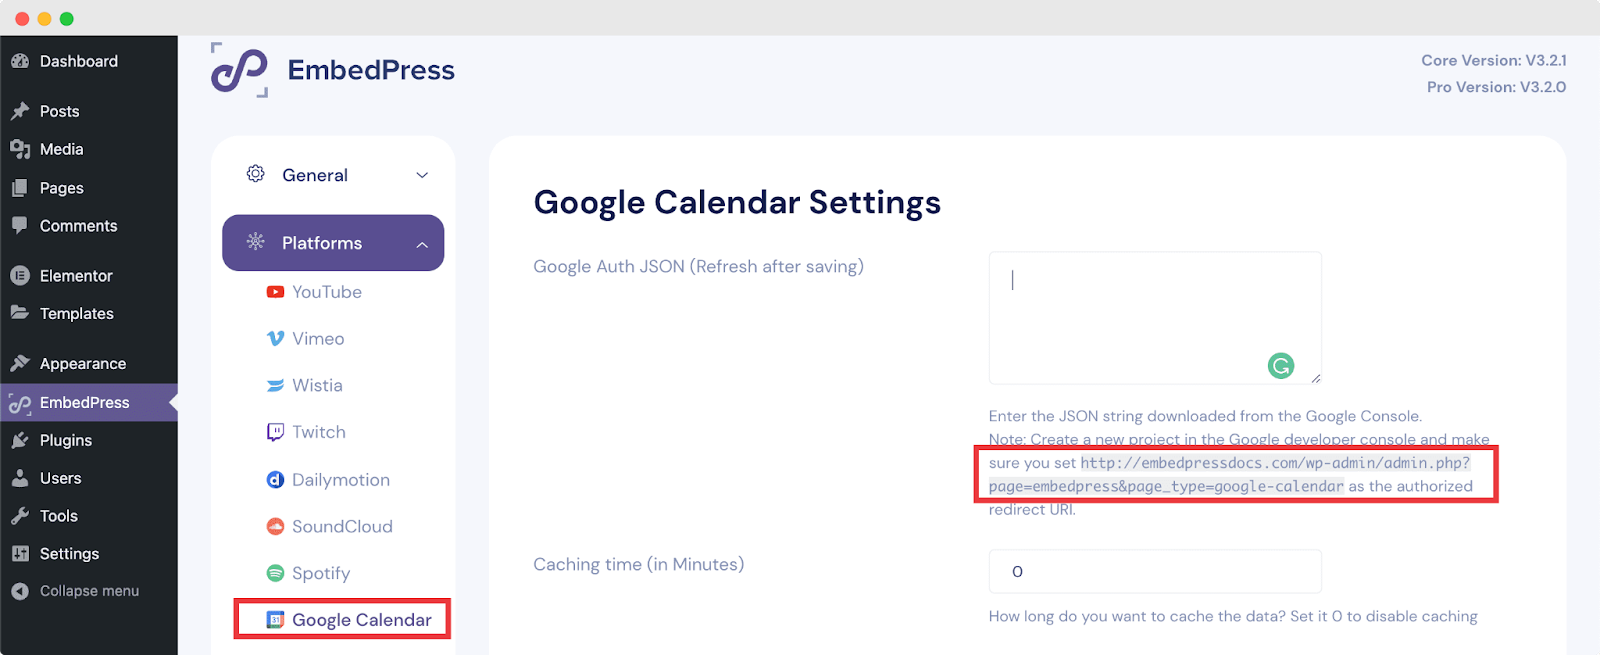
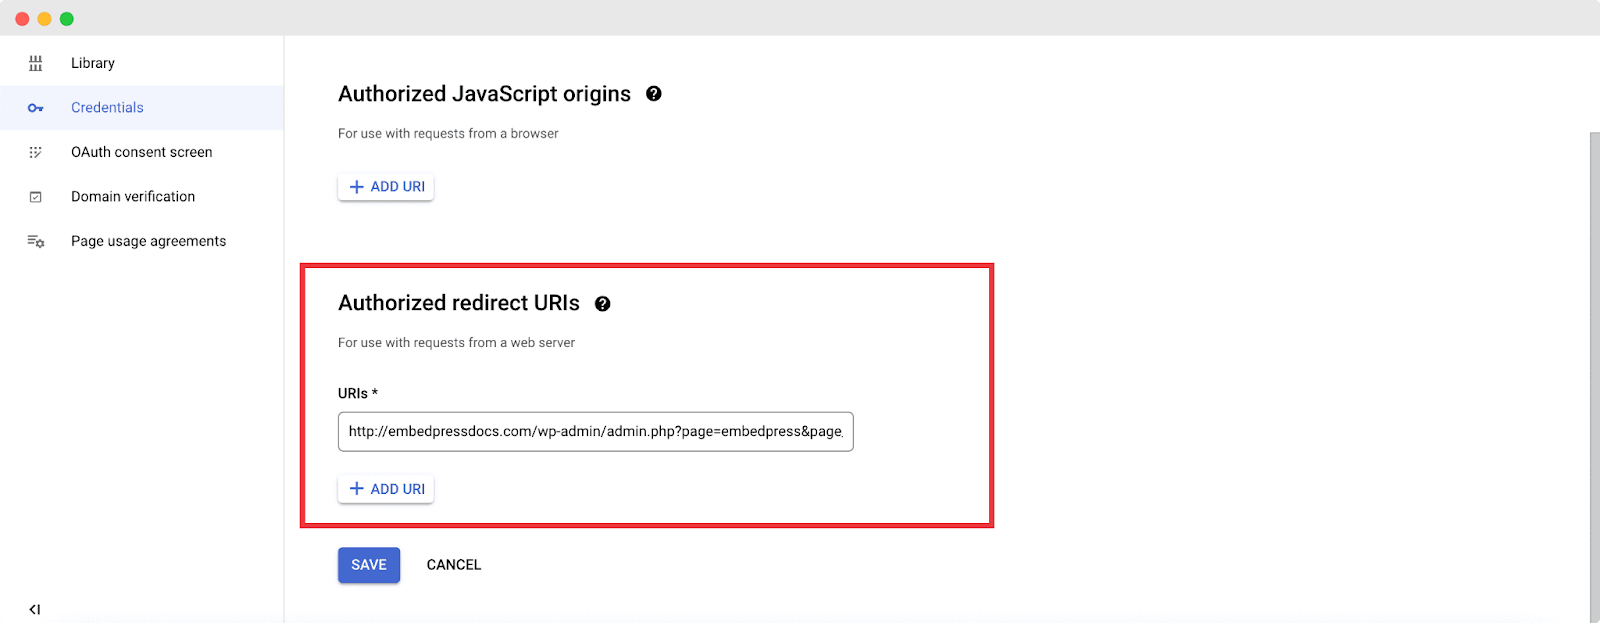
Then, head back to the Google Cloud Console ‘Client ID for Web Application’ page and paste the copied URL in the ‘Authorized redirect URLs’ field, and then hit ‘Create’.
Step 5: Paste The OAuth Client ID In EmbedPress
You will then be redirected back to the Credentials page. Download the .JSON file of your newly created OAuth Client ID, as shown below.
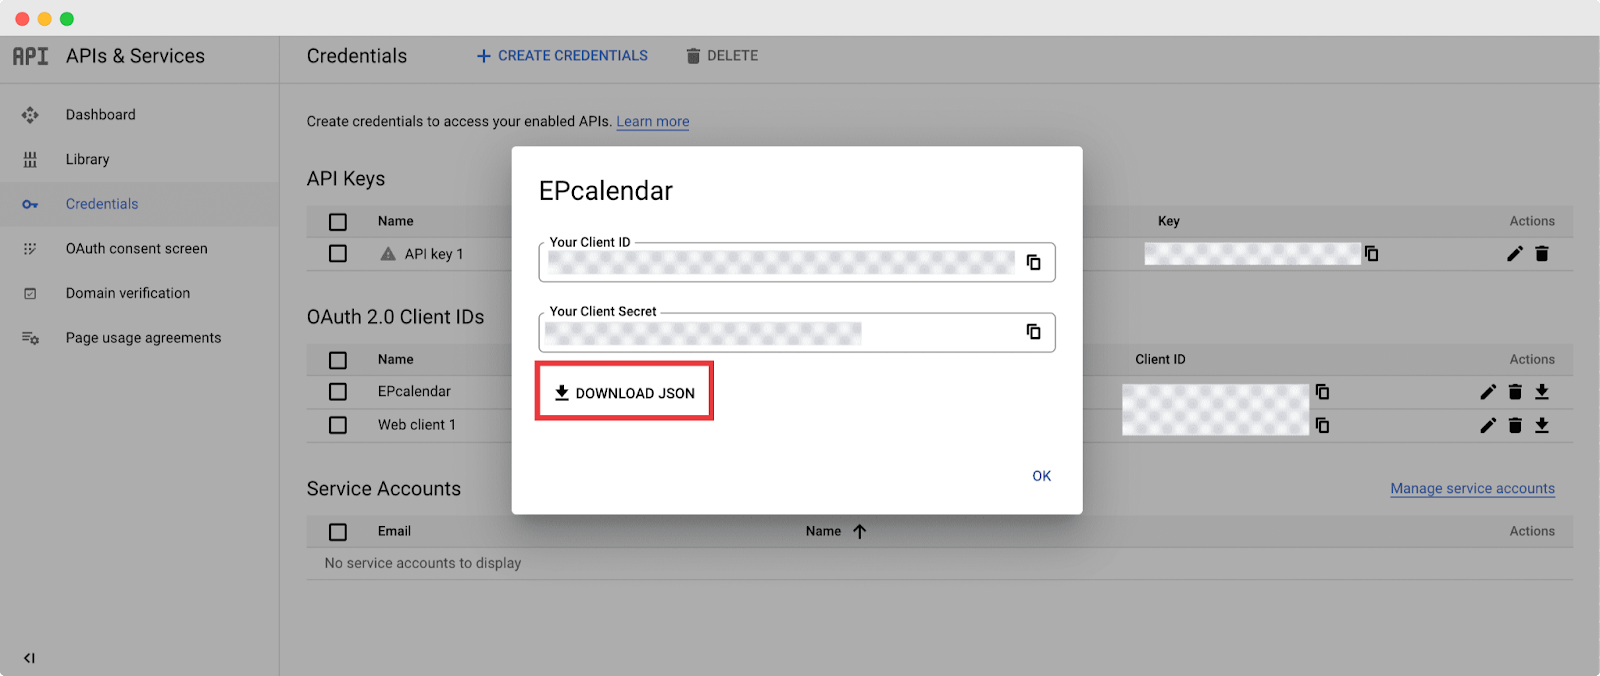
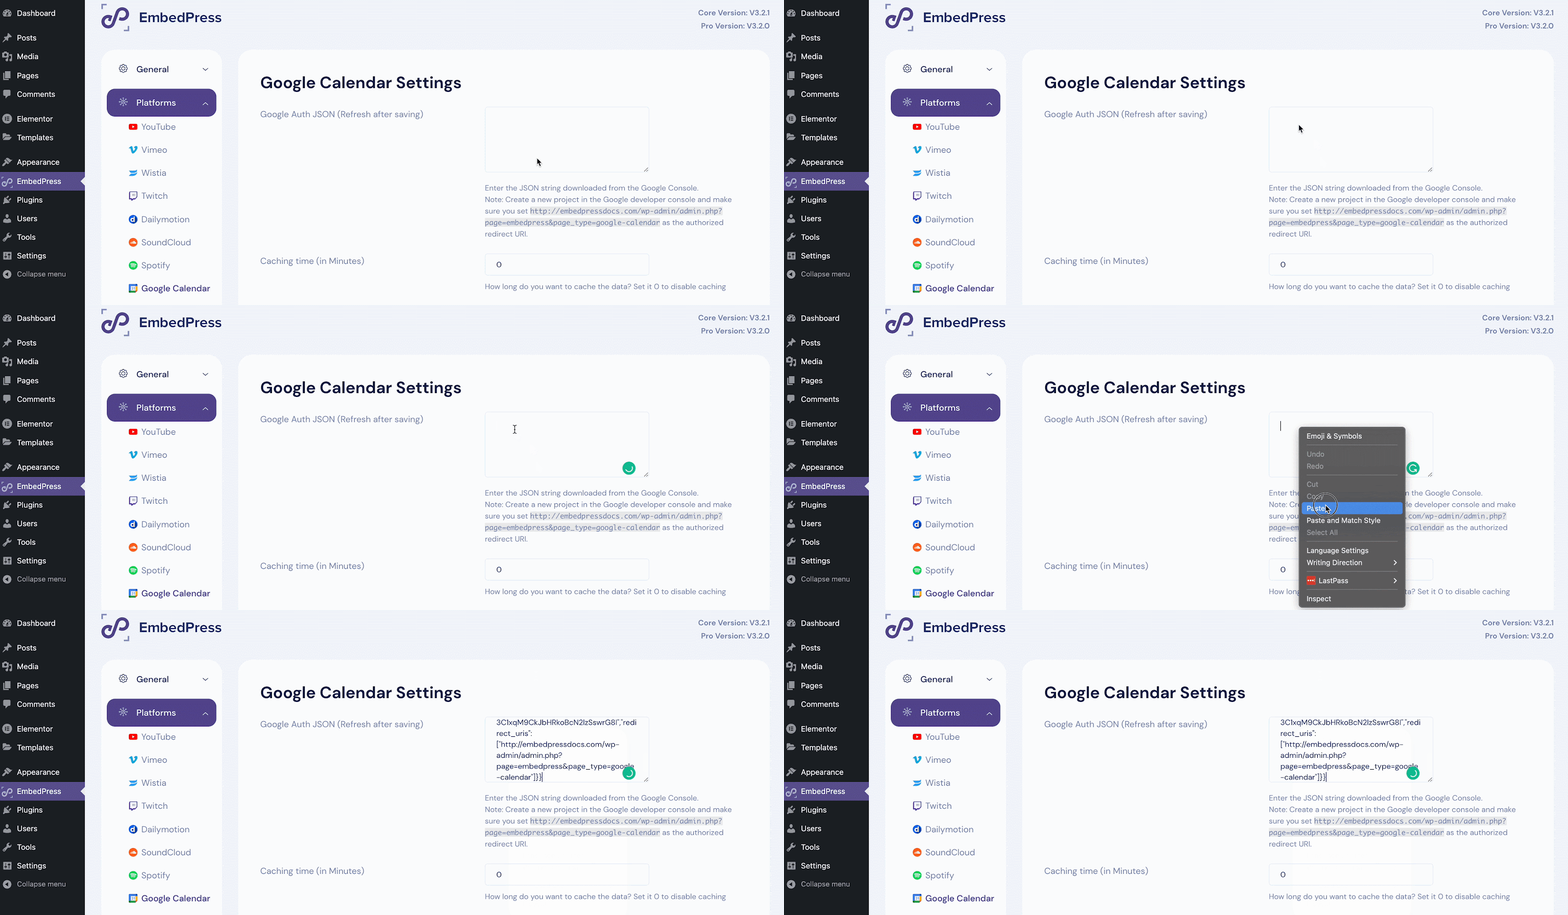
Open the .JSON file, and copy the Client ID and Client Secret as given on the file. Then, head back over to the EmbedPress Platforms Google Calendar interface and paste the copied ID in the input field given. Then hit ‘Save’ and refresh the page.
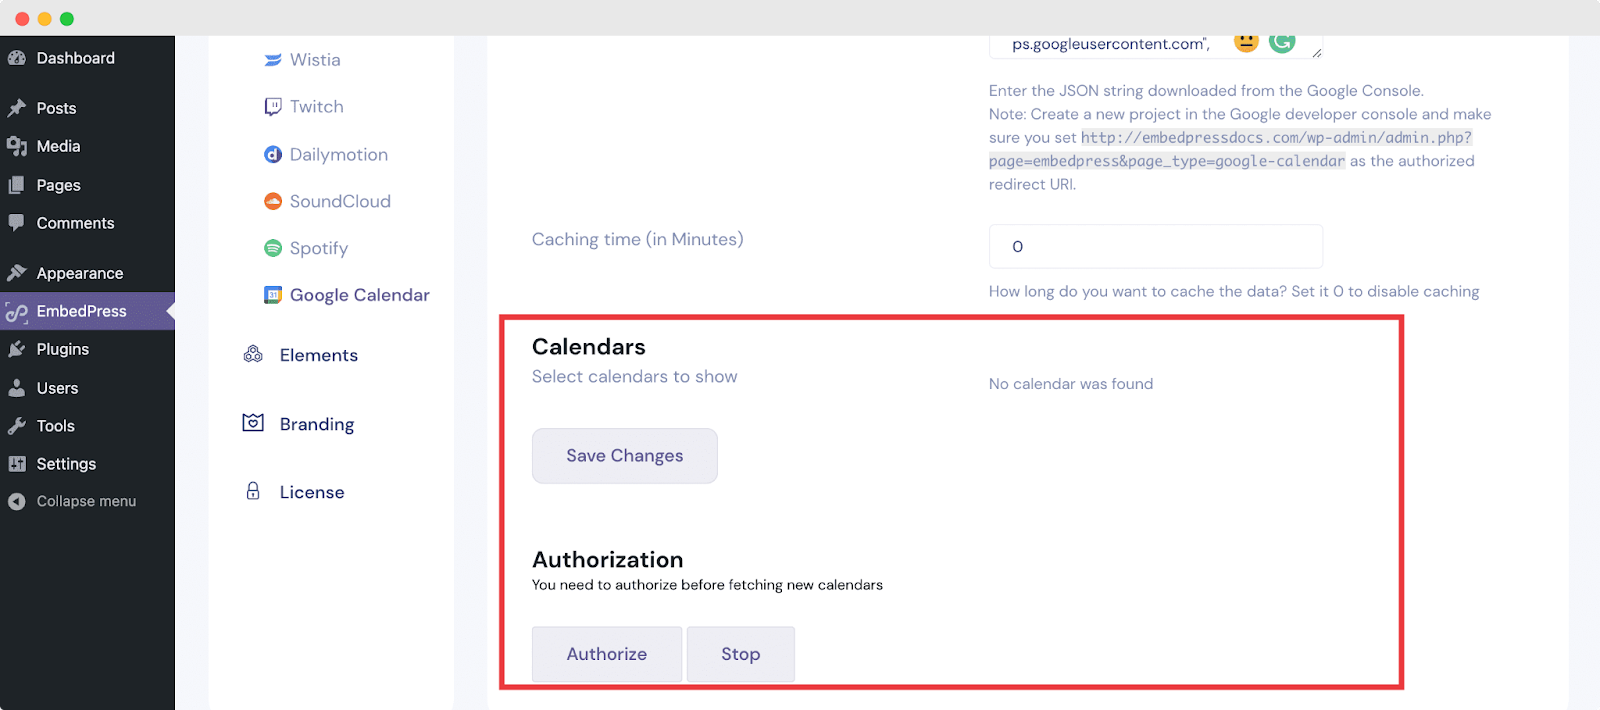
You will find a new section that will appear at the bottom of the page named ‘Authorization’ with a list of all your available private calendars. Select all or any of your private Google Calendar to embed on your WordPress website, and hit ‘Save Changes’.
And that’s it, you are all set to go and embed Google Calendars on your websites and be on top of your scheduling calendars with ease.
How To Embed Google Calendars In Gutenberg Editor?
After you have collected your Google Calendar URL or Client ID code, you are ready to embed the calendars onto your WordPress website. Follow these steps given below to embed Google Calendar in your WordPress website using the Gutenberg editor.
Step 1: Insert The Google Calendar Block
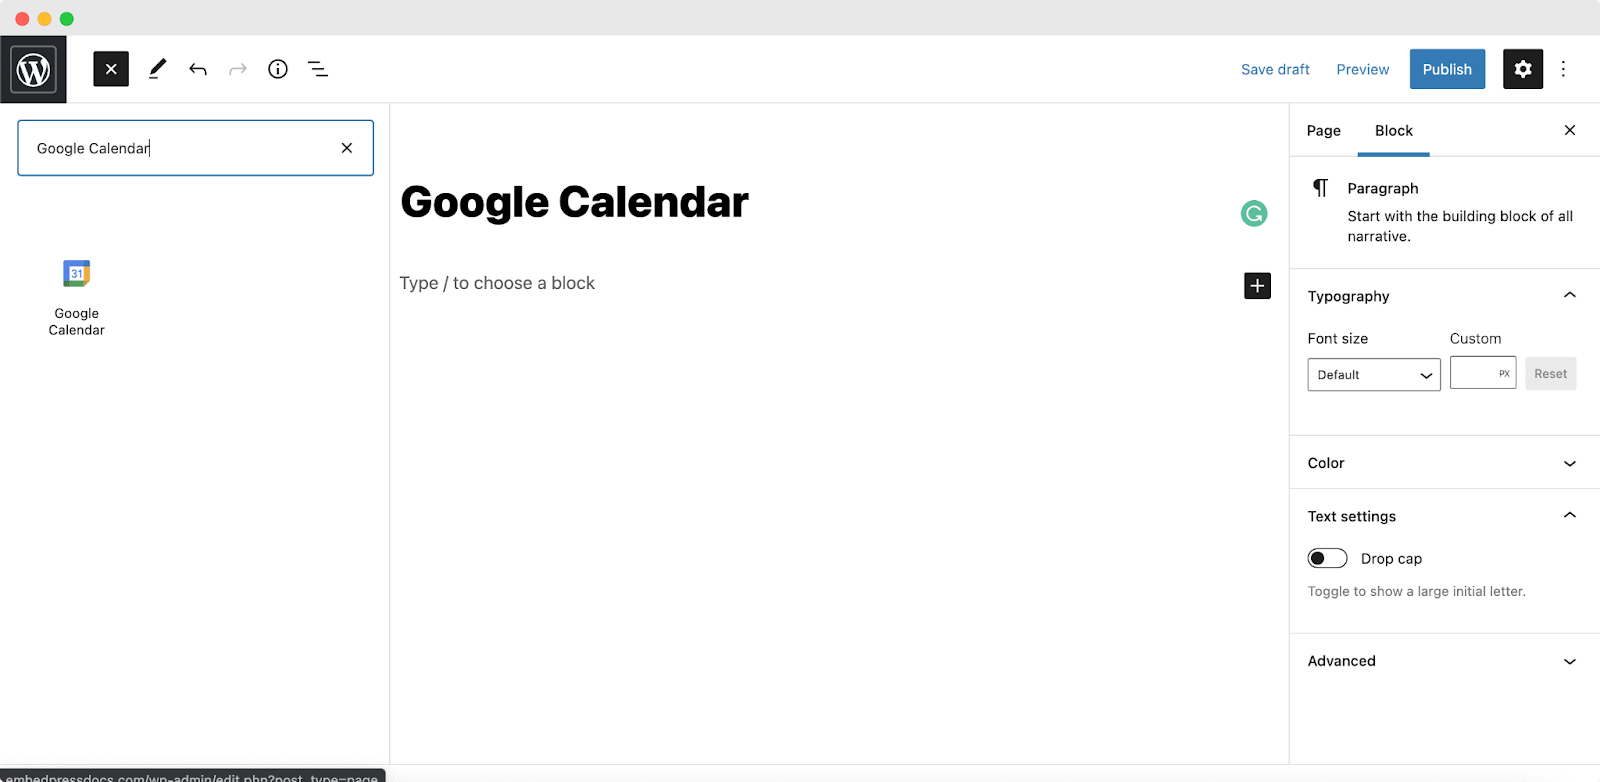
Create a new post or page from your WordPress dashboard and click on the ‘+’ icon on top of the web page or anywhere in your content area of the Gutenberg editor. Search for ‘Google Calendar’ or ‘EmbedPress’, and select the Google Calendar block, as shown below.
Step 2: Embed The Public Calendar URL
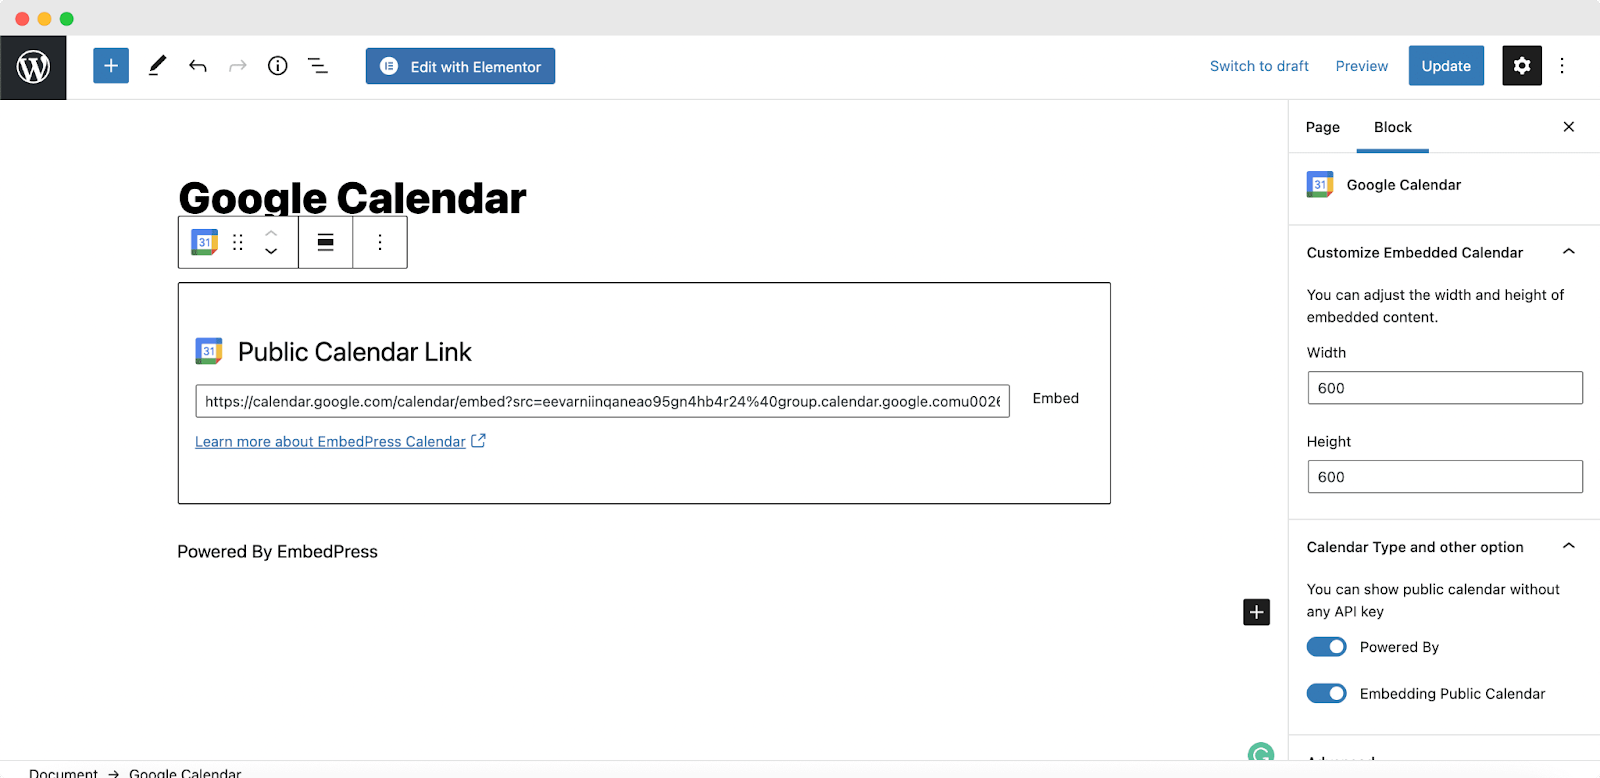
To embed your ‘Public’ Google Calendar, simply paste the public URL that you have copied earlier onto the input field of the block. And then, hit the ‘Embed’ button.
A completely responsive and customizable version of your public ‘Google Calendar’ will be embedded into your website instantly.
Step 3: Select Your Private Google Calendar
If you want to embed your private Google Calendar in your website, simply toggle to disable the ‘Embedding Public Calendar’ from the right-hand side Block customizer panel as shown below.
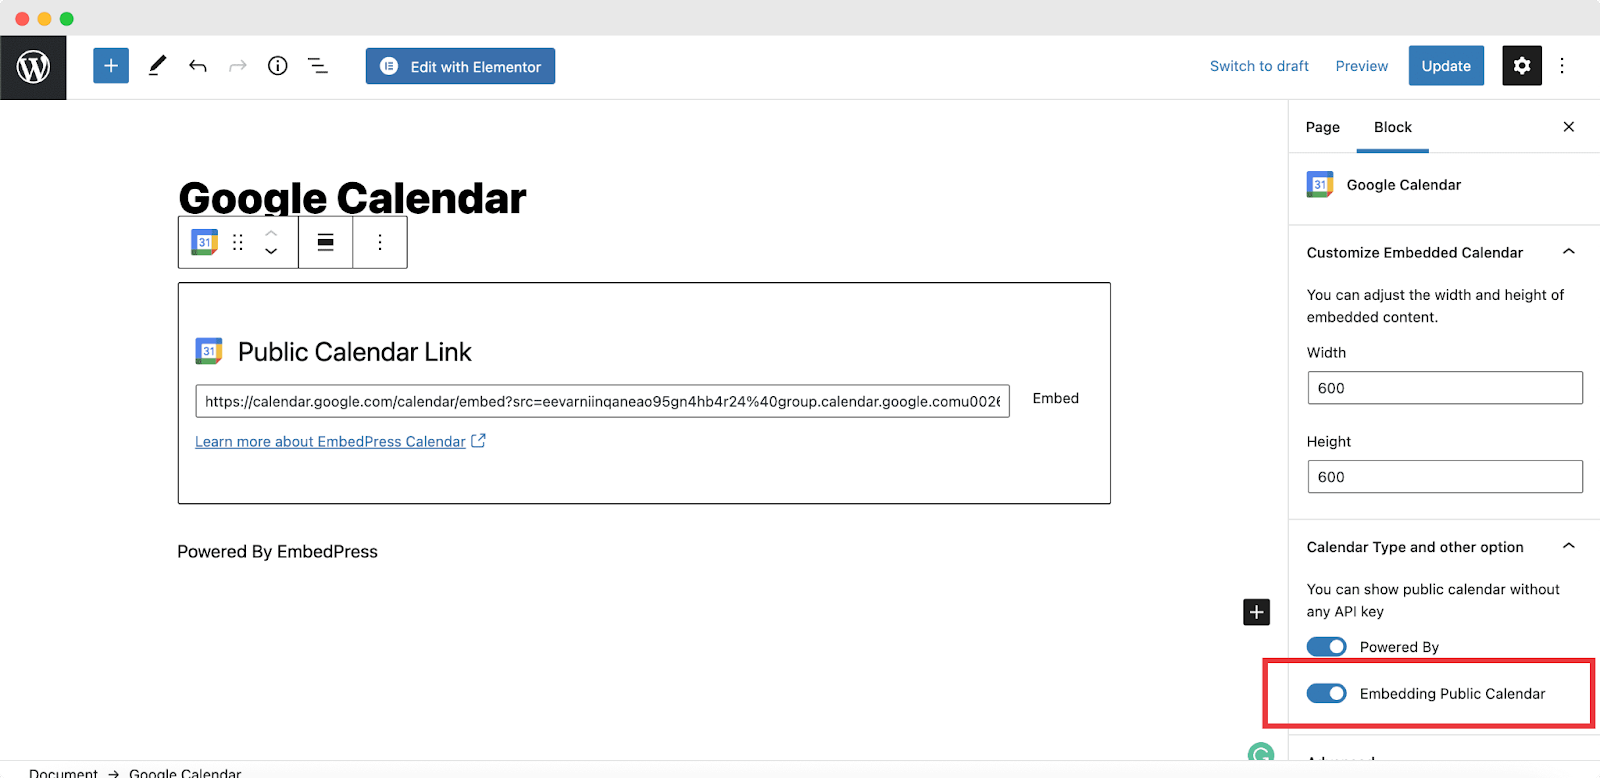
Note: The Private Google Calendar will only be displayed on the frontend of your website once you ‘Publish’ it.
Step 4: Edit & Publish Your Google Calendar
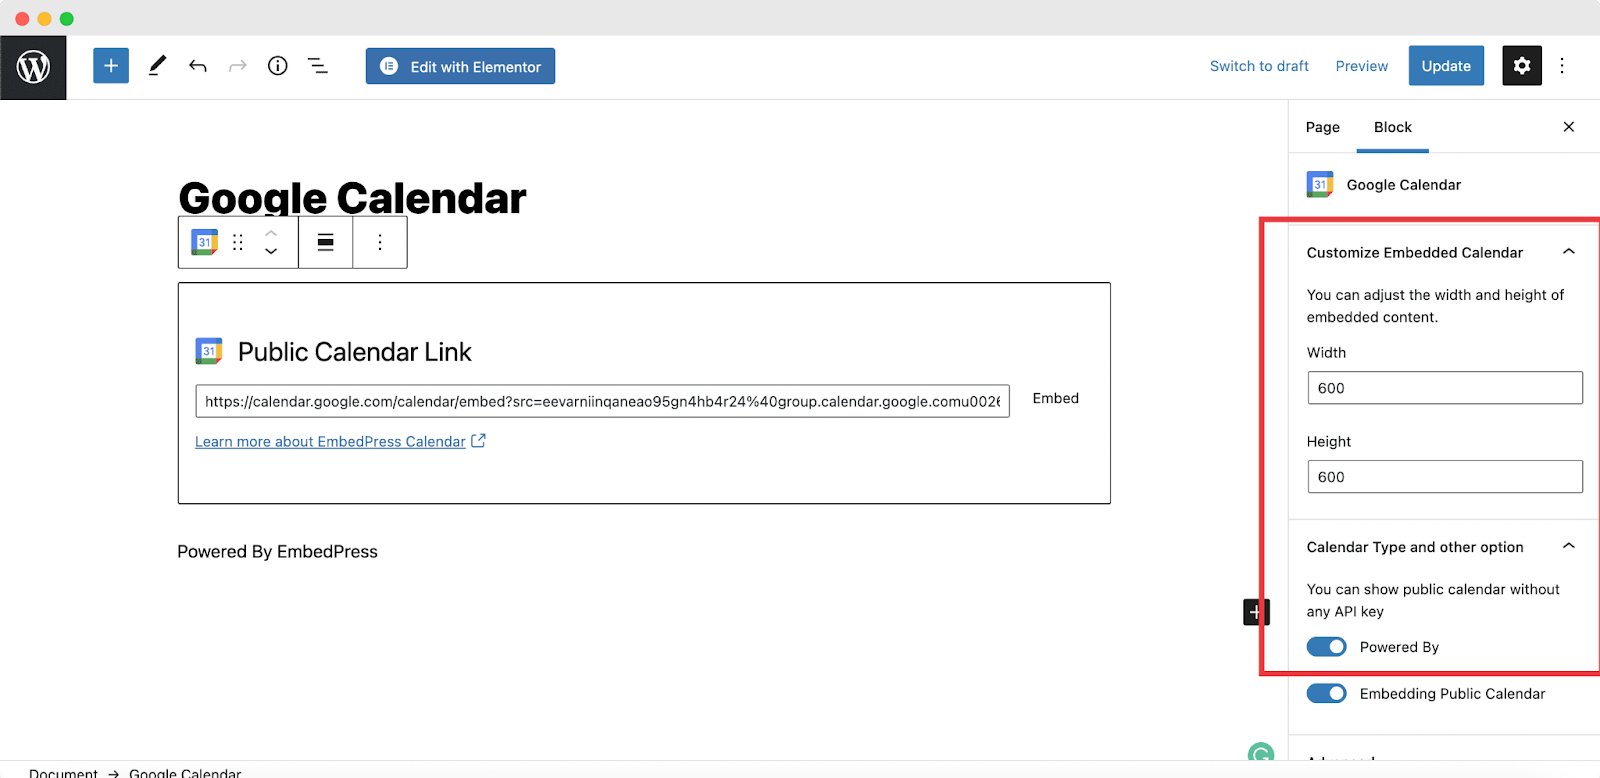
You can then add some customization and choose how you want to showcase your embedded Google Calendar on your site. You can adjust the width and height of your calendar from the options under the Block tab on your right-hand side. You can also toggle to hide the ‘Powered By EmbedPress’ text if you want.
When you are done, publish and preview your WordPress content, and a fully responsive Google Calendar will be available for your website visitors to view.
How To Embed Google Calendar In Elementor Editor?
You can also use EmbedPress with Elementor to embed Google Calendars in your WordPress website by following the detailed steps below.
Step 1: Insert The EmbedPress Google Calendar Widget
First, create a new page from your WordPress dashboard by navigating to Pages→ Add New and then clicking on the blue ‘Edit With Elementor’ button.
Then search for the ‘EmbedPress Google Calendar’ widget from under the ‘Elements’ tab in the editor’s side panel. Next, drag and drop this element anywhere on your page where you want to embed your Google Calendar.
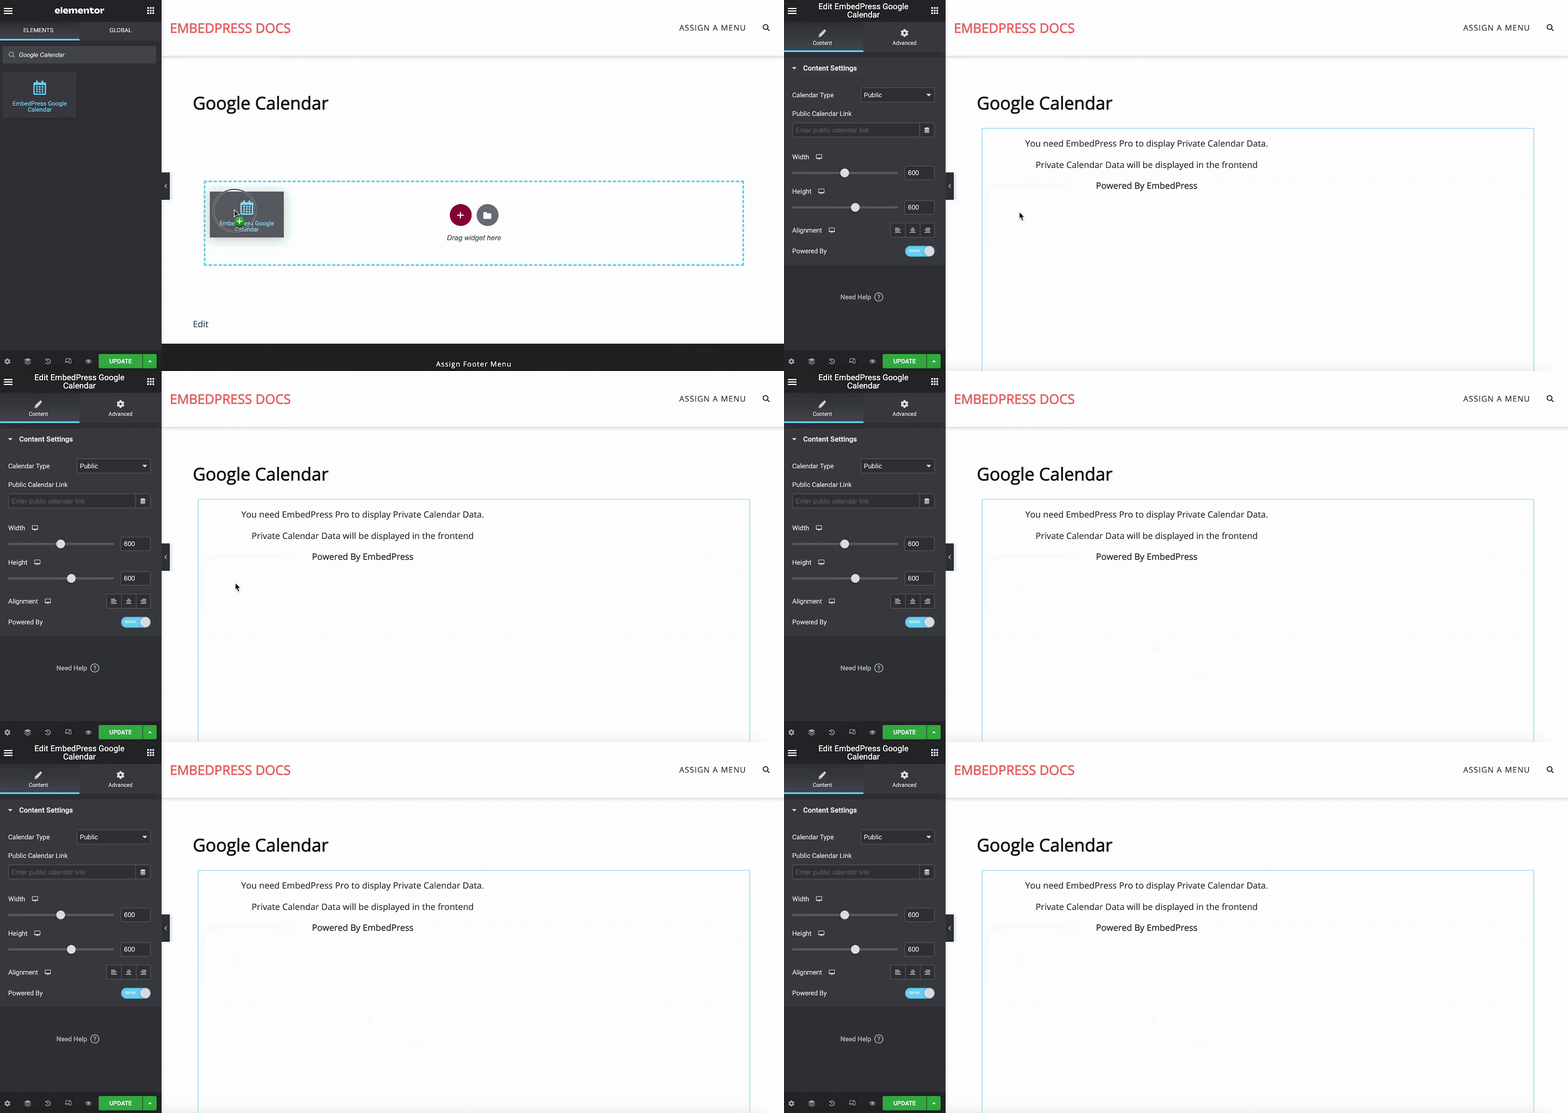
Step 2: Embed Your Public Google Calendar
From the ‘Content’ tab on the side panel, you can choose the type of Google Calendar from under the ‘Content Settings’, and set it to ‘Public’.
Then, paste the copied public Google Calendar URL. EmbedPress will automatically embed the calendar into your website.
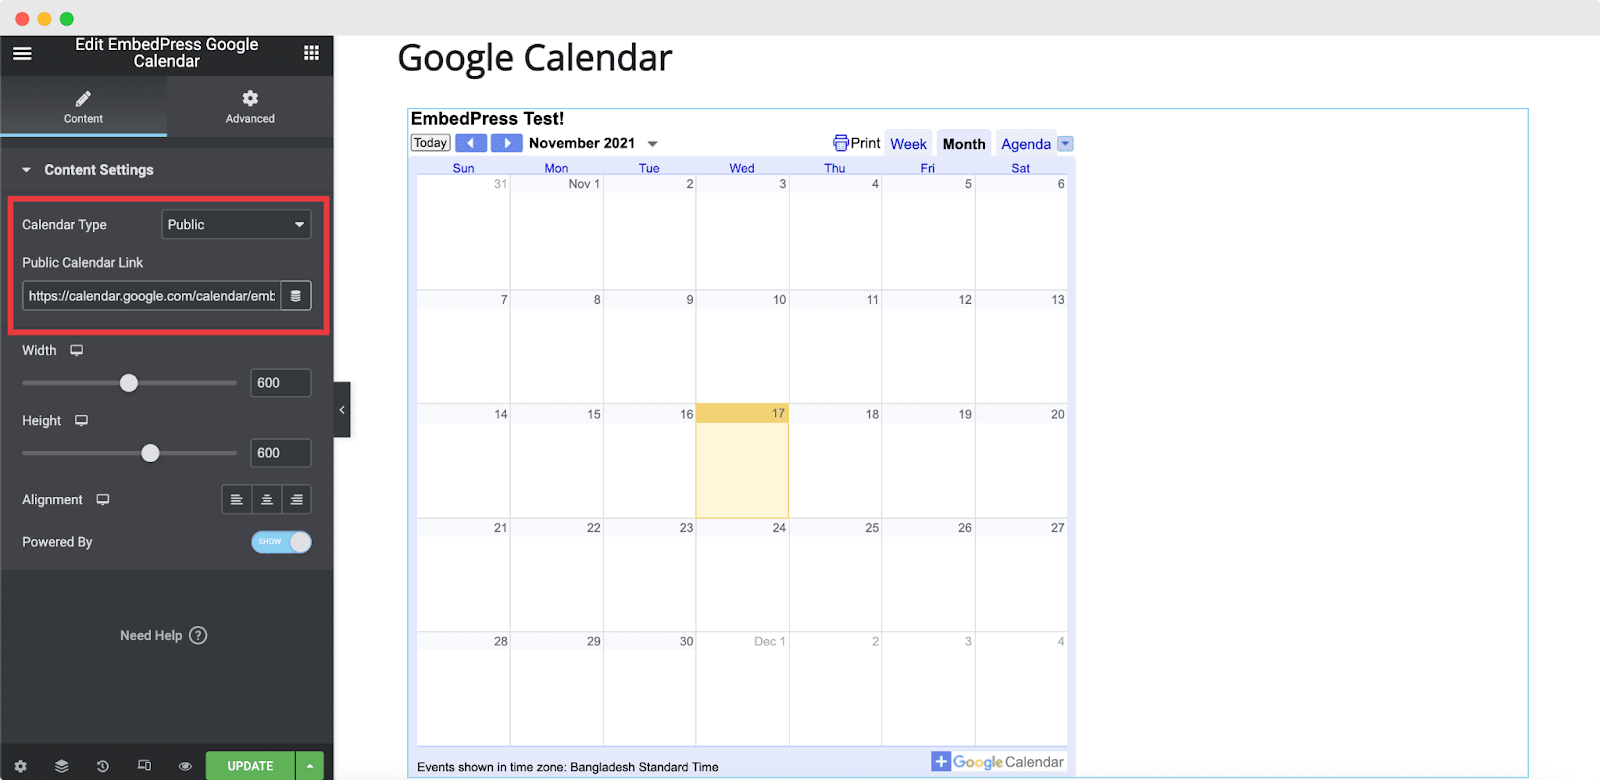
Step 3: Embed Your Private Google Calendar
Similarly, simply set the Google Calendar type to ‘Private’, and EmbedPress will automatically embed the calendar into your website.
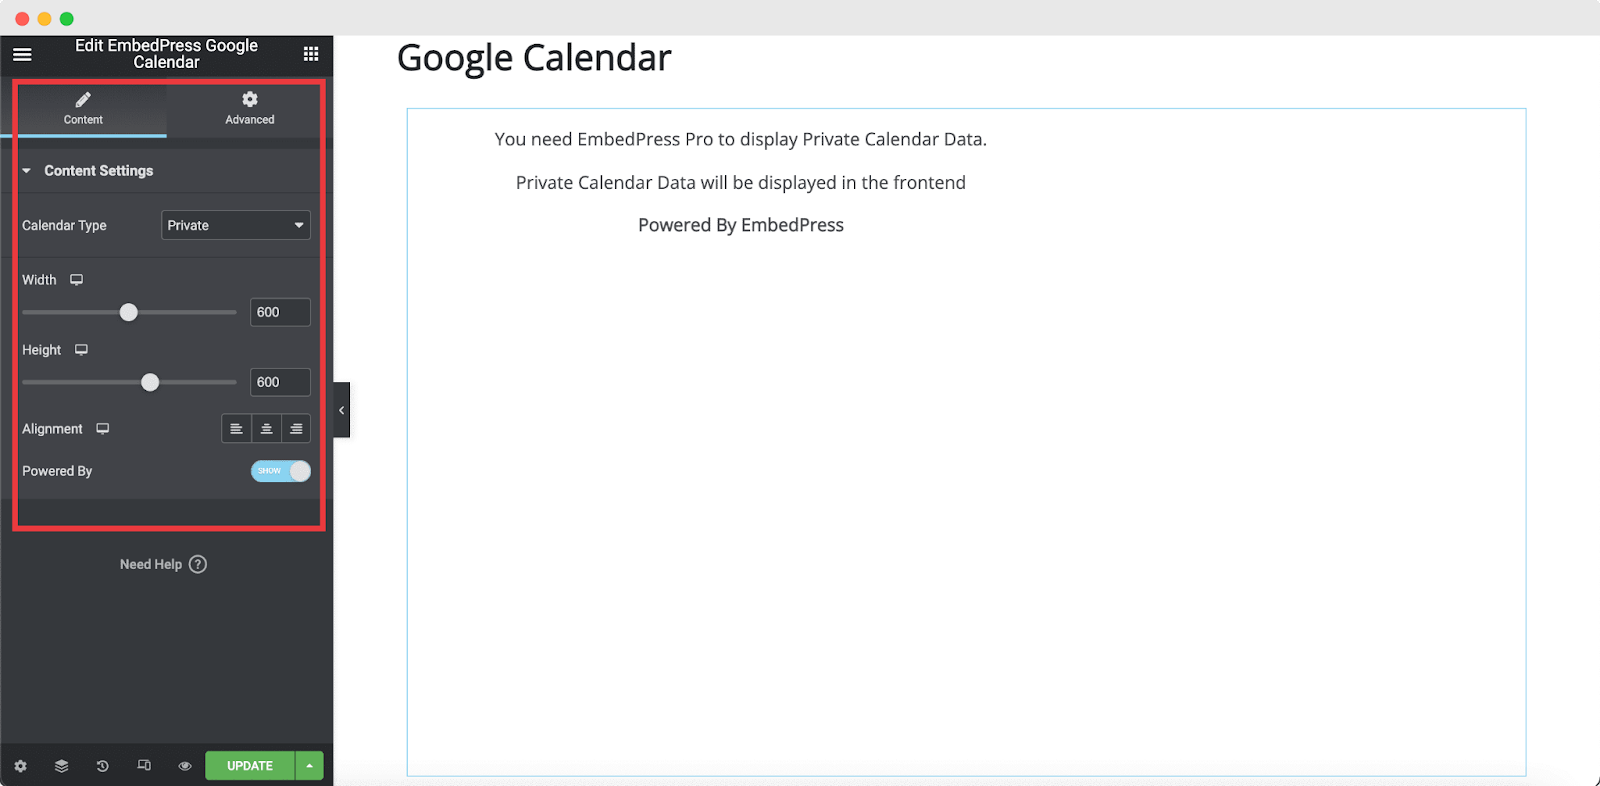
Note: The Private Google Calendar will only be displayed on the frontend of your website once you ‘Publish’ it.
Step 4: Edit & Publish Your Google Calendar
You can adjust the width and height of your Google Calendar, and even choose the alignment from the Elementor Editor. You can also toggle to hide or show the ‘Powered By EmbedPress’ text.
When you are done, click on ‘Publish’ and preview to see how a fully responsive and functional Google Calendar has been embedded by EmbedPress.

What The Final Outlook Of The Google Calendar Will Be Like?
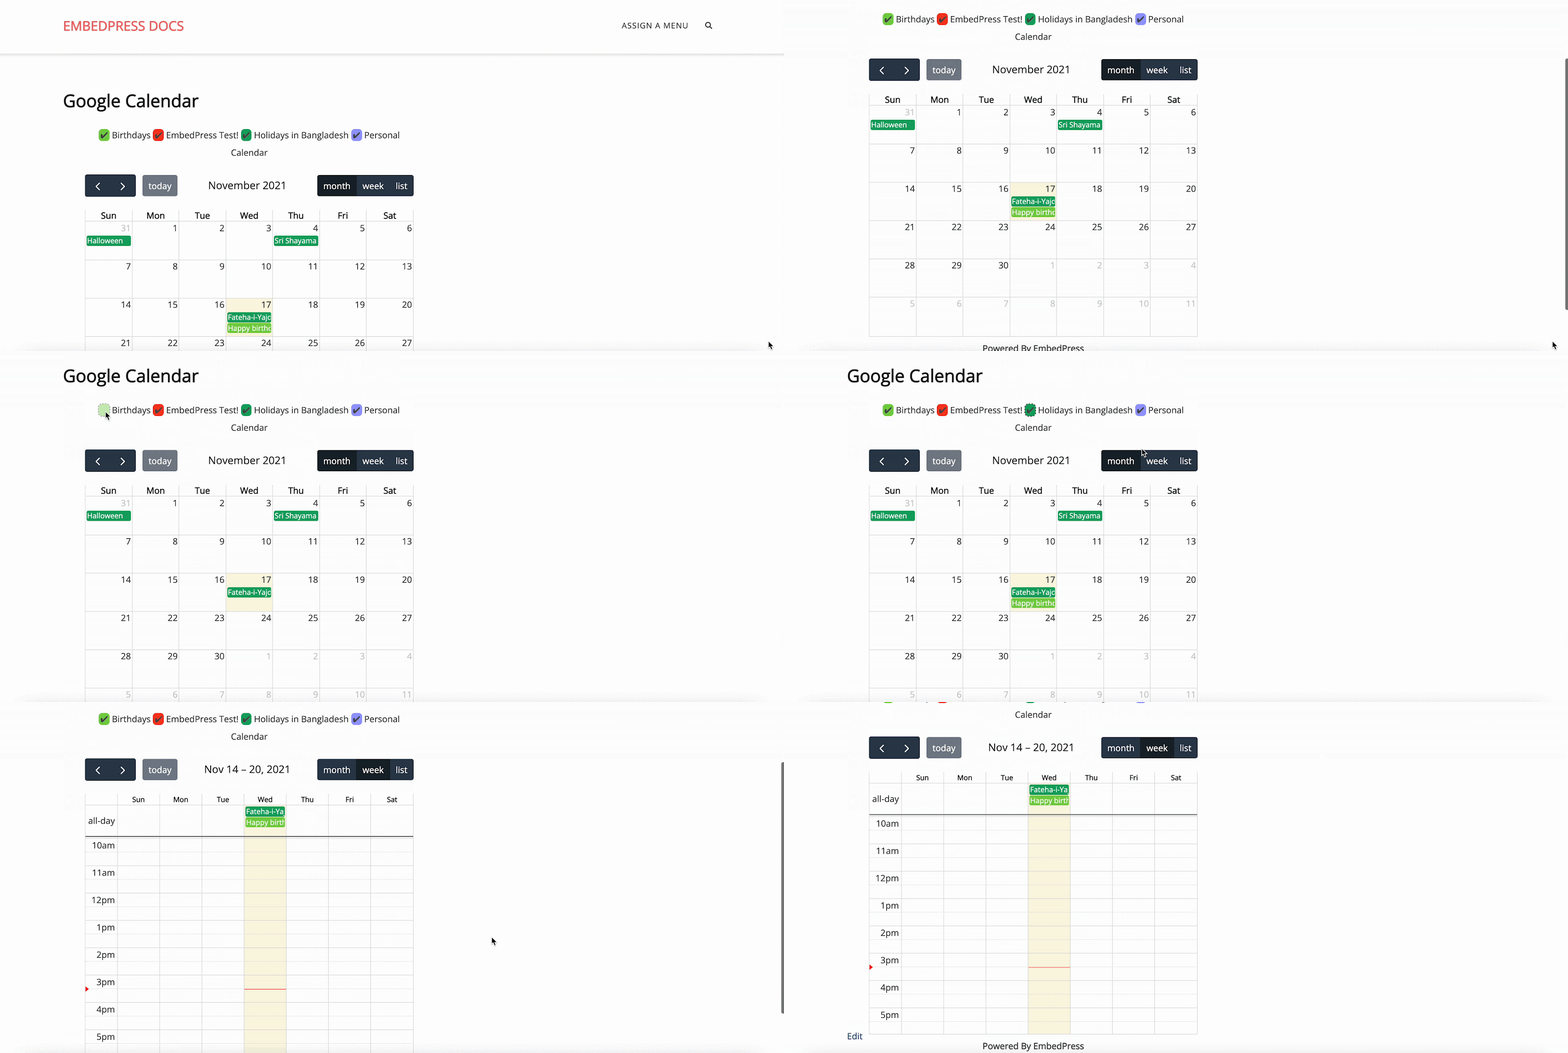
Once you have followed all the steps mentioned above, this is how the fully responsive ‘Public Google Calendar’ will look when published on your WordPress website.
On the other hand, this is how the ‘Private Google Calendar’ will be embedded on your website. You will be able to see a list of the chosen calendars and the colors that represent them.
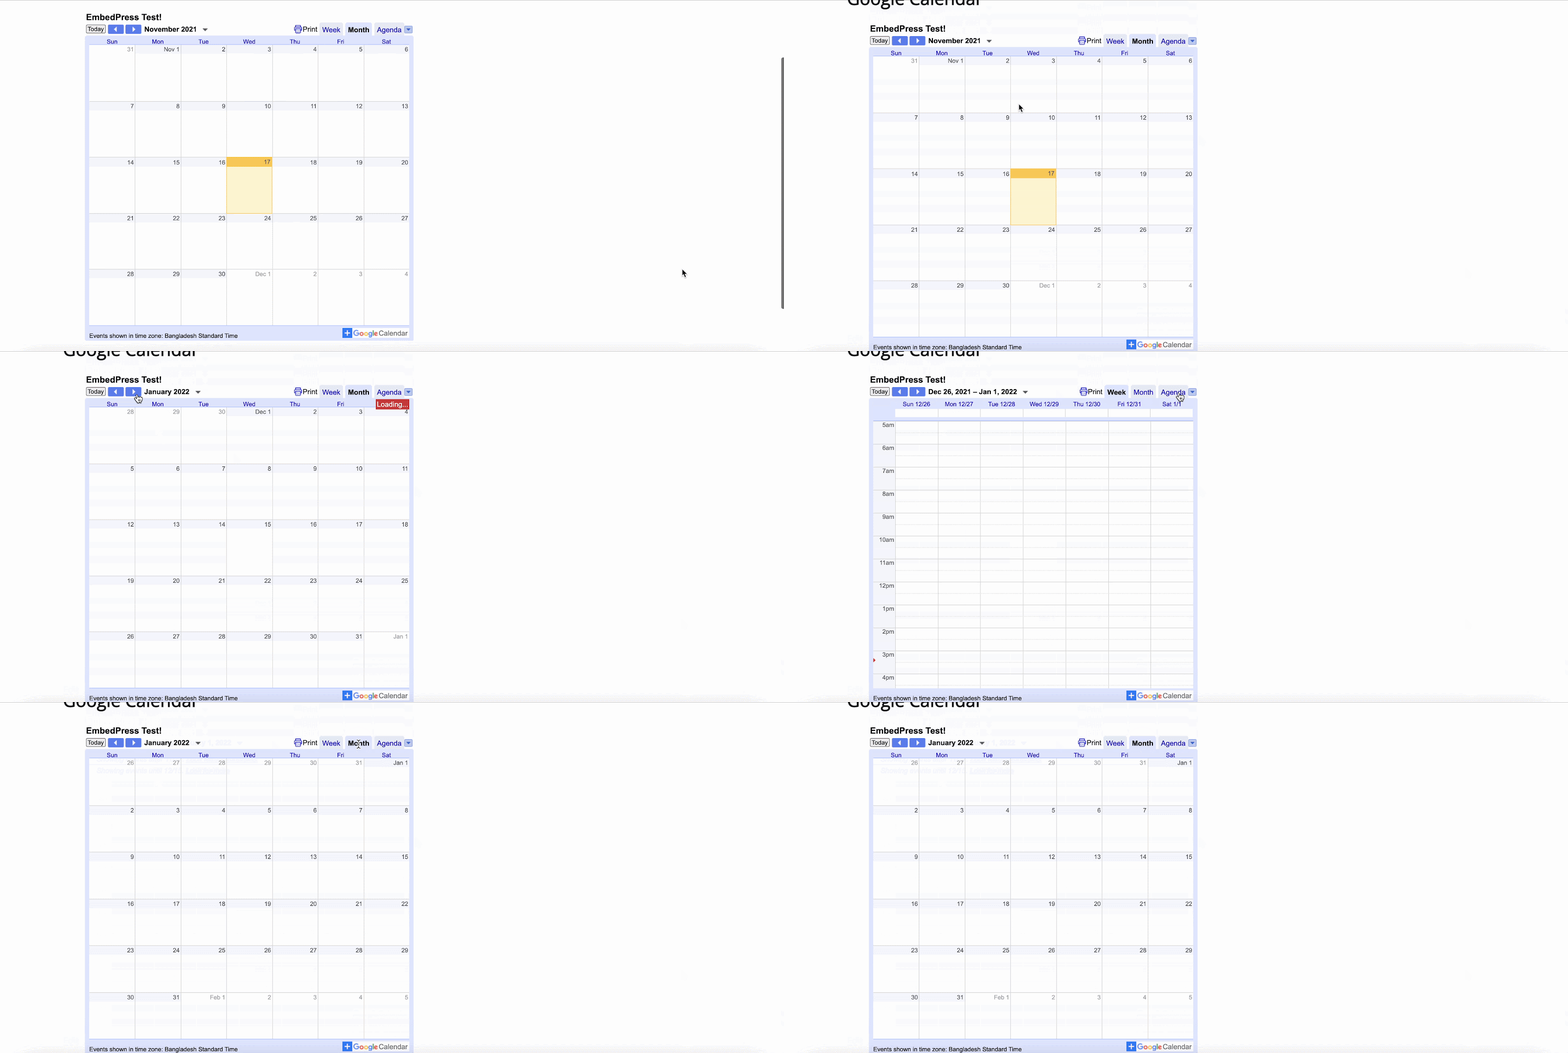
And this is how easily you can collect URLs or integrate Google API to embed a stunning Google Calendar onto your WordPress website with ease.
Other Google Applications That You Can Embed Using EmbedPress
As mentioned earlier, you can embed almost all of Google Drive’s engaging and highly informative content on your website using the ultimate embedding solution for WordPress.

Try out EmbedPress’ amazing new feature today and let us know of your experience embedding the calendars; we would love to know. Feel free to contact our support at any time if you face any problem or need any type of assistance regarding EmbedPress.
To learn about other new updates, latest features, and attention-grabbing news, subscribe to our blog. Or, you can also become a part of our friendly Facebook Community to get in touch with WordPress experts and content creators like yourself and get your storytelling to the next level.


