In today’s world, captivating your audience is more crucial than ever. The saying “a picture is worth a thousand words” has evolved into something even more powerful: dynamic, interactive presentations!
Imagine having the ability to seamlessly integrate your Google Slides presentations into your WordPress website to give your content a boost. Well, in today’s blog, we are going to talk about how to embed Google Slides in WordPress with Gutenberg and Elementor using the EmbedPress plugin.

Whether you are using the Gutenberg or Elementor page editor, we will walk you through how to embed Google slides into a web page; all made wonderfully simple with the EmbedPress plugin. Let us get started right away.
15 Reasons Why You Should Embed Google Slides In WordPress: The Benefits
Embedding the Google Slides presentation in your WordPress website using the EmbedPress plugin with Elementor and Gutenberg is a fantastic idea. Here are 15 practical reasons why it is a must-do:
🎯 Engage Your Audience: Google Slides are visually appealing and interactive. They keep your visitors engaged, which is the name of the game.
🎯 Showcase Your Expertise: If you embed detailed and informative slides onto your site, you can share your knowledge or ideas with a slick presentation that proves you are an authority in your field.
🎯 Easy Peasy Embedding: With EmbedPress, adding Google Slides to your site is like a walk in the park – no tech mastery required.
🎯 Content Variety: If you know how to embed Google Slides in WordPress, you can diversify your content. Instead of just text, offer your audience dynamic presentations.
🎯 Visual Storytelling: Use visuals and graphics to tell your story effectively. Google Slides do the heavy lifting for you.
🎯 Simplicity Wins: Whether you are a Gutenberg or Elementor fan, EmbedPress seamlessly integrates with both, simplifying your life.
🎯 Versatility: Google Slides works for all sorts of content – from educational presentations to product demos and more.
🎯 Mobile-Friendly: Your slides will look just as good on smartphones and tablets, catering to your mobile audience.
🎯 Dynamic Updates: Update your Google Slides, and they automatically update on your website – no need to tinker with HTML.
🎯 Boost SEO: Google Slides are Google’s own, so they play nicely with search engines, potentially boosting your site’s visibility.
🎯 Interaction is Key: Include clickable links, buttons, and multimedia within your slides to keep visitors exploring your site.
🎯 Time Saver: Why reinvent the wheel? Use existing Google Slides presentations to enrich your content quickly.
🎯 Universal Compatibility: Google Slides can be viewed by anyone with an internet connection, regardless of their device or software.
🎯 Real-Time Collaboration: Collaborate with others on your slides in real time, harnessing the power of teamwork.
🎯 Cost-Effective: It is budget-friendly! Google Slides are free, and you can embed them without extra costs.
So there you have it! Embedding Google Slides with EmbedPress in Elementor or Gutenberg is a win-win for both you and your website visitors. It is easy, engaging, and adds an extra layer of professionalism to your online presence. Go ahead and give it a shot.
How To Embed Google Slides In WordPress with Gutenberg Using EmbedPress Plugin
Do you use the Gutenberg plugin as your go-to editor? If yes, here is a step-by-step guide on how to embed Google Slides in WordPress with Gutenberg using the EmbedPress plugin:
Step 1: Install And Activate EmbedPress Plugin
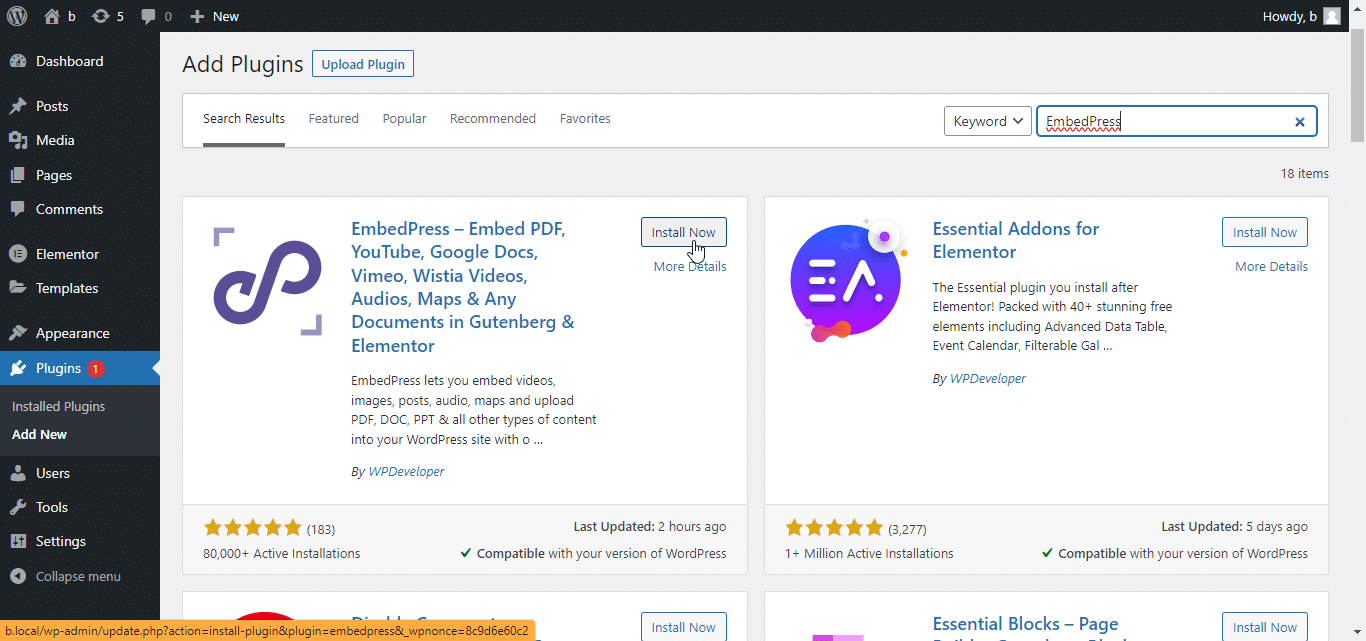
First, make sure that you have the EmbedPress plugin installed and activated on your WordPress website. If you haven’t installed or activated the plugin already, go to your WordPress dashboard and follow the steps given below:
- Click on “Plugins” in the left sidebar.
- Select “Add New.”
- Search for “EmbedPress.”
- Install and activate the plugin.
Step 2: Create Or Edit A Post/Page With Gutenberg And Add The ‘EmbedPress’ Block
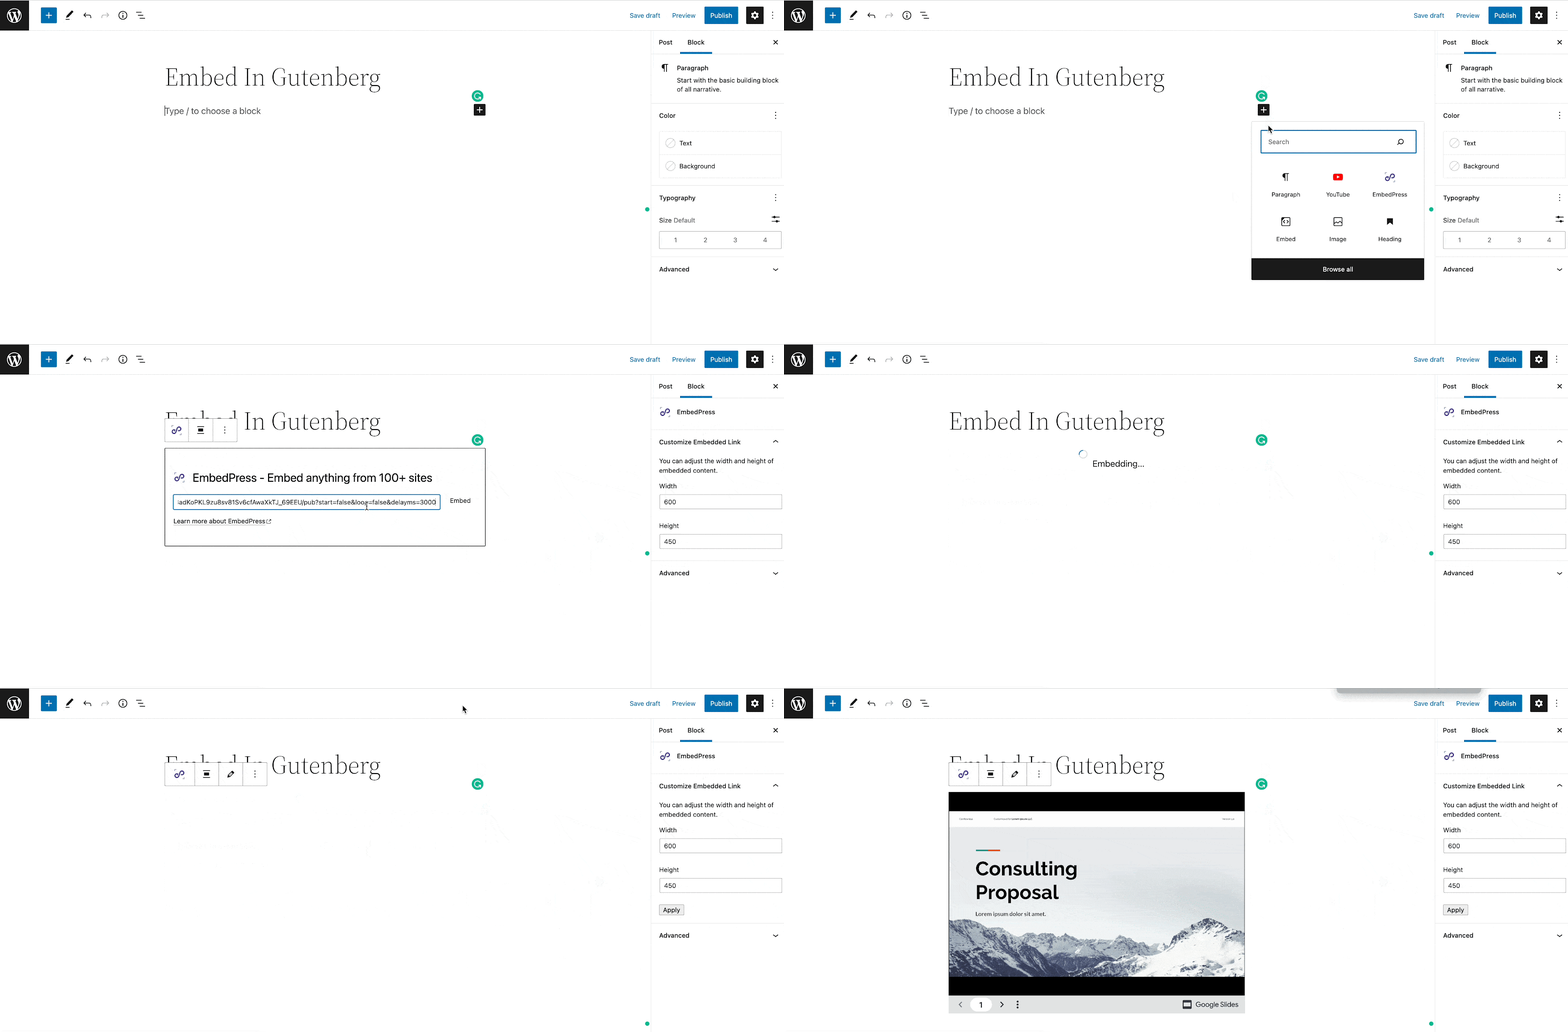
Now, either create a new post/page or edit an existing one using the Gutenberg block editor. Then, click the (+) button to add a new block where you want to embed your Google Slides presentation.
In the block search bar, type “EmbedPress” and select it from the list of blocks that appear. Once you have added the EmbedPress block, you will see a space to paste your Google Slides URL.
Step 3: Get Your Google Slides URL
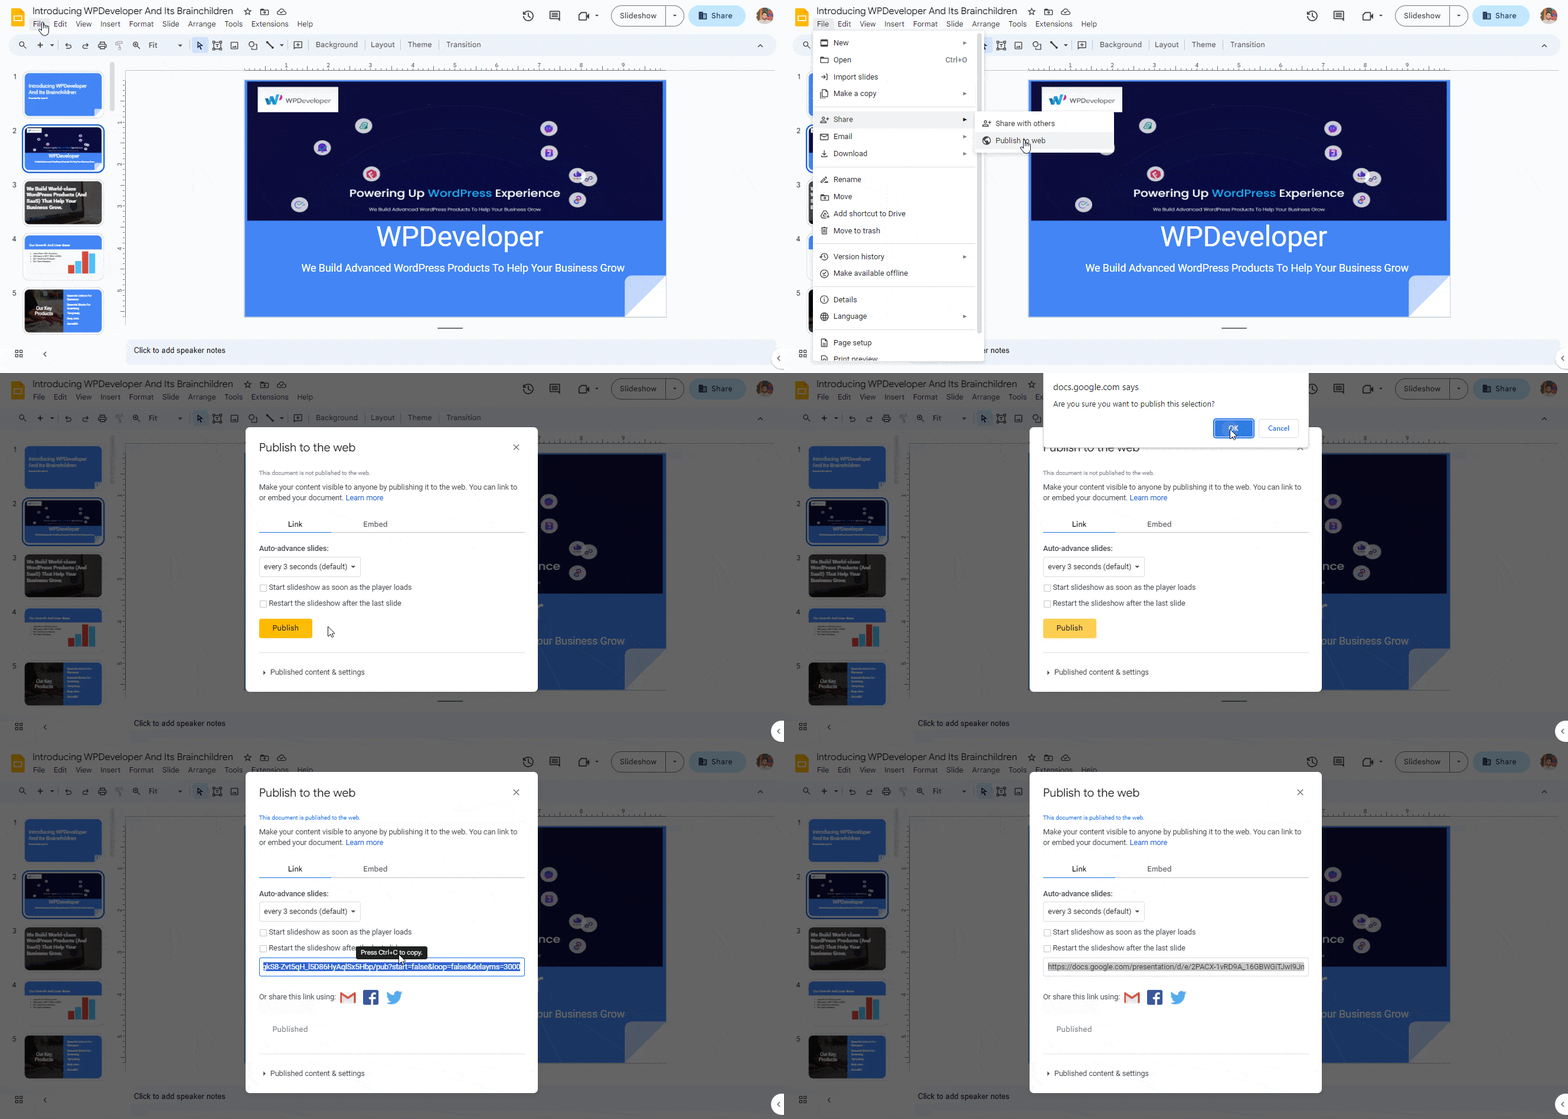
To generate the URL of your Google Slides presentation for web publication, you have to go through the following steps:
- Open your Google Slides presentation
- Click on the “File” menu and “Share”.
- Select “Publish to the web.”
- Click “Link”, and then “Publish”.
- Click on the “OK” button in the popup that appears.
- Copy the URL that appears.
Step 4: Paste The Google Slides URL
Now, return to your WordPress post/page, and paste the Google Slides URL into the EmbedPress block. It should look something like this:
https://docs.google.com/presentation/d/e/XXXXXXXX/pub?start=true&loop=true&delayms=3000 Click the “Embed” button or hit Enter. The EmbedPress block will process the URL and display a preview of your Google Slides presentation.
Step 5: Adjust Settings & Appearance As Per Your Preference
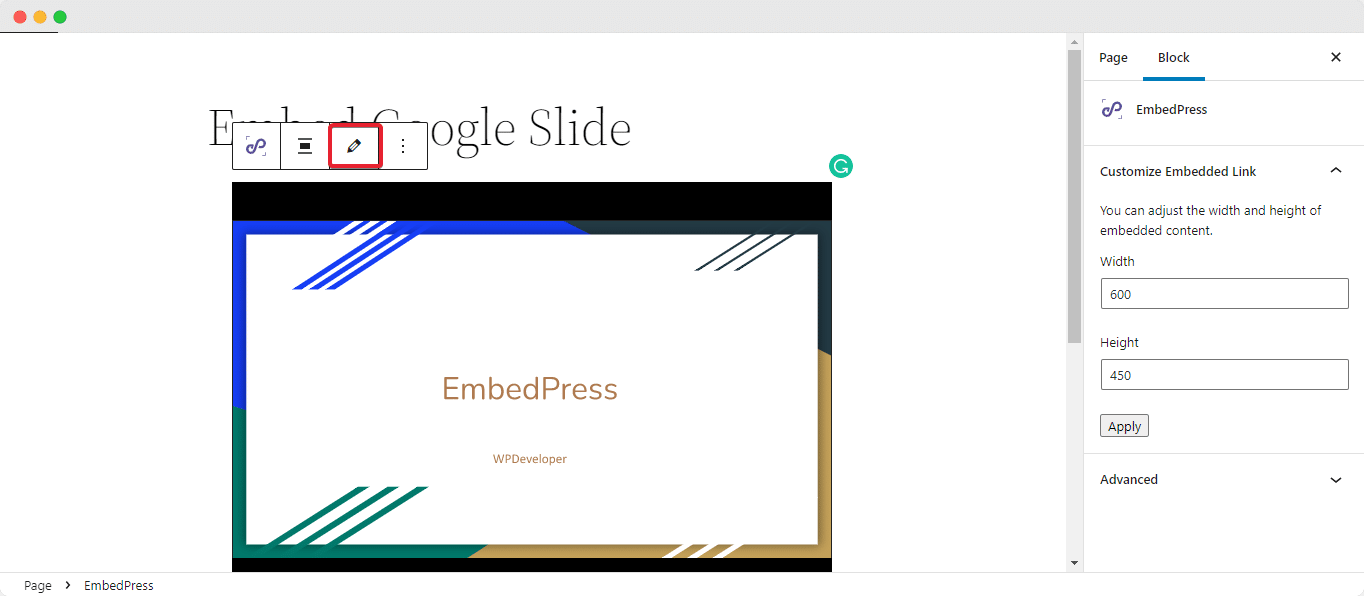
You can customize the appearance and behavior of your embedded Google Slides presentation using the EmbedPress block settings. These settings will let you enable content protection, enable social share, add additional CSS classes, and set the height and width of the slide.
Step 6: Publish Or Update And Preview Your Post/Page
Once you are satisfied with how your Google Slides presentation looks, click the “Publish” or “Update” button to save your post/page.
To make sure everything is working as expected, click the “Preview” button to view your post/page with the embedded Google Slides presentation.
That is it! You have just embedded a Google Slides presentation in WordPress using the EmbedPress plugin and Gutenberg. Now, your audience can enjoy your informative and engaging presentations directly on your website.
How To Embed Google Slides In WordPress With Elementor Using EmbedPress Plugin
In case you use Elementor for your website, here is a step-by-step guide on how to embed Google Slides in WordPress with Elementor using the EmbedPress plugin.
Note: Just like earlier, you must install and activate the EmbedPress plugin in your website to embed your Google Slides presentations onto your WordPress website.
Step 1: Create Or Edit A Page With Elementor And Add New Section
Now, create a new page or edit an existing one using the Elementor page builder plugin.
In Elementor, start by adding a new section where you want to embed your Google Slides presentation. You can add a new widget inside the section by clicking the (+) button.
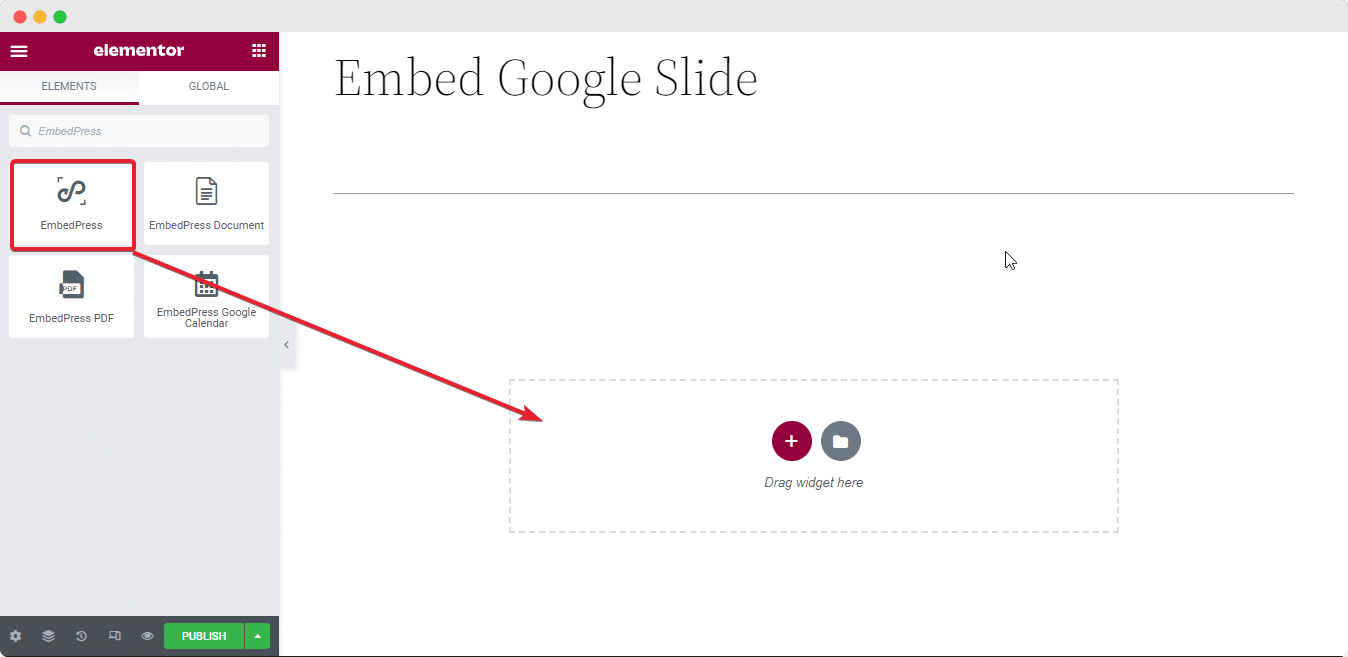
Step 2: Search For The EmbedPress Widget
In the Elementor widget search bar, type “EmbedPress” and select it from the list. Once you have added the EmbedPress widget, you will see a field to paste your Google Slides URL.
Step 3: Get Your Google Slides URL & Paste The Google Slides URL
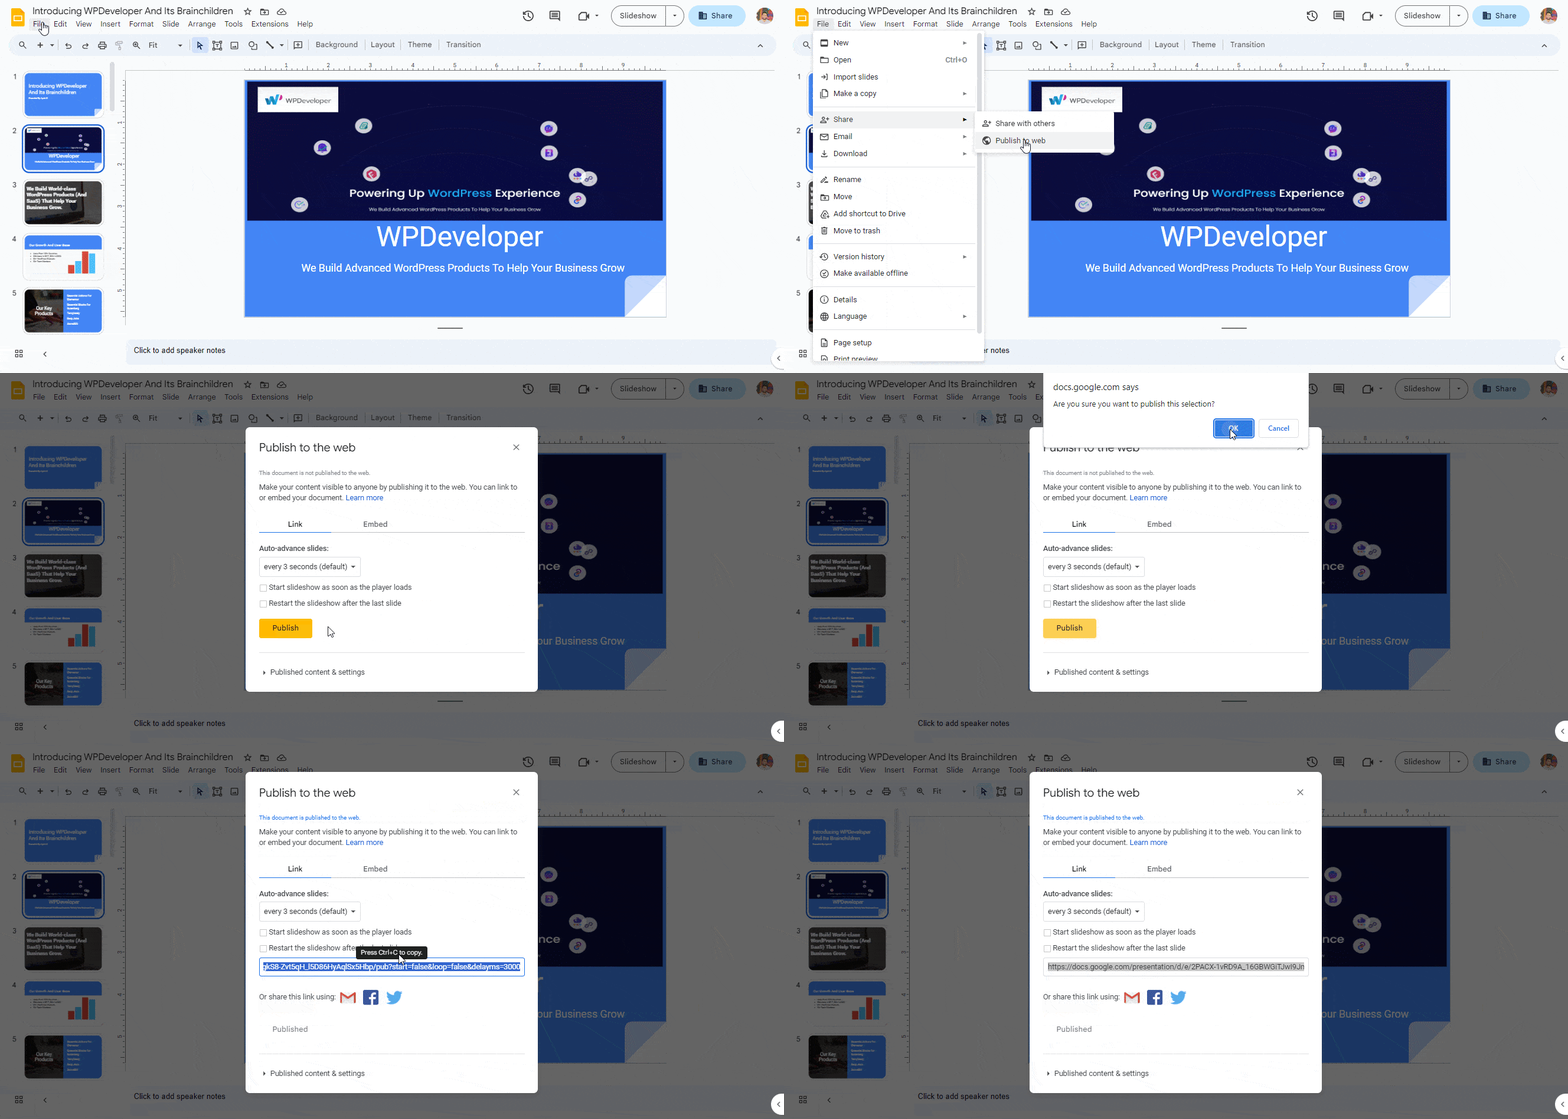
Again, to embed, you have to generate or retrieve the Google Slides URL that you want to publish to the web. Do the following:
- Open your Google Slides presentation in Google Drive.
- Click on the “File” menu and “Share”.
- Select “Publish to the web.”
- Click “Link”, and then “Publish”.
- Click on the “OK” button in the popup that appears.
- Copy the URL that appears.
Afterwards, return to your Elementor page, paste the Google Slides URL into the EmbedPress widget’s “Embedded Link” field and press Enter. It should look something like this:
https://docs.google.com/presentation/d/e/XXXXXXXX/pub?start=true&loop=true&delayms=3000 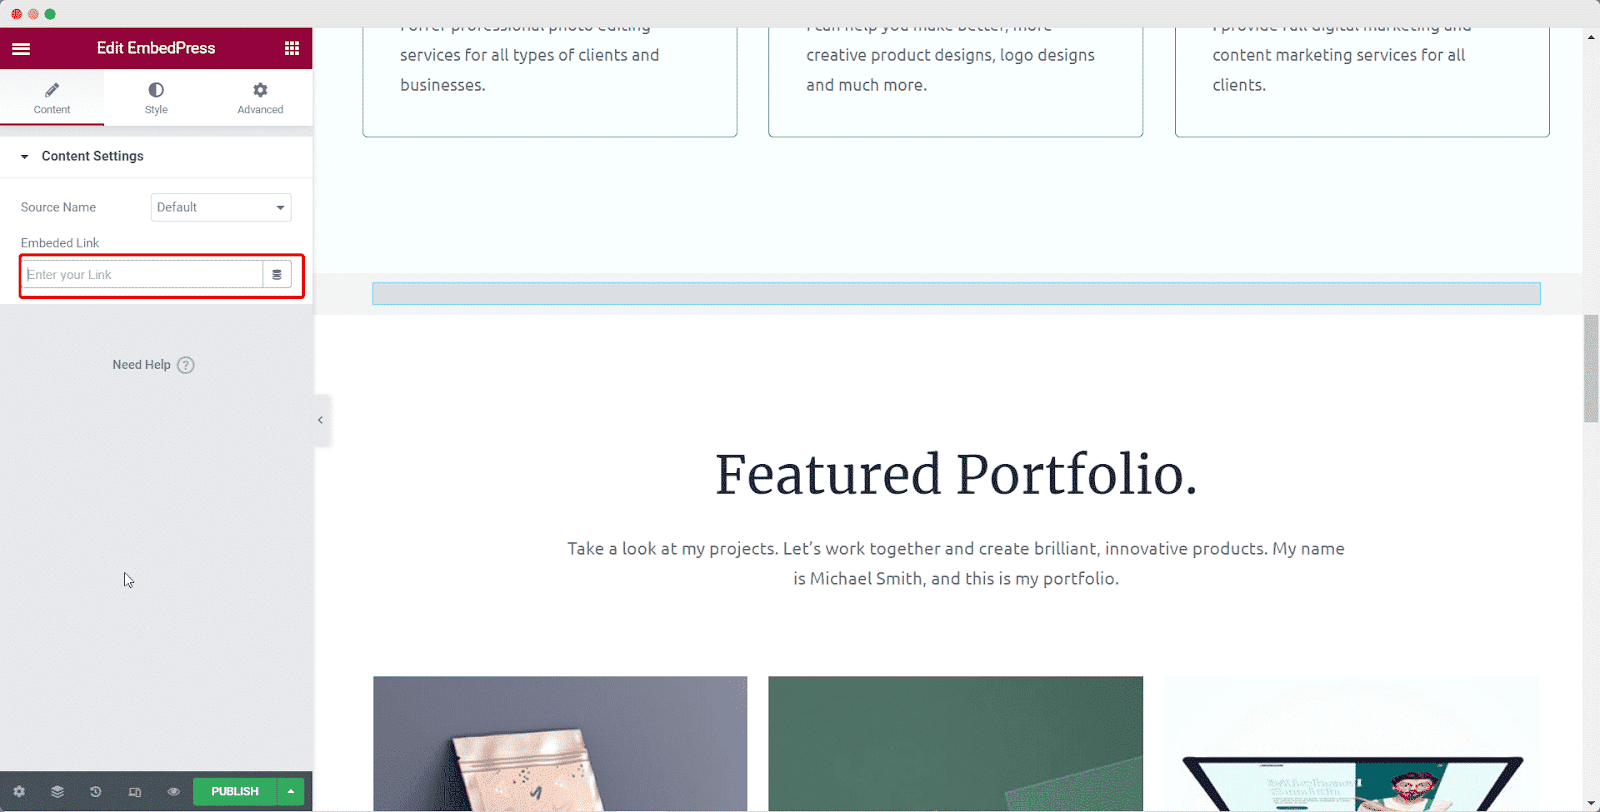
The EmbedPress widget will process the URL and display a preview of your Google Slides presentation.
Step 4: Customize The Widget
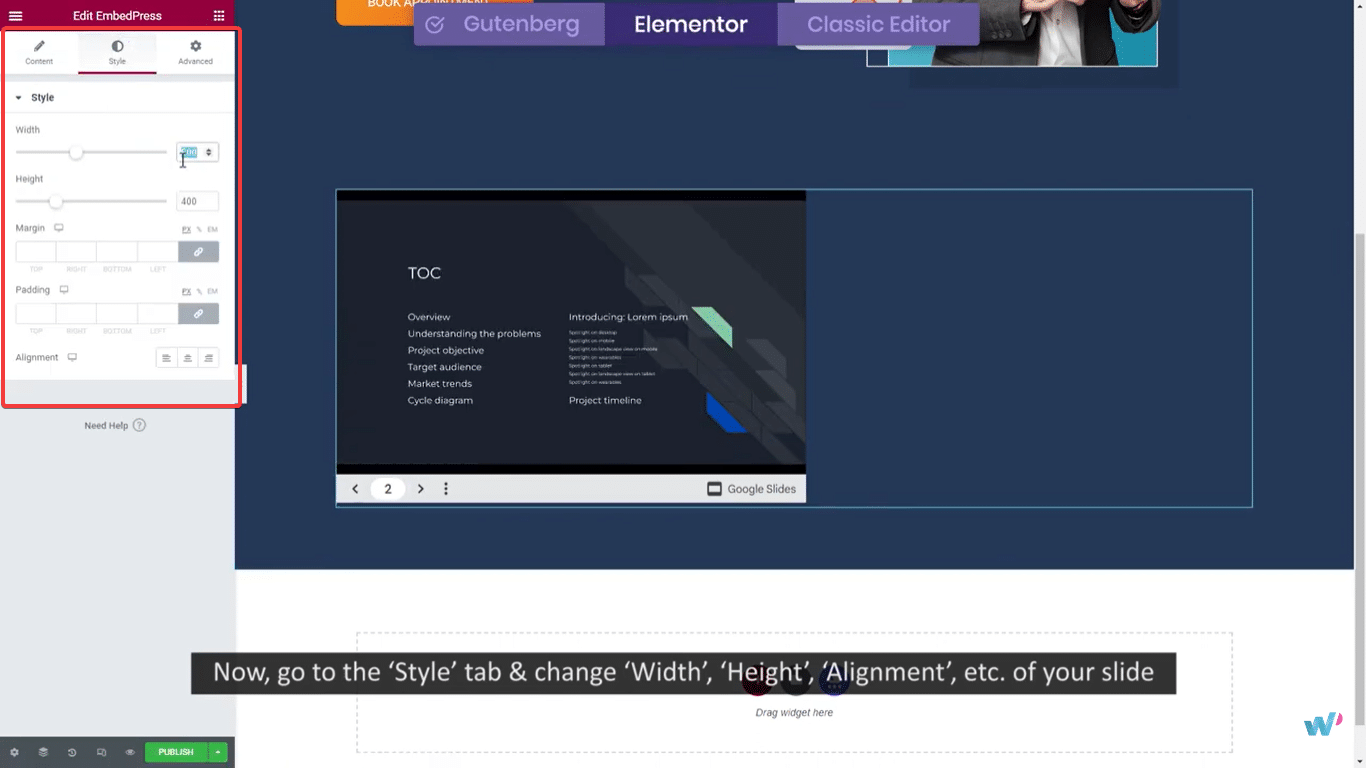
You can customize the appearance and behavior of your embedded Google Slides presentation using the EmbedPress widget settings. From the Content tab, you can enable content protection and social sharing.
From the Style tab, you can set the width, height, margin, padding, and alignment of the slide.
And from the Advanced tab, you can make changes to the layout and explore other options.
Step 5: Update, Publish, And Preview
Once you are satisfied with how your Google Slides presentation looks, click the “Update” or “Publish” button to save your page.
To ensure everything is working as expected, click the “Preview Changes” button to view your page with the embedded Google Slides presentation.
That is it! You have successfully embedded a Google Slides presentation in WordPress using the EmbedPress plugin and Elementor. You can now show your informative and interactive presentations directly on your Elementor-designed page or post.
Start Embedding Google Slides In Your WordPress Website
Embedding Google Slides in WordPress has never been easier, thanks to powerful and user-friendly tools like EmbedPress, Gutenberg, and Elementor. Whether you are a blogger, educator, or business owner, leveraging the visual appeal and interactive features of Google Slides can take your website content to the next level.
With EmbedPress, you can effortlessly integrate your presentations, making your website more engaging and informative. Gutenberg and Elementor further simplify the process, providing you with the flexibility to customize your embedded slides to match your website’s style seamlessly.
By following the step-by-step guide outlined in this blog, you can enhance your WordPress website with dynamic, multimedia-rich content, keeping your visitors engaged and informed. So, don’t miss out on the opportunity to attract your audience with visually stunning presentations. Embed Google Slides in WordPress today with EmbedPress.
Let us know if you have tried any of the methods to embed Google Slides into your WordPress website by commenting below. And don’t forget to subscribe to our blogs to discover how to embed 150+ powerful content sources in your web pages using EmbedPress today.


